

- Joined
- Jul 24, 2008
- Messages
- 1,415
- Points
- 36
it looks good!
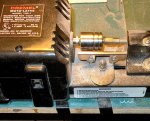
what did you make the heat sink out of?
and 105ma?
that thing should last forever with unlimited duty cycle!!!
what did you make the heat sink out of?
and 105ma?
that thing should last forever with unlimited duty cycle!!!


") It actually has taken me longer to make this post than to build one of these, (not counting harvesting the diode). Only 3-solder connections!
It actually has taken me longer to make this post than to build one of these, (not counting harvesting the diode). Only 3-solder connections!

