Welcome to Laser Pointer Forums - discuss green laser pointers, blue laser pointers, and all types of lasers

Buy Site Supporter Role (remove some ads) | LPF Donations

Links below open in new window

FrozenGate by Avery

Repair of Laserglow Lyra 5mw

Andis

0
Joined
Mar 14, 2013
Messages
3
Points
0
Hello,

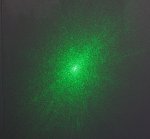
Unfortunately I have spoiled my Laserglow Lyra 5mw by dropping it into sand and trying to clean it. The beam is totally disfocusd, diffused. Having read several threads it seems that there is no way how to fix it. However, maybe somebody has tried to dismantle this device? It seems to be a monolith tube without a possibility to unscrew the front cover. Maybe there are any tricks how to open it? I hope that maybe lens can be replaced or simply removed. It cannot get worse anyway.

Thanks in advance.


Ouch :( sorry to hear that buddy

I would not try to repair this yourself. I would contact laserglow and see if they can fix it. Although, it may not be cheap to fix, it's better than you breaking the laser beyond repair.

Oh I wouldn't suggest using it at all if possible until you contact laserglow and I would make that a priority over trying to fix it yourself. :cryyy:
Best luck to you my friend
 
Last edited:
I found in this forum a similar case, where a person had conatcted Laserglow, who told that they do not do repairs and do not even provide a replacement lens.
In the name of science and curiosity I am ready even to use a saw, if that is the only way. :)
I have recently obtained another device from Dragonlasers Viper series. The finish is not that high quality as Laserglow, but 55mw power performs more than I expected.

Well I would ask them still my friend. I have quite a few of those viper series lasers from none of them have ever failed me. I have one that is 6 year old that I got from CNI originally. Still works like the day i got it! :beer:
 
What process did you use to clean it?

Could you post up pictures of the "dot"?

My thought is that perhaps you just didn't clean it properly, and the lens is just still dirty.
 
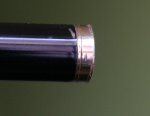
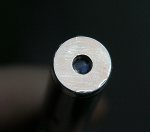
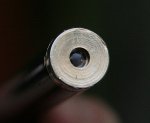
Post some pictures of the beam/dot, the lens, and the laser housing.
We may be able to help. :)
 
Please find pictures attached. The scratches on housing are traces of my attempts to dismantle the device.
 

Attachments

  • IMG_8789_2.jpg
    IMG_8789_2.jpg
    417.7 KB · Views: 182
  • IMG_8792_2.jpg
    IMG_8792_2.jpg
    339.4 KB · Views: 184
  • IMG_8793_2.jpg
    IMG_8793_2.jpg
    284.9 KB · Views: 176
  • IMG_8794_2.jpg
    IMG_8794_2.jpg
    349.1 KB · Views: 194
It looks like the lens is just dirty.
Based on the pictures, there appears to be a swirl pattern of residue on the lens. Rubbing the lens with a twisting motion usually does not get the junk off of it.

First, using pressurized air or a squeezy air blower, blow out any particles of sand or dust.
Using a clean cotton swab and isopropyl alcohol (90% or more), slightly wet the tip of the swab and wipe it in one direction across the lens.
Repeat this process several times until all visible residue is removed from the lens.

Tips:
  • Do not use your breath to blow out dust and dirt.
  • Do not use paper towels, tissues, or anything made from paper. The wood pulp can be slightly abrasive and scratch the lens, especially acrylic lenses.
  • Use just enough alcohol so that it evaporates quickly from the surface of the lens.
  • If too much liquid is used, it can leak into the module and condensate on the optics.
  • If the aperture is very small, it may help to remove some cotton from the swab with clean tweezers (fingers leave oil behind).
  • If cotton fibers get stuck in the aperture, tweezers work well to get them out.

If you are sure that the front surface of the lens is clean and the beam pattern is not any better, there may be some junk on the other side of the lens.
It's too bad you scratched up the laser. It may not be necessary to disassemble it.

Oh yeah... If you want to keep your laser's lens nice and clean when it goes in your pocket or if it falls into sand, you can make a "dust cap"
out of spare stuff you might have lying around.
I use these:
http://dx.com/p/glow-in-the-dark-silicone-tailcaps-for-flashlights-14mm-green-10-pack-5714
Just cut off the "nub" inside and the lip around the edge. They make great dust caps and the GITD feature makes it easy to find the laser in the dark. Plus, when you are using the laser, the dust cap will fit over the other end of your laser to stay safe until you need it again. :)
 
Last edited:
Unfortunately, if you've scratched the lens with sand the laser is pretty well ruined. The front part of the laser (containing the laser module and driver) is friction-fit to the body so it's really difficult to remove the actual laser module without destroying the body. The lens itself is glued to the laser module so that is also difficult to replace without causing more damage. If you want to perform an autopsy in the interest of curiosity then go for it, but it's unlikely that you will be able to fix the laser. We don't bother fixing the pointers because with the amount of labor required it's usually better to just buy a new one.


Back
Top