Welcome to Laser Pointer Forums - discuss green laser pointers, blue laser pointers, and all types of lasers

LPF Donation via Stripe | LPF Donation - Other Methods

Links below open in new window

ArcticMyst Security by Avery

OPT Lasers Cylindric lenses - NUBM44 beam correction tests

Joined
Jul 10, 2015
Messages
9,799
Points
113
So as not to produce wings before tightly focused and we need the concave lens to print on the convex at no more than about 80% coverage throughout it's focusable range, or working range, in short we don't want to over expand and clip the expanding beam.

-----edit-----

You will be thrilled with a working BE, it really makes a heck of a difference, I was keeping an eye on a stray kitty I feed and left my camera zoomed in, but you can see the hole in the plastic tote box lid is not very big, well under 1/2 an inch.

This is at a god honest 50 feet no messing around.


----edit----

Here's some pics of the hole, I burned it when I was setting up the target backing and it looked rectangular, like a double square, but we know the hot spot is in the center so.... we can't go by the hole to determine clipping. ;) A wood print shows a better spot image.

56380d1497894684-opt-lasers-cylindric-lenses-nubm44-beam-correction-tests-sany1030.jpg

56381d1497894684-opt-lasers-cylindric-lenses-nubm44-beam-correction-tests-sany1036.jpg

56382d1497894684-opt-lasers-cylindric-lenses-nubm44-beam-correction-tests-sany1040.jpg

56383d1497894684-opt-lasers-cylindric-lenses-nubm44-beam-correction-tests-sany1041.jpg
 

Attachments

  • SANY1030.JPG
    SANY1030.JPG
    202.9 KB · Views: 252
  • SANY1036.JPG
    SANY1036.JPG
    193.4 KB · Views: 242
  • SANY1040.JPG
    SANY1040.JPG
    197.1 KB · Views: 276
  • SANY1041.JPG
    SANY1041.JPG
    185.3 KB · Views: 238
Last edited:


Joined
Jul 10, 2015
Messages
9,799
Points
113
No bud, I am saying I want to build or have built some 75mm wide 10x BE's for use with all our MM diodes, they could work on the GBall diodes with GBall lenses intact just like the 3X does as well as the corrected beams, I didn't know you had one in your front end, but anyway I am looking for the right lens combination to suit our variety of diodes like the 3X does only bigger and stronger.

Also I never said you were clipping, your spot does not look clipped.

----edit----

Actually I was thinking back to a pic Alaskan showed me from a laser fitted with his own expander that had made a round spot on a plastic trash can, my revelation is that rectangle spots can make round holes as the center of a bar shaped spot is the hot spot that burns/melts first, so his round spot just like mine in plastic do not necessarily indicate a round/clipped spot.
 
Last edited:
Joined
Dec 30, 2016
Messages
1,410
Points
0
Guess what I just tried, My OPT Laser 6X/3X Cylindrical Three Lens Fast Axis Correction setup with my custom BE and at 50 feet (measured with a tape measure) I just got a personal best focusing the beam expander to the smallest spot of 10mm x 4mm !!! Holy C$#@ !

This is the lens arrangement I'm using....


It melted this hole at 50 feet pretty dang fast !


But it is on the verge of clipping the fast axis and I think it is clipping just a very small part of the outer most corners but I can enlarge the inside of that lens housing....
 
Last edited:
Joined
Jul 10, 2015
Messages
9,799
Points
113
Very nice, but you do understand what I was saying about plastics/polymers?

My hole is 1/8 of an inch but the spot was a rectangle, the center is the hottest.

So our actual spots can be a little bigger, but if we print on wood and give it 10 seconds to really burn in, then we can see the full print.

56380d1497894684-opt-lasers-cylindric-lenses-nubm44-beam-correction-tests-sany1030.jpg

56274d1496660762-opt-lasers-cylindric-lenses-nubm44-beam-correction-tests-sany0958.jpg

56275d1496660762-opt-lasers-cylindric-lenses-nubm44-beam-correction-tests-sany0959.jpg
 
Last edited:
Joined
Dec 30, 2016
Messages
1,410
Points
0
Very nice, but you do understand what I was saying about plastics/polymers?

My hole is 1/8 of an inch but the spot was a rectangle, the center is the hottest.

So our actual spots can be a little bigger, but if we print on wood and give it 10 seconds to really burn in, then we can see the full print.
Yes I understand, If you look closely at the hole mine made it is wider that it is tall and is not round at all, Mine seems to be equally hottest along a very short and very, very thin line and doesn't seem to have a hot center per say.....
 
Last edited:
Joined
Jul 10, 2015
Messages
9,799
Points
113
Our holes look just like my burns inside the rectangle seen through safety glasses, yours just burned a second longer than mine.

Now I could be wrong, but print it on wood and let it cook for 15 seconds then measure that and keep it as your high water mark.

Seriously, just look at my 1/8 inch hole, I walked up and looked at that, the bar was 3/8 by 3/16 plus some blur on the top edge, but the hot center burned that hole.

56391d1497908877-opt-lasers-cylindric-lenses-nubm44-beam-correction-tests-look.jpg
 

Attachments

  • look.JPG
    look.JPG
    75.4 KB · Views: 251
Last edited:
Joined
Dec 30, 2016
Messages
1,410
Points
0
With these pictures you can see the old 50 foot spots that were made at a longer time and are much bigger, The new spots were made with quite a shorter time and are much smaller, Not only than but you can see they were much hotter because of the whitish/grey ash across most of the new spots.....


You can even see a bit of a "tail" on the right one because it was burning as I was moving the board.....
 
Last edited:
Joined
Jul 10, 2015
Messages
9,799
Points
113
You should be able to reach flash point and ignite a paper bag, you were real close before.
Try crumpling it up to increase dwell time on the inner folds, it will flash to flame when it gets hot enough, 450 degrees F.


https://en.wikipedia.org/wiki/Autoignition_temperature

--edit--

Yes it's a lead pipe synch at 25 feet, that's why it's a good benchmark, plus...... I like make fire...ugg...ugg

But seriously everyone take cautions and be safe, don't damage property or put people at risk, I'm a professional....well not really, but don't try it at home unless you have old fashion common sense, and that's getting to be less common these days.
 
Last edited:
Joined
Dec 30, 2016
Messages
1,410
Points
0
Well I had to remove the 3X concave lens from the mix because I was getting a weird highly exaggerated butterfly wing waste effect when I focused the BE for most burning power, So now I'm just using the Opt 6X concave and the Opt convex cyl lenses before my custom BE, Plus by removing the other Opt 3X convex lens from the mix there is no chance the beam can get clipped anywhere so that's a plus !

This for the moment setup seem to be a combination of the smallest spot and at the same time the cleanest spot at 50 feet, Another plus is by removing one of the lenses I am also removing the power loss that is associated with running the beam through that lens, but I have to run more tests.....

I really wish I had a laser power meter to test real world power at 50 feet because that's the only way to be sure of the most power down range in the tightest spot.......

------------------------------------------------------------------------------

Update......

I got the spot even smaller today with the most power in the smallest spot at 50 feet, The visible light spot is only slightly larger the burn spot !!!


This is what the beam looks like at about 6 - 10 feet with only the beam expanders double concave lens diverging the beam.......


And this is after the beam expanders doublet convex is added unfocused.....


From there the square beam gets focused down to a insanely small square at 15 feet or less, Or at 50 feet it's more like a very short "line" shape that's very close to 13.40mm x 4.6mm and starts burning anything put in front of it immediately......

So far this is the most power I've gotten down range (50 feet) in the smallest, tightest beam spot !

Right now I'm trying the bring the 13.40mm axis in some more by re focusing the Cylindrical Lens Pair......
 
Last edited:
Joined
Dec 30, 2016
Messages
1,410
Points
0
This home made beam expander I made works so well that this is how insanely tight it can focus the corrected beam at 3 to 4 feet away, While sitting in my chair it only took a few seconds to draw this line at near writing speed and a flame was shooting out the entire time !!!

 
Last edited:
Joined
Aug 3, 2017
Messages
69
Points
0
I've been working on a design to house the lenses. I think I have a working design. Keep in mind that the 2nd lens can be repositioned. Trying to get quotes right now.
 

Attachments

  • Beam_Corrector_BluePrint2_c1_640x560.jpg
    Beam_Corrector_BluePrint2_c1_640x560.jpg
    215.4 KB · Views: 140
Last edited:
Joined
Aug 3, 2017
Messages
69
Points
0
Newport_Parts2.jpg

Ok if I get my parts from Newport:
Lens Tube, 1/2 inch diameter lenses, 1 inch length MODEL: LT05-10 $16.00
Retaining Ring, 1/2 inch LT Series Lens Tubes MODEL: LT05-RR (4) $5.00
Spanner Wrench, 1/2 inch LT Series Lens Tubes MODEL: LT05-WR $18.00
Focusing Lens Tube, 1/2 inch diameter lenses MODEL: LT05-F $32.00

OptLasers:
Cylindrical lenses 6X magnification (AR 400-700nm) $60.00

Total = $146.00 Plus shipping and handling

The M9 to M12 should screw right over the G2 Lens and hold it flush against the 12mm module.
So that would keep me from tightning the G2 Lens down to far onto the diode. Then the M9 to M12
Outer Male M12 threads should screw into the LT05-10.

Am I missing anything with this?

As for my previous design, I was preparing to have parts etc fabricated for both the beam corrector and a beam extender into one unit (for the S4X host). But for right now this is going to be the cheapest option. Apologies if I pestered the **** out of any of you for info. I don't ever give up! Too bad there isn't a way to change this post where people have to have been a member for x amount of time before they can read or see it that way they will have to do their homework on cylindrical lenses etc and might actually learn about wavelengths and safety. Would be a nice option for user control panel.
 
Last edited:
Joined
Jul 10, 2015
Messages
9,799
Points
113
The machining can be perfectly straight, but if your diode is pressed in just a tiny bit off center or if it is just one that's skewed a tiny bit you will need to be able to make hand adjustments to your cyl lens positioning.
 
Joined
Aug 3, 2017
Messages
69
Points
0
RedCowboy, I will only buy my diode or diode modules from a trustworthy source so I'm not as worried about that. Until I add on to it for beam expansion I need to find a normal lens to add to it preventing dust from getting down in the tube system. I think that's all I left out.
 
Joined
Aug 3, 2017
Messages
69
Points
0
I got what you mean RedCowboy. It would have been off by about 1mm.
Anyways I found parts from Thorlabs. It just took a lot of time searching for parts.

WIN_20170831_19_51_24_Pro.jpg

Just because the lens pair says 12x12x7mm doesn't mean it will fit in a tube that says for 12mm
optics. It takes a little math here.

Thorlabs_parts3.jpg


Use SL-CHS3 Extended and tapered copper heatsink from survival laser store. It will go inside the 1" tube.
The SM1AD9 has M9 threads and will allow the M9 G2 lens to screw into it using the wrench. The g2 with no focus ring should have a spring under it.
I may have a little overkill with the SM1M30 tube at 3" but it needs 42mm and
2" is 50.8mm so that's not a lot of room to play. The SM1CPL05 will secure it to the S4X host. Small mm difference but the SM1AD9 will center it. The s4x could be brought up a few micro milimeters with electric tape etc.
The SM1AD16 (x2) will hold my cylindrical x6 lens.
Then my SM1CP2M end cap that will be machine drilled.

adaptors to hold lens
10.16mm (thick) x 2 = 20.32mm

adaptor to m9 g2 lens = 10.16mm (thick)
--------------------------------------------
[30.48mm]

Lens tube 76.2mm (length)
-------------------------------------------
Room to play 25.4mm

Updated 9-17-07
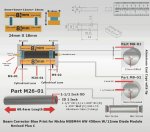
SM1A27 'thanks SL'...the s4x thread length is about 4 mm (M26 with 1mm pitch) and the adapter internal threads about 5, SM1AD9 no g2 lens focus ring....it will hold the heatsink down in the 1" tube ...followed by optics/munts...best guess now the 3"length tube is prob more accurate $146.00
I looked for an adapter with smooth internal bore and 1" or SM1 external threads but had no luck finding anything that would directly fit the heatsink to hold it down. You can buy the coupler if you want but probably won't need it.

Mounting the lens pair is a little bit more tricky. I'm going to have to start with the Clear Aperture of the retaining rings. (Note attached photo on fitting a square into a circle). For these from Opt Lasers it's going to need SM19RR Retaining Rings Ø0.64" (Ø16.3 mm). From what I see the thickness of the lens is going to be a problem at 7mm thick. The SM1AD19 allows for 6.1mm thickness max. I may be able to turn 2 of these back to back to mount my lens in 1" tube system from ThorLabs. If this works turning them back to back I will need at least a 1" tube that has a 2" length. (SM1M25)

As for beam expansion, from what I see this is my best and cheapest option after beam correction using the SM1 tube system from thorlabs:
SM1A25 (SM1A25 adapter has external M25.5 x 0.5 threading and internal SM1 (1.035"-40) threading)
laser beam expander offers 1-10X magnification for laser pointers That is a 1-10x beam expander and may be cheaper than building my own. *Will be keeping the expander locked up in a vault so that it never gets aimed up...86 miles to space @6 Watts X 10 my estimates that puts me about 60 miles straight up. Laserbee don't be spraying that at my lens! Ok grab your spray if your really just love me but can't bring yourself to admit it :na:
I got an idea laserbee stand still for a minute while I see if I can bounce my beam off the MLI on a satellite at you :rolleyes: let me know when it hits you.
:D I'm admitting I'm a little curious about the beam divergence. can you take measurements for me?

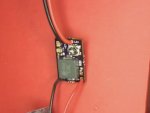
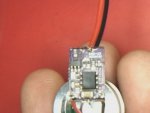
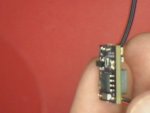
My rebuilt S4X is back in action and ready for optics:
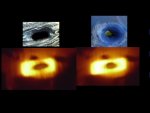
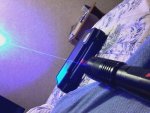
 

Attachments

  • 20170914_141003.jpg
    20170914_141003.jpg
    86.7 KB · Views: 36
  • 20170914_141030.jpg
    20170914_141030.jpg
    99.2 KB · Views: 32
  • 20170914_141047.jpg
    20170914_141047.jpg
    85 KB · Views: 27
  • 20170917_180749.jpg
    20170917_180749.jpg
    177.2 KB · Views: 33
  • 20170917_201953.jpg
    20170917_201953.jpg
    129.2 KB · Views: 24
  • 20170917_191938.jpg
    20170917_191938.jpg
    108.4 KB · Views: 28
  • 3.jpg
    3.jpg
    46.1 KB · Views: 44
  • 4.jpg
    4.jpg
    75.8 KB · Views: 47
Last edited:


Top