Welcome to Laser Pointer Forums - discuss green laser pointers, blue laser pointers, and all types of lasers

LPF Donation via Stripe | LPF Donation - Other Methods

Links below open in new window

ArcticMyst Security by Avery

Opt Lasers 6X Cylindrical Testing

Joined
Sep 20, 2013
Messages
17,254
Points
113
DTR's site shows only pulls for the 44s. I don't believe anyone has brand new diodes for sale. I'm pretty sure they all come out of new blocks before they're put into PJs.


Joined
Dec 30, 2016
Messages
1,410
Points
0
DTR's site shows only pulls for the 44s. I don't believe anyone has brand new diodes for sale. I'm pretty sure they all come out of new blocks before they're put into PJs.
Wouldn't that make them new ? Or am I misunderstanding something ?
 
Joined
Jul 10, 2015
Messages
9,799
Points
113
DTR only sells zero hour NEW pulls or new stock unless he tells you up front that something is from a used machine.
 
Joined
Sep 20, 2013
Messages
17,254
Points
113
Wouldn't that make them new ? Or am I misunderstanding something ?

By "brand new" I am distinguishing the diodes that have no solder or cut pins from the new pulls. I was getting brand new M140 diodes on eBay back when DTR was getting them as pulls. It cost me a couple $$ more, but I liked having never been soldered on diodes over pulls.
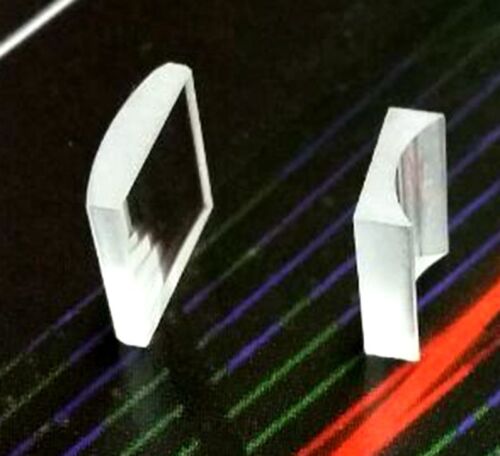
I put these together so you would know the difference.
 
Last edited:
Joined
Feb 25, 2008
Messages
2,128
Points
63
I've had a set of 6x sitting around for a couple years now that I've been wanting to use with a 7475. I assume you set the focus for infinity. If you did, would you be able to provide some measurements? For example, from the front of the G2 to the back on the first lens of the 6x set. The from the front of the first lens of the set to the back of the second lens.

I don't care about burning. I just want the best beam profile over a long distance.
 
Last edited:
Joined
Jul 10, 2015
Messages
9,799
Points
113
Center to center for the 6X c-lens pair will be right at 35mm but you want to fine tune by hand the final setting before gluing them down and set your concave 1st making sure your rotation and placement left/right is correct by using a target some distance away then when your concave is aligned you set the convex 35mm away and adjust it's rotation and placement.

You lock down your G2 to infinity and make sure your spot which will look like a bar/line is horizontal far field, that is it needs to be perfectly parallel to your optics bed, you do this by adjusting the rotation of your module in your heat sink, then set your concave cyl as close as you reasonably can to your G2 but don't worry if you need to set it a 1/2 an inch away rather than a 1/4 inch away as it's not critical.

I like to use a target at least 15 feet away and I center my beam from the G2 on my target and the spot will be a horizontal line at the target, then when I set my concave cyl I position it so it's again centering the spot/line which will now be much much wider, it will be at the same height so long as your optics bed is milled square and your lens is made right, you want to adjust the rotation and placement left/right so your line is centered at the same place on your target.

Then set your convex cly 35mm away ( center to center ) and adjust the rotation by observing the skew at your target and placement left/right so your line which will now be much shorter is again centered, make fine adjustments to the 35mm separation distance to get your best beam.


These lenses are not guled down and not in their final setting but they are very close to set and you can see how the beam prints on the lens, I always wait until I have everything just right and then add a drop of UV activated glue to each side of each lens with the laser running so I can see that nothing moves and correct if it did, I cure my glue only after I see everything is just right.

65141
 
Last edited:
Joined
Feb 25, 2008
Messages
2,128
Points
63
Center to center for the 6X c-lens pair will be right at 35mm but you want to fine tune by hand the final setting before gluing them down and set your concave 1st making sure your rotation and placement left/right is correct by using a target some distance away then when your concave is aligned you set the convex 35mm away and adjust it's rotation and placement.

You lock down your G2 to infinity and make sure your spot which will look like a bar/line is horizontal far field, that is it needs to be perfectly parallel to your optics bed, you do this by adjusting the rotation of your module in your heat sink, then set your concave cyl as close as you reasonably can to your G2 but don't worry if you need to set it a 1/2 an inch away rather than a 1/4 inch away as it's not critical.

That might be fun since I plan on pressing the diode directly into the HS.
 
Joined
Jul 10, 2015
Messages
9,799
Points
113
Oh yea that will be tough. I always try to set my modules rotation in the heat sink just right by marking the module after I set the infinity focus, but always need to adjust it anyway when I power it up, then I set the spot/bar/line in the mortar line of a brick wall and sight across the lens bed and even still sometimes need to adjust a little more after that.

You can try to do it by eye but it will likely need to be adjusted, would be better IMHO if you used a module.........or you could put your lens bed on a slip over sleeve so it could be rotated.
 
Joined
Feb 25, 2010
Messages
1,643
Points
113
HMmmm….Yes...to the perfect explanation from RC !
SO...You all know my....er….ah...lack of love...for a press fit. !!

OK...yes....we get a slightly better thermal transfer between LD and module...with a press fit....But...I greatly prefer a friction fit with a thin, application of Artic Silver. I feel the difference in thermal transfer is very, very small !!

Hmmm....so a friction fit...What is this you say ?...

I always...ever so slightly...open up/machine any 12 x 30 CU Module - LD socket I use. The removal of a very slight amount of CU from the socket ID will yield a friction fit. This friction fit will allow the LD to be "finger pressed" into the socket . A very, very slight amount of Artic Silver should be applied to the LD OD to achieve better thermal transfer !

I do this because I am very demanding in my requirements for the LD beam axis to be in a perpendicular condition to the 12 x 30 module barrel. When using a multi-diode set up, such perpendicularity...is NOT optional. I feel the action of pressing the LD into any heat sink may not provide
perpendicularity.....SO...I do not press fit.

Also...radial positioning of the LD.... when combined with the C-Lenses....demands ....as close to perfect as possible !! OK...Not going to the Moon here....but....Ya might as well do it right....and that means one needs the ability to really " Dial in" the radial position. To Press Fit into a stationary Heat Sink....well....just NO....IMNSHO....the action of the pressing the LD will most likely disturb the correct radial alignment....and...then what ???...Your Far Field beam geometry is not optimal !!

Well...I gotta go....I have been busy with seasonal home projects...and may now finally get back to my many concurrent " Projects/builds "

CDBEAM

Oh yea...Distance between Colli and first C-lens...typically about 20mm....and C-lens to C-lens separation....as RC noted...and experiment to achieve the minimal Far Field geometry. You may also want to trial the new G8 Coli lens ( AKA...Super 8.....hahaha ) !!!!! I bet this will deliver the optimal arrangement !!
 
Last edited:

reloader45

Active member
Joined
Mar 17, 2019
Messages
172
Points
28
Hello CDBeam,

did anyone told you, that your comments are very difficult to read for a non native English Speaker?


best regards

Edgar
 
Joined
Jul 10, 2015
Messages
9,799
Points
113
Something I forgot to mention is the thread slack/play between the G2 and it's module or if you have a press fit arrangement then your M9x0.5 threads for your G2

I usually use the head from a 12mm copper module to lock down my G2's infinity focus in a 20mm module but the thread slack can throw the beam off center so when I am adjusting my module's rotation in my heat sink so the spot/bar/line is parallel to my lens bed I also check that the beam is centered in my exit hole which is often a M11.4x0.5 threaded hole for a beam expander so I can see very well which way up/down and left/right that my beam needs to move.

I often attach the beam expander as a final check and look at the beam's print seen on the output lens ( best seen through amber safety glasses ) then I loosen my lock down and through trial and error I push the G2 in its socket to where I think it needs to go and TIGHTEN down my lock ( 12mm module head ) that way when it's correct I won't have to go back and try to tighten the lock without moving the setting, so adjust/pray and tighten it down then check and repeat until its well centered, this is not as fancy as an adjustable mount but it works well and saves a lot of re-sanding/milling.

65155
 
Last edited:
Joined
Sep 20, 2013
Messages
17,254
Points
113
I've had a set of 6x sitting around for a couple years now that I've been wanting to use with a 7475. I assume you set the focus for infinity. If you did, would you be able to provide some measurements? For example, from the front of the G2 to the back on the first lens of the 6x set. The from the front of the first lens of the set to the back of the second lens.

I don't care about burning. I just want the best beam profile over a long distance.
I haven't tried the 6X cyl lens pairs on an NDG7475, but it seems like overkill to me. I also have some 2X and 3X lens pairs that might work better for that diode. Just a thought.
 
Joined
Jul 10, 2015
Messages
9,799
Points
113
Yes and here's a 4X pair that would likely be more suited to the 7475 giving you a narrower beam, granted their center to center separation will be shorter but you can easily find the range by hand using a target at a few meters distance.


Top