

- Joined
- Jul 3, 2015
- Messages
- 500
- Points
- 43
I have experimented with a number of ways of dinner this and I am always wanting to improve on previous builds.
One thing I feel is important is to be able to easily troubleshoot problems which is difficult if the driver is soldered directly to the LED pins or if the build uses very short wire runs and is cramped. I like to use an inductive, clamp type meter that Redcowboy recommended but you have to be able to get the clamp around one wire.
I also want to easily be able to swap out parts...mainly the driver and the LED if one goes south on me.

The heatsink was made by Lifetime17 as was the copper driver shelf you see below it.
He made the copper driver shelf with a 20 mm diameter to fit behind the 20 mm DTR module containing the LED. I am using a copper driver shelf because copper is more efficient at transferring heat than aluminum. (I just learned that the difference is significant.)
I am using an ASC4500 driver mounted with a special blend. MG 2 component thermal adhesive with a smidgen of Fujik and Silicone thermal compound. The result is a good bond, but if necessary, I can remove the driver without damaging it. The heat sink on the top of the driver is not necessary...but I have a bunch of them lying around and, well, what the heck. It is set at 4.5 amps.
The driver has 24 G silicone leads with a Deen's micro polarized connector in the battery end and a non polarized one in the LED end.
(I used to use the polarized ones so my maglites have them already...but I am moving to the non polarized ones which are easier for me to configure for testing. I have special leads with these connectors for my dummy load and power supply for testing.)
The 20 mm module is the NUBM44 and the 12 mm is an 07 465.
The heatsink has 3 setscrews. 1 for the 20 mm module, 1 in the middle and one on the end to hold it to the maglite.
I have 2 maglite mods that Jarob did for me. He still does them but without the battery monitor. The monitor changes color when your lipo cells drop in Voltage. Here is the link for the Monitor.
Here is the finished laser.

We moved not long ago, and I have yet to unpack my laser power meter. When I do, I will post the result.
I am trying a G8 lens for the first time.
What if anything would I do differently if possible?
If Lifetime17 can do it, and much more labor would be involved, I would make the heatsink a larger diameter and instead of superficial grooves, he would make deep grooves creating thin heatsink find which would increase the surface area and increase the rate of heat loss.
I would also make the heatsink longer. Why? Because I would also like to make the copper driver shelf 20 mm aspect a bit longer. This would increase the contact surface area with the heatsink.
Of course, the other way of doing this would simply to let Lifetime 17 make the entire host, heatsink and all.
Getting everything into the heatsink after putting thermal paste on both the 20 mm module and the driver shelf was a little tricky.
I would move the setscrew further back so that the driver shelf would be right at the end of the 20 mm bore aspect of the heatsink.
This might make putting everything in a bit easier.
One has to account for the wire and the connectors. I did not want them to scrunch up too much.
Finally, I have an extension for my maglite so it will take 3 32650 cells. The Felongs I have been using have good capacity but lag a bit in voltage. They are simple lipo chemistry.
I am expecting some 32650 lithium Iron Phosphate (LFP) cells to arrive today. They can deliver 10 amps. Their nominal voltage is 3.6 V. We will see how they perform.
EDIT: The 32650 LFP batteries I ordered turned out to be 32700 and the 3 32650 Felong batteries would not fit in my maglite. It was a 2 D cell for which I purchased an extension....but 3 of the 32650s would not fit.
I wound up using 2 of the 32650s and 1 26650 until I can get more 26650s. I also swapped out an sxd for the ASC4500 but left the setting at 4.5 Amp.
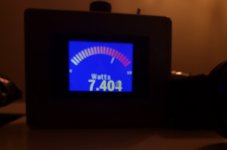
With either a G2 or the G8 which I had never used before, I am getting 7.4 W which I am satisfied with.

EDIT 2: I picked up some good IMR 26650 batteries from the wholesale place in PA.
How to fit them in a D cell-sized Maglite?
A trip to my local Giant Supermarket, just to the right of the fridge with the Kosher Kalbasa, there it was....
32650 to 26650 downsize tubes!

7.5 inches long, it fits perfectly! You never know what you find in your local supermarket.
What you say? Why would 32650 to 26650 downsize tubes be next to Kosher Kalbasa? How should I know?
Ok. I lied It was a bit more complicated than that.....but not much.
I went to our local hobby joint and picked up some thin polystyrene sheets. The guy recommended super glue. Forget it. Does not work. Two component epoxy.....not much better.
Turns out all that struggling was unnecessary. I just used a 26650 cell as a form and wrapped a single sheet around it and used duct tape to hold it. I used successive layers of duct tape and polystyrene sheets until I got the thickness I needed to fit into the Maglite.
The difference in diameter between 32650s and 26650s is only 6 mm in diameter.....a little more than a half centimeter. So, it does not take much material to get a fairly stiff and durable tube that fits into the Maglite.
One thing I feel is important is to be able to easily troubleshoot problems which is difficult if the driver is soldered directly to the LED pins or if the build uses very short wire runs and is cramped. I like to use an inductive, clamp type meter that Redcowboy recommended but you have to be able to get the clamp around one wire.
I also want to easily be able to swap out parts...mainly the driver and the LED if one goes south on me.
The heatsink was made by Lifetime17 as was the copper driver shelf you see below it.
He made the copper driver shelf with a 20 mm diameter to fit behind the 20 mm DTR module containing the LED. I am using a copper driver shelf because copper is more efficient at transferring heat than aluminum. (I just learned that the difference is significant.)
I am using an ASC4500 driver mounted with a special blend. MG 2 component thermal adhesive with a smidgen of Fujik and Silicone thermal compound. The result is a good bond, but if necessary, I can remove the driver without damaging it. The heat sink on the top of the driver is not necessary...but I have a bunch of them lying around and, well, what the heck. It is set at 4.5 amps.
The driver has 24 G silicone leads with a Deen's micro polarized connector in the battery end and a non polarized one in the LED end.
(I used to use the polarized ones so my maglites have them already...but I am moving to the non polarized ones which are easier for me to configure for testing. I have special leads with these connectors for my dummy load and power supply for testing.)
The 20 mm module is the NUBM44 and the 12 mm is an 07 465.
The heatsink has 3 setscrews. 1 for the 20 mm module, 1 in the middle and one on the end to hold it to the maglite.
I have 2 maglite mods that Jarob did for me. He still does them but without the battery monitor. The monitor changes color when your lipo cells drop in Voltage. Here is the link for the Monitor.
Here is the finished laser.
We moved not long ago, and I have yet to unpack my laser power meter. When I do, I will post the result.
I am trying a G8 lens for the first time.
What if anything would I do differently if possible?
If Lifetime17 can do it, and much more labor would be involved, I would make the heatsink a larger diameter and instead of superficial grooves, he would make deep grooves creating thin heatsink find which would increase the surface area and increase the rate of heat loss.
I would also make the heatsink longer. Why? Because I would also like to make the copper driver shelf 20 mm aspect a bit longer. This would increase the contact surface area with the heatsink.
Of course, the other way of doing this would simply to let Lifetime 17 make the entire host, heatsink and all.
Getting everything into the heatsink after putting thermal paste on both the 20 mm module and the driver shelf was a little tricky.
I would move the setscrew further back so that the driver shelf would be right at the end of the 20 mm bore aspect of the heatsink.
This might make putting everything in a bit easier.
One has to account for the wire and the connectors. I did not want them to scrunch up too much.
Finally, I have an extension for my maglite so it will take 3 32650 cells. The Felongs I have been using have good capacity but lag a bit in voltage. They are simple lipo chemistry.
I am expecting some 32650 lithium Iron Phosphate (LFP) cells to arrive today. They can deliver 10 amps. Their nominal voltage is 3.6 V. We will see how they perform.
EDIT: The 32650 LFP batteries I ordered turned out to be 32700 and the 3 32650 Felong batteries would not fit in my maglite. It was a 2 D cell for which I purchased an extension....but 3 of the 32650s would not fit.
I wound up using 2 of the 32650s and 1 26650 until I can get more 26650s. I also swapped out an sxd for the ASC4500 but left the setting at 4.5 Amp.
With either a G2 or the G8 which I had never used before, I am getting 7.4 W which I am satisfied with.
EDIT 2: I picked up some good IMR 26650 batteries from the wholesale place in PA.
How to fit them in a D cell-sized Maglite?
A trip to my local Giant Supermarket, just to the right of the fridge with the Kosher Kalbasa, there it was....
32650 to 26650 downsize tubes!
7.5 inches long, it fits perfectly! You never know what you find in your local supermarket.
What you say? Why would 32650 to 26650 downsize tubes be next to Kosher Kalbasa? How should I know?
Ok. I lied It was a bit more complicated than that.....but not much.
I went to our local hobby joint and picked up some thin polystyrene sheets. The guy recommended super glue. Forget it. Does not work. Two component epoxy.....not much better.
Turns out all that struggling was unnecessary. I just used a 26650 cell as a form and wrapped a single sheet around it and used duct tape to hold it. I used successive layers of duct tape and polystyrene sheets until I got the thickness I needed to fit into the Maglite.
The difference in diameter between 32650s and 26650s is only 6 mm in diameter.....a little more than a half centimeter. So, it does not take much material to get a fairly stiff and durable tube that fits into the Maglite.
Attachments
Last edited:


")