

- Joined
- Sep 22, 2010
- Messages
- 1,360
- Points
- 48
About a month ago I posted this thread "http://laserpointerforums.com/f50/does-lase-yes-yes-does-56874.html" about the first laser I built from scratch on a breadboard. I decided instead of stuffing it in a project box it deserved a better host than that so I ordered one of Jayrob's black pen hosts. Yeah I decided a pen would be a good idea for a first build.
Now before I go on I must take a moment to recognize the diodes that gave themselves for this project.
635 LD1 shined brightly for weeks on end and didn't complain when I forgot to unplug the power and left it running all night and found him happily lasing away 13 hours later. His life was cut short when some unnamed idiot mistook the clips from the battery pack leads for those from the multimeter. Death was thankfully instantaneous. :angel:
635 LD2 bravely stepped up to take his place only to be maimed for life after the back of the aixiz module moved during pressing and snapped off his legs. He only lased once but he shown brightly. He did get his final revenge while I was using FlamingPyro's diode extractor when it slipped and his case pin jammed most of the way into my finger. I can't say I blame him.
635 LD3 was next on the firing line and served valiantly until a short turned him into an LED. Another purple heart recipient.
Ok I admit that was cheesy as hell but I couldn't resist. Now on to the build pics.
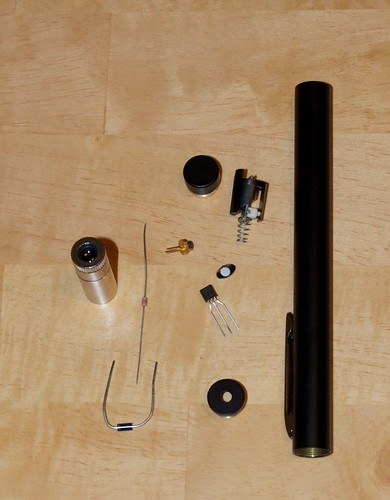
2010-10-30_06-28-15pm by ltkernelpanic, on Flickr
The parts list:
Jayrob black pen host with switchboard option
5mW 635nm diode and aixiz module from modwerx
"baby" LM317
30 ohm resistor
not pictured are the two 10440 LiIons that power it. The diode wasn't used after all.
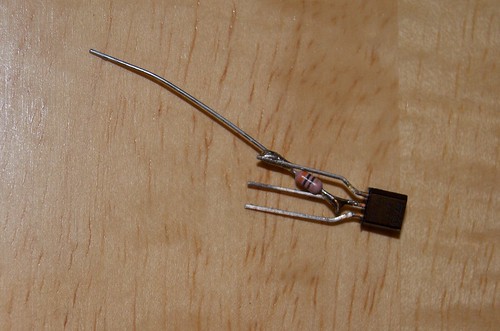
2010-11-08_09-01-36pm by ltkernelpanic, on Flickr
First I trimmed one leg of the resistor and soldered it to the top of the adjust leg then soldered the other leg to the bottom of the output leg. I clipped that bit that was jutting towards the input leg later.

2010-11-08_08-59-55pm by ltkernelpanic, on Flickr
It works. One of 635 LD3's final performances.

2010-11-08_09-06-54pm by ltkernelpanic, on Flickr
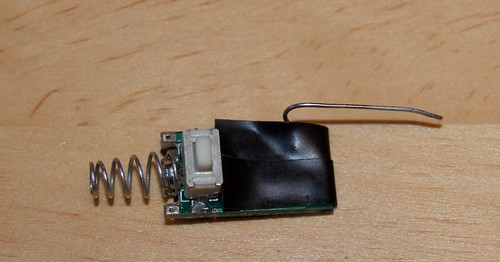
The switch board option I bought with the kit. Well worth the extra 3 bucks IMO. You can get power from the large pad right in front of the switch or the top two pads in the second row from the right.
2010-11-08_09-24-38pm by ltkernelpanic, on Flickr
Here I soldered what was left of the leg I trimmed off the 30 ohm resistor onto the board and bent it to fit though the opening in the switch holder. I had to redo the tape to only cover the area where the LM317 would sit so the board would silde in the holder.
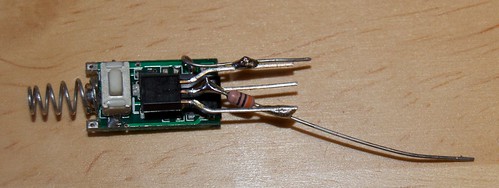
2010-11-08_09-37-04pm by ltkernelpanic, on Flickr
The driver soldered to the switchboard. I didn't notice the solder blob was that big until i took this pic. I tapped it with the top of my iron a couple times to make a nice smooth joint that I could slide a piece of heat shrink tubing on.
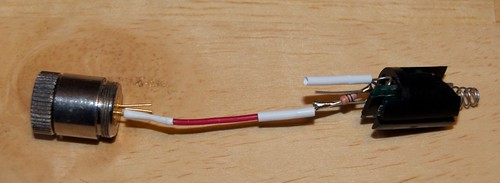
2010-11-08_10-10-29pm by ltkernelpanic, on Flickr
Everything all soldered up.
Unfortunately there was a fatal flaw in my work. The way I soldered and bent the lead going to the driver meant the switch had to sit farther back in the holder so when I put it in the host and tested it a few times the switch jammed from not being pushed down straight. I ended up ordering a new switchboard along with a second pen for a later build. I didn't take any pictures since I only chanced two minor things. When I soldered the lead to the board this time I attached it to the second pad in so when I bent it it was just inside the board allowing it side into the holder properly. I also soldered a longer wire between the driver and diode. Here's a free tip: Never toss the legs from resistors/diodes after trimming them to length. They're great for jumpers or things like this.
All that now said the final product.
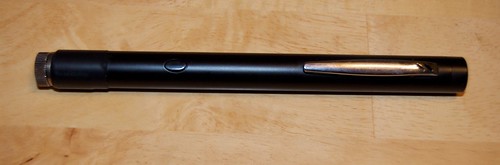
2010-11-13_12-13-06am by ltkernelpanic, on Flickr
Now the 64k question is after all that does it work?
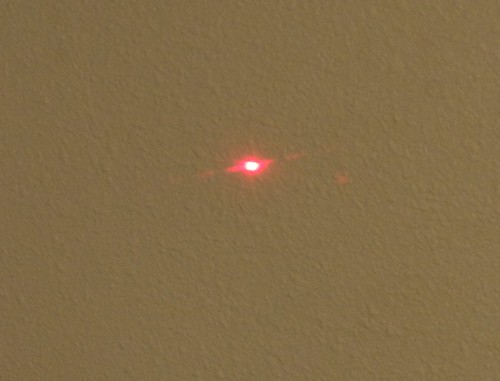
2010-11-13_12-13-50am by ltkernelpanic, on Flickr
Yep!
And a crappy beam shot. Time to go hunting on amazon for a cheap fog/smoke machine.
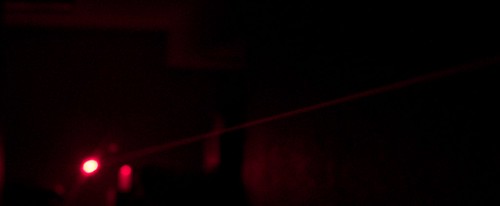
2010-11-13_12-01-33am by ltkernelpanic, on Flickr
The dot looks huge because I was handholding the laser during a 1 second exposure.
I realize I could have bought two prebuilt, smaller 5mW laser pointers for what the four diodes cost me alone but as my AP chem teacher back in highschool said sometimes you have to "Learn for learning sake." which is how I approached this project.
I should also note that the "baby" LM317 i ordered because I didn't think a standard LM317T would fit on my breadboard. I also didn't realize when I ordered them they were limited to outputting 100mA so I just tossed them in my parts bin when I found out that the "normal" sized one fit fine until this project came along where it worked perfectly.
Wow. That was a long post. I apologize for all the pics to those on slower connections but I always found that I learned best from seeing then doing so maybe someday these will help someone else.
Now before I go on I must take a moment to recognize the diodes that gave themselves for this project.
635 LD1 shined brightly for weeks on end and didn't complain when I forgot to unplug the power and left it running all night and found him happily lasing away 13 hours later. His life was cut short when some unnamed idiot mistook the clips from the battery pack leads for those from the multimeter. Death was thankfully instantaneous. :angel:
635 LD2 bravely stepped up to take his place only to be maimed for life after the back of the aixiz module moved during pressing and snapped off his legs. He only lased once but he shown brightly. He did get his final revenge while I was using FlamingPyro's diode extractor when it slipped and his case pin jammed most of the way into my finger. I can't say I blame him.
635 LD3 was next on the firing line and served valiantly until a short turned him into an LED. Another purple heart recipient.
Ok I admit that was cheesy as hell but I couldn't resist. Now on to the build pics.
2010-10-30_06-28-15pm by ltkernelpanic, on Flickr
The parts list:
Jayrob black pen host with switchboard option
5mW 635nm diode and aixiz module from modwerx
"baby" LM317
30 ohm resistor
not pictured are the two 10440 LiIons that power it. The diode wasn't used after all.
2010-11-08_09-01-36pm by ltkernelpanic, on Flickr
First I trimmed one leg of the resistor and soldered it to the top of the adjust leg then soldered the other leg to the bottom of the output leg. I clipped that bit that was jutting towards the input leg later.
2010-11-08_08-59-55pm by ltkernelpanic, on Flickr
It works. One of 635 LD3's final performances.
2010-11-08_09-06-54pm by ltkernelpanic, on Flickr
The switch board option I bought with the kit. Well worth the extra 3 bucks IMO. You can get power from the large pad right in front of the switch or the top two pads in the second row from the right.
2010-11-08_09-24-38pm by ltkernelpanic, on Flickr
Here I soldered what was left of the leg I trimmed off the 30 ohm resistor onto the board and bent it to fit though the opening in the switch holder. I had to redo the tape to only cover the area where the LM317 would sit so the board would silde in the holder.
2010-11-08_09-37-04pm by ltkernelpanic, on Flickr
The driver soldered to the switchboard. I didn't notice the solder blob was that big until i took this pic. I tapped it with the top of my iron a couple times to make a nice smooth joint that I could slide a piece of heat shrink tubing on.
2010-11-08_10-10-29pm by ltkernelpanic, on Flickr
Everything all soldered up.
Unfortunately there was a fatal flaw in my work. The way I soldered and bent the lead going to the driver meant the switch had to sit farther back in the holder so when I put it in the host and tested it a few times the switch jammed from not being pushed down straight. I ended up ordering a new switchboard along with a second pen for a later build. I didn't take any pictures since I only chanced two minor things. When I soldered the lead to the board this time I attached it to the second pad in so when I bent it it was just inside the board allowing it side into the holder properly. I also soldered a longer wire between the driver and diode. Here's a free tip: Never toss the legs from resistors/diodes after trimming them to length. They're great for jumpers or things like this.
All that now said the final product.
2010-11-13_12-13-06am by ltkernelpanic, on Flickr
Now the 64k question is after all that does it work?
2010-11-13_12-13-50am by ltkernelpanic, on Flickr
Yep!
And a crappy beam shot. Time to go hunting on amazon for a cheap fog/smoke machine.
2010-11-13_12-01-33am by ltkernelpanic, on Flickr
The dot looks huge because I was handholding the laser during a 1 second exposure.
I realize I could have bought two prebuilt, smaller 5mW laser pointers for what the four diodes cost me alone but as my AP chem teacher back in highschool said sometimes you have to "Learn for learning sake." which is how I approached this project.
I should also note that the "baby" LM317 i ordered because I didn't think a standard LM317T would fit on my breadboard. I also didn't realize when I ordered them they were limited to outputting 100mA so I just tossed them in my parts bin when I found out that the "normal" sized one fit fine until this project came along where it worked perfectly.
Wow. That was a long post. I apologize for all the pics to those on slower connections but I always found that I learned best from seeing then doing so maybe someday these will help someone else.
Last edited:


")