Welcome to Laser Pointer Forums - discuss green laser pointers, blue laser pointers, and all types of lasers

Buy Site Supporter Role (remove some ads) | LPF Donations

Links below open in new window

FrozenGate by Avery

LM317 test driver

Joined
Jan 12, 2008
Messages
3,290
Points
83
I made a nice Rog-inspired LD test driver, thought I better post some pics. :)


P3290152.jpg


Screw output terminals for wires, hooks, clamps etc. to the diode.
P3290149.jpg


Input terminals, max 35V.
P3290166.jpg


An on-off-on DPDT-switch turn the diode on, off, and discharge the capacitors. Another switch shorts the 1 ohm resistor at higher currents to spare some heat. Same with the pot, a safety jumper makes sure that the pot doesn't get disabled by mistake, and a LED confirms that the disabling-switch is live.
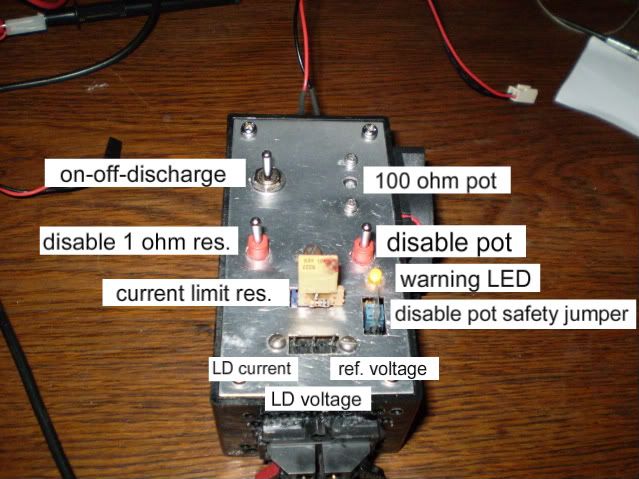
P3290146-1.jpg


Some chosen limit resistors and arrays.
P3290151.jpg


Fits in socket.
P3290150.jpg


Allot of wires! But that's what makes it work. ;)
P3290161.jpg


P3290163.jpg


driver board with some caps, diode and two voltage regulators, one adjustable for the laser (under heatsink), and one fixed for the fan.
P3290165.jpg


Testing a high power LED.
P3290157.jpg


Bright LED is bright...
P3290158.jpg


Driven at 1.1A...
P3290154.jpg

... and 3.67V
P3290155.jpg


Well, that is a lot more complex than mine.... :)I must have a look at those speaker wire conectors, they will last longer and are easier to use than my terminal block :-/

.....And you have just inspired me to put mine in a project box

Nice job, it is so worthwhile, I have used mine dozens of times over the last year or so[smiley=thumbup.gif]

Regards rog8811
 
Nice workmanship.. I like all the bells and whistles, but something tells me if you were to happen to accidentally hit some of those switches during operation.. *poof*
 
That's what the safety jumper is for. If I need the pot disabled it means that I'm using allot of current and the pot might otherwise fry, so I have to stick with fixed value resistors. If I'm using less current, say <500mA, I put move the jumper which is in series with the switch. In that way I can't accidentally kill the diode because the switch isn't live any more. Plus the LED is a reminder if the switch is live.

rog8811 said:
Well, that is a lot more complex than mine....  :)I must have a look at those speaker wire conectors, they will last longer and are easier to use than my terminal block :-/

.....And you have just inspired me to put mine in a project box

Nice job, it is so worthwhile, I have used mine dozens of times over the last year or so[smiley=thumbup.gif]

Regards rog8811
Thanks! I was lucky and got the terminals very cheap in a surplus grab-bag some time ago. Finally I got to use them!
 
Schematic with colour-codes and parts list.

lm3172.jpg


Squares:

Red = DPDT switch
Orange = electrolytic capacitor, 10uF, 50V
Yellow = LM317
Light green = current limit resistor
Green = voltmeter (reference voltage, 1.25V)
Light blue = 100 ohm potentiometer
Blue = on-off, or on-on toggle switch (disable potentiometer)
Violet = safety jumper (potentiometer)
Brown = safety jumper (LED). Both jumpers are mechanically connected.
Pink = electrolytic capacitor, 16uF, 35V
Gray = tantalum capacitor, 10uF, 35V


Dots:

Red = ceramic capacitor 100nF, 50V
Orange = 1N4007 silicon diode.
Yellow = 1 ohm resistor, ±1%
Light green = on-off, or on-on toggle switch (disable 1 ohm resistor)
Green = voltmeter (LD current)
Light blue = voltmeter (LD voltage drop)
Blue = laser diode
Violet = 7812 voltage regulator
Brown = 12V fan
Pink = 2.2 kohm resistor
Gray = LED


Back
Top