Welcome to Laser Pointer Forums - discuss green laser pointers, blue laser pointers, and all types of lasers

Buy Site Supporter Role (remove some ads) | LPF Donations

Links below open in new window

FrozenGate by Avery

Halo Style 2 stage COILGUN

Then you should another camera-circuit for charging cap bank 2...never used one, but guess they dont have that much power.
I would aim for 50 and 30J stages...


I will assist you...no further help needed I guess :-) could mail a simple plan for light gates. Parts cost about 5$ or so...only 6 or 7 parts.
 
I'll take a look tomorrow at what you've got in mind. Thanks for your help. I'm on my way to the uber design soon. :)
 
Oh so you wanna put some effort in the design? Can help you alot with this ^^
Post or mail a pic and I will help me create something cool.

I am working on a 10 stage rifle...the more stages, the harder it gets.
 
I would be interested in seeing the part list for the light gate trigger. I've been trying to work out how to pull that off.

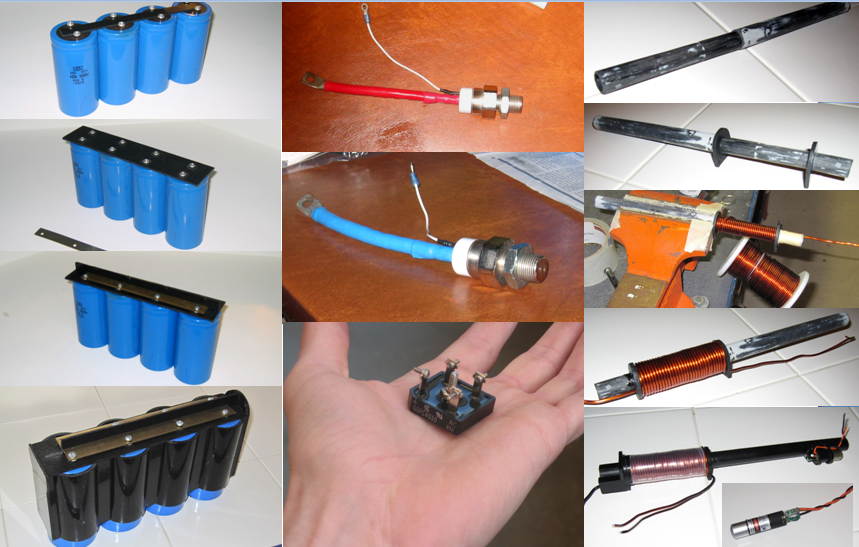
Still working out the specs on mine. The cap for the primary coil i have will be a little too much. it's 450V 1800uf. so 180 joules or so I think. Though I can tone that down a bit by not charging it to the full 450v For my second stage I've got two 350v 409uf caps from old polaroid cameras. The large cap is nice and new, but the older ones I'm going to have to slowly charge up to restore them. Still trying to decide on final charging goals and work out a charging system to slow charge. Going for a thicker projectile of around 8mm so the larger caps should work nicely I'm guessing.
 
180J for a 2 stage should work. But 8mm is a bit much. Use 6x18mm or so.
Maybe you should buy 3 newer caps from ebay. Wont cost much.

The pulse of the second coil has to be shorter, so I would charge 450V for stage 2 and 350V for the first.

Theory
Just below the middle of the page...

I use a slightly different plan...could upload it if you want.
 
Just finished the entry level disposable Kodak pistol. It is done very crudely just as a proof of concept. Now that I have a "feel" for the way everything works, I'll look for some larger caps. This unit fires a piece of a 1/4-20 bolt about 20 feet and only has 2 120uf 330V caps. The coil is about 5/8" long with 21 gauge magnet wire and only 4 windings deep. It is wound somewhat crudely.

The next design I expect to have about 450v 1000uf in the first stage. Then whatever you recommend for the second stage. The coils will be wound more neatly and tighter. If I got even 1/4 of the power you have I would be happy. :)

I don't know what these camera circuits can handle without degrading quickly after a few shots. If I use proper SCR's instead of the weakling camera circuits, I know that it would be much more powerful and reliable.
 
The projectile of my gun digs into styrofoam on a 5m distanz. Hard to get it out...already too powerful....for other people ;-)
The rifle has to split a brick!

Maybe you should try a ZVS driver and a selfwound transformer.

I cant tell you how to make the perfect coil for the second stage...you would have to measure the speed after stage 1. I would aim for 0.5ms pulse-duration.
 
Yes, I see what you mean about the ZVS driver, looking at the High Voltage forum. These coils don't look to be very deep, but the magnet wire looks thick................

Construction2.png
 
That´'s Jasons Coilgun. Nice Design...but its not very efficient. I am not a fan of single-stage coilguns. The length of his coil and projectile...well, I would use shorter coils/slugs.
Coil-length = Slug-length...the first coil can be 20% longer...
 
I'll be getting some more magnet wire tomorrow to wind a better first stage coil. I'm not sure whether I should stay with 21awg or look for some 18awg for better efficiency. Also the longer coil would seem to be better, but as you say shorter is better. :) How many layers is optimal in your opinion?
 
Ok, I think I'll stay with 21awg and it calculated to be 4 layers with the converter posted by you. I was surprised that the layers stay the same with changes in coil length. But of course inductance and resistance change. Thanks for the converter/formula. :)
 
You have to add the ESR of the caps and maybe the inner resistance of the wires...

Keep in mind: Make the coil only as long as your projectile...first coil maybe a bit longer.
 
I wound a new coil 3/4" long, that is wound neatly with 4 layers and glued with super glue. My projectile is 3/4" long and I added another cap to the other 2 for a total of 330uf. It's starting to hit harder and could break thin glass now. It goes about 25 feet but this is with a longer projectile and therefore more weight. This is getting to be a bit addicting. It's too much fun ! :D Once I find some 450v 1000uf caps locally I'll start building the mini-gun/bull pup pistol/rifle. ;-)

Ich danke Ihnen für mich begann mit der Schaffung dieses Projekt! :beer:

Edit: I just found a 300v 410uF Rubycon photoflash cap in my electronics stash box. :D
 
Last edited:


Back
Top