

- Joined
- Sep 16, 2007
- Messages
- 3,667
- Points
- 113
I've had a 589 nm CNI module for a few years. It's an amazing little laser and although it's output power is relatively low at ~30 mW, the color is one of my favorites.
A couple years ago I purchased a manual milling machine and have spent much of my free time learning how to use it. I have several laser projects in the works and just finished one: fabricating a new home for this special 589 nm laser module.
The concept I had in mind when designing this laser had to deal with a few key points:
1. Heat management - this laser is inefficient, so it needs plenty of heat-sinking mass.
2. Constant-on/off functionality
3. Modular design for changing power sources and optics
4. A cool "science tool" look, rather than the "lightsaber" aesthetic that is so common
So I made some plans, pulled out some aluminum and brass stock and got to work.
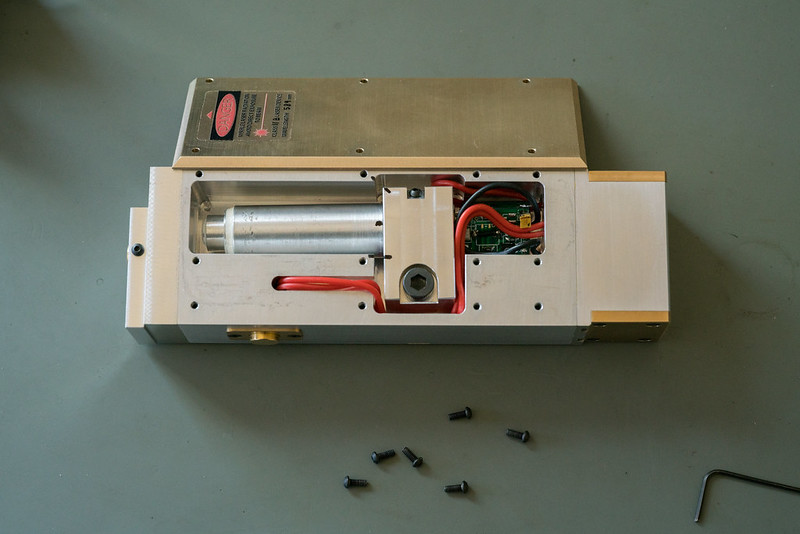
A quick break-down of the components of the host:
The main body is milled from a solid block of aluminum. The module is fixed inside the pocked via a simple aluminum heatsink that fits around the brass diode-containing portion of the laser module. The battery compartment fits a single CR123A battery and hides an electronic power switch that uses an FET to give the laser constant on functionality with a momentary switch placed in the side of the main body under a nicely polished brass button (I turned the button in the mill since I don't have a proper lathe).
The aperture has two components. The main aperture plate contains a wedge prism to correct most of the misalignment inherent in the laser module. It also has two precision-ground steel pins and a threaded hole between them for a small M3 screw. These features allow the placement of the secondary aperture plate, which accepts a brass optic mount that is fixed in place with a set screw. The secondary aperture is slotted so that it can slide into position so that the beam can pass through the "free" aperture which passes a normal beam or through the brass optic mount, which currently contains a 45 degree line optic (other optics like a fiber coupler, beam expander, etc. can be easily installed). The stainless M3 screw can be tightened to secure the secondary aperture into one position or another.

This design allows alignment of the laser beam to be achieved simply by manipulating effectively 3 axes:
a. Swiveling the heatsink to adjust horizontal alignment
b. Rotating the module inside the heatsink to adjust vertical alignment
c. Rotating the wedge prism to compensate for residual misalignment along any axis
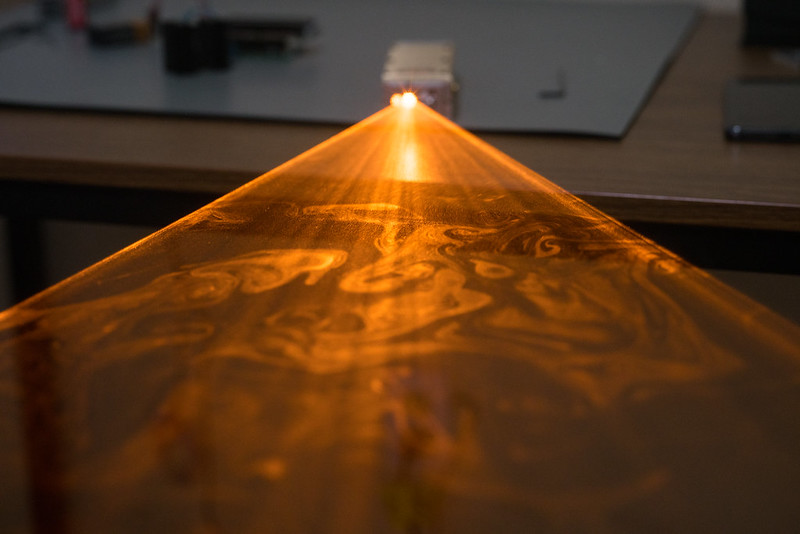
The result is a beam that comes out very "straight" from the host - an underrated quality.
Ok, here's some action shots.

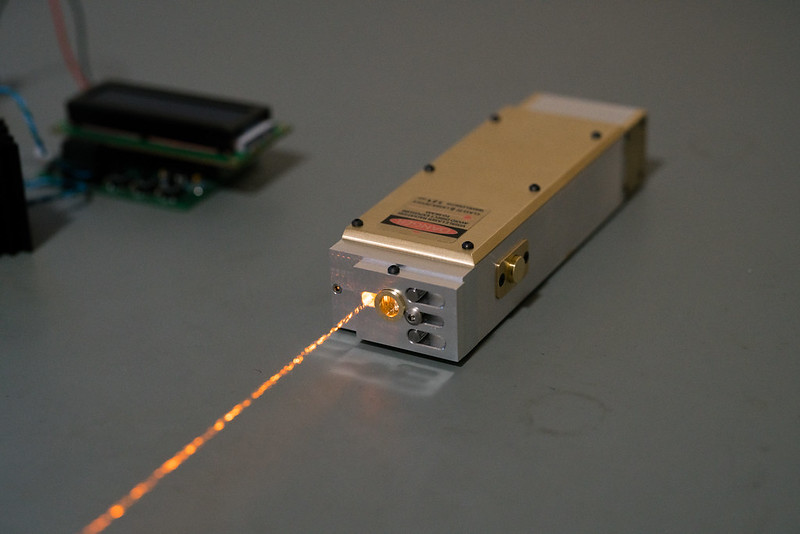
As you can see, this is a real CHUNKY laser. While it is technically portable and easily fits into my hand, it's not ideal for an office pointer. It's more of a portable benchtop laser. It's about 140 cm ( 5.5 inches) long and has a bit less weight than a CNI portable lab laser like the PGLs (e.g. Laserglow Aries, etc.).
I have some more really cool projects coming up, featuring more of my manual machining skills (still learning and improving with every project) so keep an eye out for more fancy lasers with uncommon optics assemblies...
Thanks for looking!
A couple years ago I purchased a manual milling machine and have spent much of my free time learning how to use it. I have several laser projects in the works and just finished one: fabricating a new home for this special 589 nm laser module.
The concept I had in mind when designing this laser had to deal with a few key points:
1. Heat management - this laser is inefficient, so it needs plenty of heat-sinking mass.
2. Constant-on/off functionality
3. Modular design for changing power sources and optics
4. A cool "science tool" look, rather than the "lightsaber" aesthetic that is so common
So I made some plans, pulled out some aluminum and brass stock and got to work.
A quick break-down of the components of the host:
The main body is milled from a solid block of aluminum. The module is fixed inside the pocked via a simple aluminum heatsink that fits around the brass diode-containing portion of the laser module. The battery compartment fits a single CR123A battery and hides an electronic power switch that uses an FET to give the laser constant on functionality with a momentary switch placed in the side of the main body under a nicely polished brass button (I turned the button in the mill since I don't have a proper lathe).
The aperture has two components. The main aperture plate contains a wedge prism to correct most of the misalignment inherent in the laser module. It also has two precision-ground steel pins and a threaded hole between them for a small M3 screw. These features allow the placement of the secondary aperture plate, which accepts a brass optic mount that is fixed in place with a set screw. The secondary aperture is slotted so that it can slide into position so that the beam can pass through the "free" aperture which passes a normal beam or through the brass optic mount, which currently contains a 45 degree line optic (other optics like a fiber coupler, beam expander, etc. can be easily installed). The stainless M3 screw can be tightened to secure the secondary aperture into one position or another.
This design allows alignment of the laser beam to be achieved simply by manipulating effectively 3 axes:
a. Swiveling the heatsink to adjust horizontal alignment
b. Rotating the module inside the heatsink to adjust vertical alignment
c. Rotating the wedge prism to compensate for residual misalignment along any axis
The result is a beam that comes out very "straight" from the host - an underrated quality.
Ok, here's some action shots.
As you can see, this is a real CHUNKY laser. While it is technically portable and easily fits into my hand, it's not ideal for an office pointer. It's more of a portable benchtop laser. It's about 140 cm ( 5.5 inches) long and has a bit less weight than a CNI portable lab laser like the PGLs (e.g. Laserglow Aries, etc.).
I have some more really cool projects coming up, featuring more of my manual machining skills (still learning and improving with every project) so keep an eye out for more fancy lasers with uncommon optics assemblies...
Thanks for looking!


")
")