
Welcome to Laser Pointer Forums - discuss green laser pointers, blue laser pointers, and all types of lasers
How to Register on LPF | LPF Donations

Navigation
Install the app
How to install the app on iOS
Follow along with the video below to see how to install our site as a web app on your home screen.
Note: This feature may not be available in some browsers.
More options
You are using an out of date browser. It may not display this or other websites correctly.
You should upgrade or use an alternative browser.
You should upgrade or use an alternative browser.
445nm Chrome leadlight pen host - 65mW *LOTS OF PICS*
- Thread starter leukoplast
- Start date


- Joined
- Jul 4, 2008
- Messages
- 2,036
- Points
- 48
Ok, here is what it looks like without a lens. Not sure what mode this is. Anybody who does, feel free to chime in!
To me, it looks like you're just above the single mode threshold-the primary mode is going strong, but the others are barely eking out any light. However, the beam shape is still definitely not round :crackup:
- Joined
- Jan 7, 2007
- Messages
- 368
- Points
- 18
Yeah getting the button just right is one of the trickiest parts of a pen build...
The button is lined up perfectly, it's the switch that is malfunctioning. Because it can turn off without even being 'unclicked'.
To me, it looks like you're just above the single mode threshold-the primary mode is going strong, but the others are barely eking out any light. However, the beam shape is still definitely not round :crackup:
I don't think any of the 445's (at least with the XJ-A140/130 diodes) will ever be round. It's just how the are designed.
jayrob
0
- Joined
- Sep 21, 2007
- Messages
- 9,862
- Points
- 113
Oh man that's a pain if it's the switch...
I learned long ago to double check all that stuff during the 'set driver' stage. Before the build ever gets completed...
Now that it's done, it's a pain to try and replace it. I can send you another switch board if you want... (if I sold you a switch board)
Otherwise, I can send you another momentary switch...
JLSE
1
- Joined
- Dec 13, 2007
- Messages
- 3,580
- Points
- 0
The button is lined up perfectly, it's the switch that is malfunctioning. Because it can turn off without even being 'unclicked'.
Before you take anything apart, have a look in the tube with the batteries
out. Press the button and see if the assembly is flexing down away from the
button.
You could try shimming under the area of the switch with a small folded
piece of paper...
Its worth a try just in case its something as simple as a little support required.
- Joined
- Jan 7, 2007
- Messages
- 368
- Points
- 18
Oh man that's a pain if it's the switch...
I learned long ago to double check all that stuff during the 'set driver' stage. Before the build ever gets completed...
Now that it's done, it's a pain to try and replace it. I can send you another switch board if you want... (if I sold you a switch board)
Otherwise, I can send you another momentary switch...
No worries Jay, it works good enough for general pointing purposes.
") It is just slightly annoying. I bet a bigger plastic button piece (that glues on after everything is slipped together) would solve the problem, since it would make putting more pressure on the switch easier.
It is just slightly annoying. I bet a bigger plastic button piece (that glues on after everything is slipped together) would solve the problem, since it would make putting more pressure on the switch easier. Although I just did a test with the other switch you sent me with my mutimeter (since I got two) and it does the same exact thing. I can get the current to stop flowing just by lightly lifting the pressure (without fully disengaging the click).
It seems like it is simply a faulty design of all the switches.
jayrob
0
- Joined
- Sep 21, 2007
- Messages
- 9,862
- Points
- 113
Hmmm... first complaint on those switches...
I'll have to start checking them before I ship...
I'll have to start checking them before I ship...
- Joined
- Jan 7, 2007
- Messages
- 368
- Points
- 18
Before you take anything apart, have a look in the tube with the batteries
out. Press the button and see if the assembly is flexing down away from the
button.
You could try shimming under the area of the switch with a small folded
piece of paper...
Its worth a try just in case its something as simple as a little support required.
Thanks for the tip. I checked from the battery opening part to see if anything was getting stuck or is the board wasn't supported right, and it seems fine (far as I know, lol). The clicky itself clicks really easily and seems Ok in that respect. It's just the contact point inside the clicky releases before the click itself gets disengaged.
Hmmm... first complaint on those switches...
I'll have to start checking them before I ship...
It's probably just me. I am kind of obsessive about stuff like this. Most likely for everybody else this is no problem. And it's really no huge deal for me either, it's just not 'perfect'
 .
. I am just used to how my CNI 532nm pen works, I really love the clicky on it. See the CNI the button protrudes out much further than the little buttons for these hosts do. So it's easier to press and hold down. These leadlight pens all have a very flat 'short' button. It is pretty much level with the outside pen shell. All I need to do is either find a button that is 'taller' or do some makeshift work to make it taller.
I was thinking about getting the second button I have and gluing it on top of this one to make it taller, only problem with this is that I wouldn't have a button for my other pen host. But I think I have seen this done before with these style pen buttons. Where the supplier glues one of them on top of the other to make the button protrude out further for easier pressing.
Know of any good button suppliers I could check out?
JLSE
1
- Joined
- Dec 13, 2007
- Messages
- 3,580
- Points
- 0
Thanks for the tip. I checked from the battery opening part to see if anything was getting stuck or is the board wasn't supported right, and it seems fine (far as I know, lol). The clicky itself clicks really easily and seems Ok in that respect. It's just the contact point inside the clicky releases before the click itself gets disengaged.
These leadlight pens all have a very flat 'short' button. It is pretty much level with the outside pen shell.
I know when I was using the leadlight cases from zbolt, from time to time they would click but the pressure making it to the switch would loosen off. The switches were fine, but some required just a little extra pressure or the light would flicker or cut off during use.
Its always good to try the simplest things first... saves much time.
The fact that the buttons are near flush to the body is a good thing, if the
button was too easy to activate you run the increased chance of accidental power up's.
- Joined
- Jan 7, 2007
- Messages
- 368
- Points
- 18
Well, I just used up my first set of batteries. I was using it tonight and the power started dropping big time. I thought I had killed my laser from possible overheating, but I quickly realized it was just the batteries. So once the voltage hits about 6.35v it gets below the drivers capabilities to provide proper current. So at this current, the diode needs at least 4.1 volts.
So roughly 5-6 days with a set of batts for me. And slightly above average use every single day. Not too bad really.
So roughly 5-6 days with a set of batts for me. And slightly above average use every single day. Not too bad really.
- Joined
- Jan 7, 2007
- Messages
- 368
- Points
- 18
I really like how you have the focusing ring on the outside.
I'm am looking into building this kit. Where you able to fit the entire aixiz housing inside of the pen? or were you just using the upper part?
Thanks
Udanis
With the focus ring on the outside, it is a absolutely perfect fit! :yh:
The plastic insert that comes with the pen (that holds the button and board with the spring contact) is snug against the back of the module with no extra space. No matter if you use the chrome host (which is slightly longer) or the black one, this is a perfect measurement. The clicky button thing lines up almost perfect in each host.
Basically all you need to do is solder one of the wires from the module to the side of the spring board thingy. Make the module case positive or negative. Then shove it in the pen and make sure it's a tight fit (a little bit of tape on the outside of the module will ensure this). You don't even need to glue the plastic insert. Since it is pressing against the module, the batteries have nowhere to push it.
The only downside to this fit is the 10440 batteries. They are a few millimeters short of touching the top of the pen. What I did was simply got a small neodymium nickel plated magnet and put it on the end of the battery + side. This gave me the extra length to make full contact with the pen.

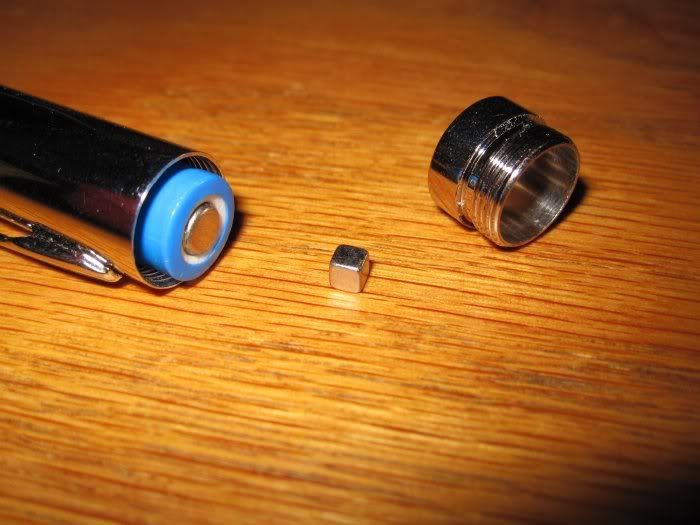
You can get the magnets at either one of these places. I have bought stuff from both, and they are good businesses.
K&J Magnetics - Products
Neodymium Magnets
Although you could make it more professional by putting a blob of solder on the inside of the tail-cap to make the reach longer. It's obviously up to you :beer:
Either way post some pics and details when you get it built!
DrSid
0
- Joined
- Jul 17, 2010
- Messages
- 1,506
- Points
- 48
Lovely ! From now on, laser without a magnet is not a laser.
The only downside to this fit is the 10440 batteries. They are a few millimeters short of touching the top of the pen. What I did was simply got a small neodymium nickel plated magnet and put it on the end of the battery + side. This gave me the extra length to make full contact with the pen.
Hmm interesting. I had the same problem. but getting magnets seems kinda like overkill. I just pressed in some AL foil in mine.
Soldering might be a bad idea though. I tried to solder a spring into the cap. I couldnt get it hot enough with a 120watt soldering gun for the solder to stick. Getting it hot enough might ruin the finish. Might need a toaster oven and solder paste.