Welcome to Laser Pointer Forums - discuss green laser pointers, blue laser pointers, and all types of lasers

Buy Site Supporter Role (remove some ads) | LPF Donations

Links below open in new window

FrozenGate by Avery

michelson morley interferometer project help

Davidlang

New member
Joined
Jan 8, 2019
Messages
20
Points
3
My goal is to build a michelson morley interferometer to demonstrate destructive interference where the detector is black. I have seen many videos where they show rings. I would like it to go all dark or close to it. A good demonstration is this youtube video.

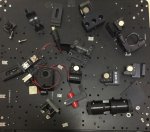
I have a laser table with these vibration absorbers
https://www.shopbdproduct.com/product_p/s64-aa-12.5.htm

I have this laser : coherent vmb2.3-15L 10.5 mw 635 nm. Will this laser work and does anyone know the power supply or a battery that can run it.

I have various mirrors, beamsplitters, and an beam expander. If anyone has any tips they would be appreciated. I am new to lasers.


Could not find coherence length spec for this laser which is necessary for interferometer. A micrometer sled on one mirror may help, but it will be difficult to dial in an integral number of wavelengths distance. Also, it will be super sensitive to vibration, air currents, and thermal expansion and contraction. To make it go dark and stay dark sounds like a tall order. Good luck to you.
 
Thanks. I figured I might need a new laser and a translation stage with a micrometer. Both are expensive so I figured I would come on here and get some advice before I spend too much on the wrong part. I will try to get my laser working and see how it performs.

For vibration the table has 4 vibration absorbers. I also put it on a rubber mat made for washing machine vibrations. If that doesn’t work I can put it in a tub of sand.

It doesn’t need to remain black for a long period of time. I would just like to see it go black long enough for someone to tell that it went black. In the video he made it look easy. I’m not sure what equipment he is using.
 
I have access to the original experiment if you want a oicture
 
I see that the beam is not spread out much in your video example. If it were spread out more, where your screen was closer to the lens, you would not get a complete destruction of the light source. That has been my experience with these interferometers. Even if you keep the beam tight, it will be very difficult to get total destructive interference as the lengths are changing by tiny fractions all the time.
 
Yes. Total interference would be difficult. I was simply trying to get something like he did. I would like to thank you again for the help . I got a rough set up but the laser is too bright to look at right now. I may need some rails and I will look into a hene laser for this project.
 
Yes. Total interference would be difficult. I was simply trying to get something like he did. I would like to thank you again for the help . I got a rough set up but the laser is too bright to look at right now. I may need some rails and I will look into a hene laser for this project.
There are diode lasers suitable for this project if you look. A HeNe that will work may be easier to find. The longer the coherence length of the laser, the more error you can have in the mirror distances from splitter. If all you want to do is demonstate destructive interference your set up does not have to be overly complicated. There are photos of my set up on this website under the thread Osram PL530 - Tiny 530nm OPSL. Note that I placed the dcv lens before the beam splitter instead of after. Both configurations will work, but I have found that before makes alignment easier.
 
Last edited:
Thanks for the advice. That pattern does look good for a diode. I’m going to try to find a hene for around $200. Then I will see if I need a micrometer after that. The guy in the video made It look easy. Hopefully I can make it work.
 
I am starting to dial it in. My alignment is still far from perfect. As you get closer the number of fringes gets lower until you only have one. Pushing on the table seems better for fine tuning then the micrometer. The vibration was still too much to keep it black. It may have actually gone black in between frames. 73F4D42A-C828-44E9-9548-8DA9CC418EBF.jpegFD2F458D-1A78-42EC-A37C-A3E674319755.jpegBDA415FB-01F5-48AD-A218-2304DDC5B6BB.jpeg6D1A1A60-7CB6-46BA-BF6E-8F818116753E.jpegC6783413-2A65-434C-8DD0-54F2DBD6B28F.jpeg
 
Last edited:
I used two different hene lasers and two different beam splitters in the pictures. It took about 1hr to line it up. In the brown pictures I got it to "black out" with a 13.8mw polarized 1144p jds uniphase hene laser and a 1" economy thorlabs 50/50 beam splitter. The window was small for the 1" beam splitter. You can see some reflection leaking through on the right side. The dark pictures are taken with the 1144p and a unknown beam splitter found on ebay. This is the seller description:


"Up for auction is a 2” Diameter Research Quality Beamsplitter for visible wavelengths made by Bond Optics Inc for LLNL. Excellent for high power work between 500-700nm with a damage threshold of 20J/cm^2. This Beam Splitter is in perfect condition and designed to work at 45 AOI incidence. It is 1/2” thick fused silica and in Excellent Condition. The surface flatness is 1/20 wave prior to coating. The sides are finely frosted. Also included is a matching PETG storage/travel accessory case. The one shipped to you is the one in the photo (I have more of these). Inscription says 70%R at 694.3nm. The last photo shows transmission/reflection at 633nm...looks about equal.

This is a very versatile BS to have in your lab if you are pumping visible photons so don’t hesitate to toss in a winning bid now… you can’t go wrong with this beautiful optic. This mirror would cost hundreds of dollars from CVI/Melles Griot/Idex."


The hyperbolic brown images are using a uniphase non polarized hene 1007-0726 with the thorlabs beam splitter. The beam expands well so no lenses are used. When I used the second beam splitter I was able to get bullseye shapes. I was unable to "black out" this laser. I am not sure if it was because it was randomly polarized, its beam expanded, or because it was a lot shorter. I was able to get much better images of fringes with this laser.

With proper equipment and sufficient experience in "fine tuning" I believe you should be able to "black out" a laser beam with destructive interference.
 
Last edited:


Back
Top