Welcome to Laser Pointer Forums - discuss green laser pointers, blue laser pointers, and all types of lasers

How to Register on LPF | LPF Donations

Arctic Spyder III Laser

I reprinted the Spyder, that one was too small and it was fucking disgusting for me!
Now they're printing the last piece and then it's finished, time to assemble it forever and then I'll post a photo.

I wonder why those few people who said "thanks, I'll print it" haven't posted a photo yet. Do they think they're making fun of me? If so, the only ones making fun of me are themselves, brother of my assholes. If you print it, fine, otherwise who cares!!!!!

I notice that both Ted and Avery don't give a damn about LPF, they haven't changed the name to @Jirkas99 yet


I actually had a meat lovers pizza last night, I don't treat myself to pizza that often, but man oh man was it good, they give you a little cup of garlic butter with each pizza to dip the crust in too, get a couple extra if you like it.:D
Sounds like you sure enjoyed:)
No anchovies, no pinnaple and no green peppers but everythong else is very doable as long as its not spicy.
 
Final Result

1000000582.jpg

1000000586.jpg

I had to melt the parts to make them fit together, but in the end I'm happy, I like it! If you like it, fine... otherwise... who cares?
 
Nothing can be done on this printed-only model, it's just a model to keep as a collection/souvenir... and keep in mind that I enlarged it to 4cm each part, the guy who created the model forgot to make the internal and external threads... which is why you either have to create them yourself with male and female dies, or you have to print 5cm piece by piece. Anyway, do you like it at least a little?
 
Nothing can be done on this printed-only model, it's just a model to keep as a collection/souvenir... and keep in mind that I enlarged it to 4cm each part, the guy who created the model forgot to make the internal and external threads... which is why you either have to create them yourself with male and female dies, or you have to print 5cm piece by piece. Anyway, do you like it at least a little?
If its a souvenir and is placed on a shelf why not just press fit the parts?
Even if the individual pieces are loose there is alway a way to build them up, like using clear scotch tape on the external pieces.
 
If its a souvenir and is placed on a shelf why not just press fit the parts?
Even if the individual pieces are loose there is alway a way to build them up, like using clear scotch tape on the external pieces.
I need to find a way to thread the loose parts, maybe printing it at 5cm diameter for each piece, with the threads it would be great, but I need to do some research, I'm not good with Fusion, I barely managed to convert the files from SDLPART to STL/3MF
 
I guess its time to look for some tap an die's.
I'm still baffled to how the knurling and upper nubs are made in a printer.
 
I googled and saw that you can 3D print with different metals.
How expensive is a 3D printer that you can use aluminum?
 
WOW..😮
I guess they aren't cheap..
Yep is true.. aren't for nothing cheap , their costs range from €19,000 [USD 22,162.55]
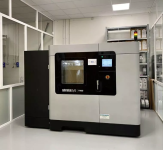
Up to models like the ones in the picture which can even reach €149,000 [USD 173,801.05]
But those that print in metal use a mix of powders, which, when passed through a scanner-like sensor, emerge with each pass, and one by one, they form the single, finished piece.
This is why the "polycasting" technique is used with a "Devilforge" bucket forge—have you ever seen one? With a lid that raises and lowers, where you connect a turbine to power the flame, attached to a tall white LPG cylinder, you mold the piece with plastic, then prepare the wooden and red clay tray specifically made for casting, place the printed piece in it, and close the tank tightly, poke holes to let the excess aluminum out, and then, as soon as it's melted in the crucible, you grab it with tongs and glasses and pour it into the tank. As soon as it comes out of the holes, it's ready. Just let it cool and then you take it out. This is an economical, DIY solution!
 
Last edited:


Back
Top