Welcome to Laser Pointer Forums - discuss green laser pointers, blue laser pointers, and all types of lasers

LPF Donation via Stripe | LPF Donation - Other Methods

Links below open in new window

ArcticMyst Security by Avery

Uniphase Argon Laser Help

Joined
Aug 21, 2017
Messages
14
Points
3
This may be a double post, but I dont care at the moment.
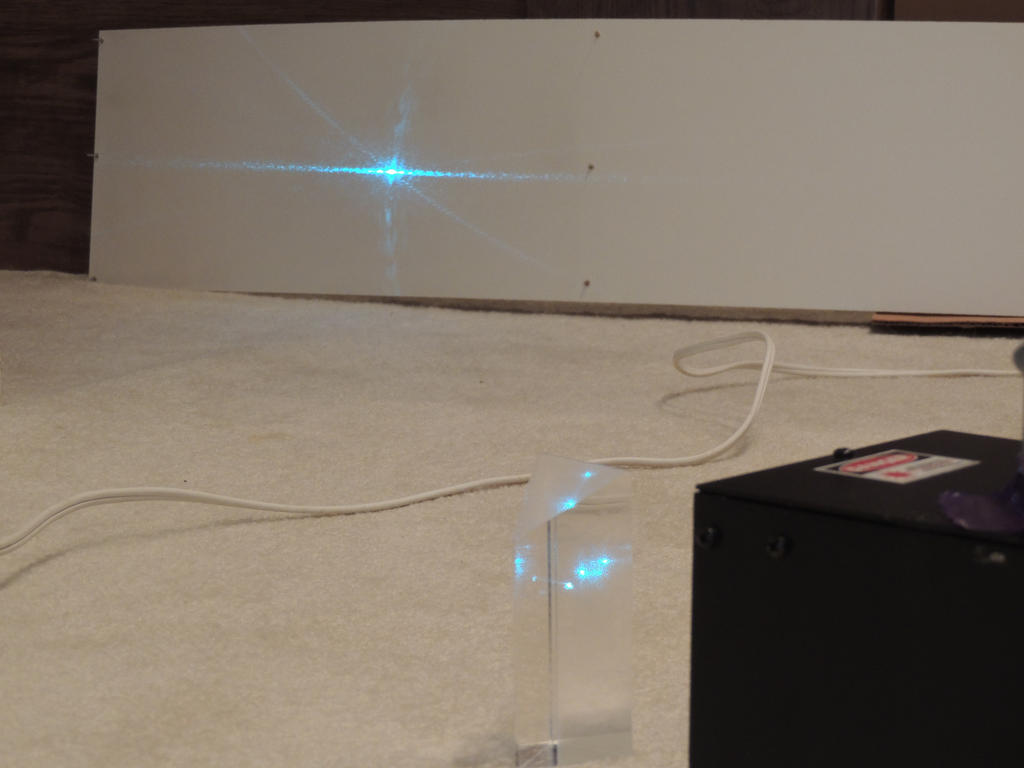
It works!
it_lives__by_timberwolf224-dbne9rg.jpg

untitled_by_timberwolf224-dbnf2s7.jpg


This is the fan that I am using to cool the laser, and how its connected to the laser head. It works well, moves a lot of air,
keeps the laser cool enough (I think), and the discharge air temperatures average about 94F.
untitled_by_timberwolf224-dbnf2tv.jpg
cooler_by_timberwolf224-dbne9qk.jpg


The jumpers on the PSU. (pliers on the floor are unrelated, don't worry.)
untitled_by_timberwolf224-dbnf2t1.jpg


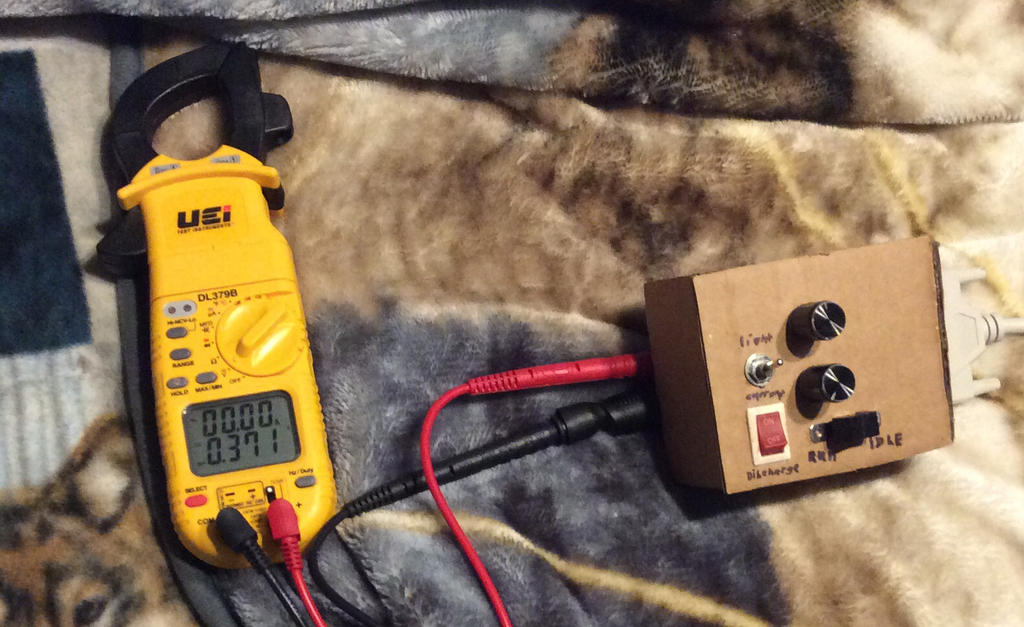
The PS arrived at about 10:40 this morning. I set to work rebuilding the 240V adapter box that I have previously used, and at about noon everything was set up. Shortly after, I turned it on, and got nothing. I read the documentation again, and realized I had forgotten to connect the discharge enable jumper. A short correction later, and I switched it on, and it worked. It actually started on the first attempt. The tube idle current is about 4 amps. Forgot to measure the output power connection, I may edit this later. I took a gamble with this laser (and its power supply), and I think its safe to say, it paid off. I was not going to give up on this laser easily, and I am very happy that I didnt.
Not bad for a first hobby level laser, eh? :)

(Edits: formatting.)
 
Last edited:


diachi

0
Joined
Feb 22, 2008
Messages
9,700
Points
113
Very nice! :D

You should get a regular radial fan to attach to the top of the head, much neater. Can't remember the dimensions, standard size though.

Take the built-in power readings with a grain of salt.
 
Joined
Aug 21, 2017
Messages
14
Points
3
Congrats man! WTG! :D Enjoy that beautiful beam!!!
Thanks! I will indeed enjoy it, there's nothing quite like an argon laser!
Very nice! :D

You should get a regular radial fan to attach to the top of the head, much neater. Can't remember the dimensions, standard size though.

Take the built-in power readings with a grain of salt.
Thanks. The remote blower may be less convienient, but its quieter while moving the same amount (or more) of air. I will look in to a fan that will mount on top of the laser later, this setup works fine for now. The fan is a 120mm mount, standard size. (4inch, iirc) I do take the readings with a grain of salt, I don't have a meter that can read DC amperes at that range, so I don't know how accurate they are. They seem to be about right though.
 

diachi

0
Joined
Feb 22, 2008
Messages
9,700
Points
113
Thanks! I will indeed enjoy it, there's nothing quite like an argon laser!

Thanks. The remote blower may be less convienient, but its quieter while moving the same amount (or more) of air. I will look in to a fan that will mount on top of the laser later, this setup works fine for now. The fan is a 120mm mount, standard size. (4inch, iirc) I do take the readings with a grain of salt, I don't have a meter that can read DC amperes at that range, so I don't know how accurate they are. They seem to be about right though.


...Wait, why are you measuring DC amps?
 
Joined
Aug 21, 2017
Messages
14
Points
3
...Wait, why are you measuring DC amps?

I'm not. What I meant is; the tube voltage is DC, so to confirm that the internal current readings are correct, one would have to measure the current through the tube with a DC clamp ammeter, which is not a common tool.
 
Last edited:

diachi

0
Joined
Feb 22, 2008
Messages
9,700
Points
113
I'm not. The tube voltage is DC, so to confirm that the internal current readings are correct, one would have to measure the current through the tube with a DC clamp ammeter, which is not a common tool.

I'd accept the current readout from the PSU without any verification, it may be a little off but not enough to matter. No need to verify it with a DC clam ammeter. If it's giving you wacky readings (anything other than around 0.4V-1.1V) you'll know.

I wouldn't trust the built in optical power meter though. Doesn't hurt to try it, but don't accept it as truth without verifying with an LPM.
 
Last edited:
Joined
Aug 21, 2017
Messages
14
Points
3
:oops:
I'd accept the current readout from the PSU without any verification, it may be a little off but not enough to matter. No need to verify it with a DC clam ammeter. If it's giving you wacky readings (anything other than around 0.4V-1.1V) you'll know.

I wouldn't trust the built in optical power meter though. Doesn't hurt to try it, but don't accept it as truth without verifying with an LPM.

That's what I am doing.
What I was saying about the clamp meter just refers to how you *could* check the accuracy, if the internal current readings were way off, or if you really wanted to. Sorry if I confused you.

Yea, I dont know about the built in power meter. I haven't measured its reported output, but seeing as I don't have a LPM at the moment, I would have no way to check the accuracy of it, so I am just not trusting it until I can test it.

Edit: I just re-read this page of the thread, and realized you were referring to the built in output power readings here,
Take the built-in power readings with a grain of salt.
not the current readings. :oops:
 
Last edited:
Joined
Aug 21, 2017
Messages
14
Points
3
I'd love to get my hands on an Ar/Kr, if I could find one I could afford. :)
(Sorry about the long delay between postings, I have been rather busy lately.)

Shortly after I got my laser working I bought some parts and built a controller for it. This is that controller, with the tube current at idle shown on the meter to the left.

controller_by_timberwolf224-dbqjdzs.jpg
 
Last edited:

vk2fro

0
Joined
Nov 30, 2009
Messages
1,304
Points
63
ok is that fancy enclosure what I think it is? A cardboard laser controller? :)
 
Joined
Aug 21, 2017
Messages
14
Points
3
ok is that fancy enclosure what I think it is? A cardboard laser controller? :)

Yup! Simple, but effective. I thought about using something premade, or 3d printing something, but cardboard is cheaper, easier to work with, and I have copious amounts of it. Not to mention I was impatient and wanted to finish the controller! :)
 

vk2fro

0
Joined
Nov 30, 2009
Messages
1,304
Points
63
of course - you can always pretty it up after getting it working, and as a bonus, use the cardboard controller as a template for drilling holes in a plastic enclosure should you decide to upgrade. Did make me smile! A dremel comes in handy for those rotten 25 pin printer port plugs :)
 
Last edited:


Top