Welcome to Laser Pointer Forums - discuss green laser pointers, blue laser pointers, and all types of lasers

Buy Site Supporter Role (remove some ads) | LPF Donations

Links below open in new window

FrozenGate by Avery

Smoke Machine

Joined
Nov 22, 2008
Messages
1,506
Points
48
Hi,
I recently acquired a Vivid smoke machine, and I was wondering if anyone had any experience tinkering with the insides. The unit came without the wired remote, so I simply poked a metal rod inside the jack connector for the remote, and voila, I had smoke. I didn't like having the metal rod as a solution, though, so I took the cover off and looked inside. Instead of being a 2-pin plug, the jack has 3 pins - brown, black and red. IIRC the voltage between red and black was 12 or so. My question is, has anyone done a mod like this before, and if so, how did you set up the pins? None of the combinations I've tried so far work (the most obvious being brown->red). Is it possible that I have blown a component? All the other functions seem to be working fine. I can upload pics if necessary, just ask.

Sorry for any typos, I burnt my finger on the nozzle and it's not easy to type...
Thanks
Charlie


In a couple of minutes I can post a picture showing and describing the inside of my controller.. it is very simple.


Edit:sorry it will take slightly longer, I am drawing a diagram.
 
Last edited:
Controller for smoke machine

Ok, so here is the basic layout of the inside of my controller.. very simple.
The controller plug has 3 pins in a triangle which connect to the smoke machine, but I cannot say which is which as they are not named or coloured.
However, I know that one of them is for a signal that the smoke machine is warmed up while the two others are positive and negative.
I imagine the top must be the signal as it sort of makes sense to let it be the seperate one.

Inside the controller you find 3 wires corresponding to the three pins.
A green/yellow, a blue and a red.
On the picture:
1) Is where the button is located. The red wire is the positive + wire. When the button is pressed it connects to the blue wire which is negative -
2) Green/yellow wire is seperate from the others. This is signal.
3) Signal wire connects to a small resistor which then splits into two different wires.
4) These wires connect to two diodes which light up when the unit is ready. These are covered in beautiful black goo on the inside.
5) The wires connect again and this current also exits through blue -

As far as I can see all you need to do is get two pieces of wire, attach them to + and - pins on your unit and then the other end to a button. If you want you can get hold of a third wire, two LEDS and a small resistor and also have the signal. The signal is actually rather good to have so you know when you can blast some smoke.

Good luck!
 

Attachments

  • IMG_1210.JPG
    IMG_1210.JPG
    103 KB · Views: 299
I forgot to add that it is quite likely that you have not blown any components but that your smoke machine has simply been warming up some of the times you have tried to activate it, and therefore has not responded. After ~15 second full blasts most smoke machines need a bit of heat up time, not only when you start them at first.
 
That's a really useful post, thanks! Is the plug at the other end a large "stereo jack" or is it more like a DMX-type connector? Mine is a Vivid VF-1, what is yours?
 
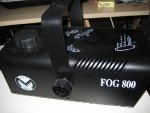
Mine is a Fog 800 from MacMah.
To be honest I have no idea whether that is a good thing, but I do know that this little beast pumps out crazy amounts of smoke. As the name suggests, it has an 800W heater.

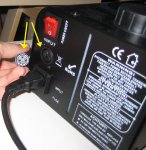
Here is a picture of the plug in my hand beside the connector (marked by two arrows).
And a picture of my smoke machine. Sorry for crappy pic quality but I just took them now and resized them in paint.

Hope all of this helps you out! Smoke machines are awesome, especially when you combine them with lasers :D
 

Attachments

  • IMG_1220.JPG
    IMG_1220.JPG
    102.2 KB · Views: 343
  • IMG_1225.JPG
    IMG_1225.JPG
    79.2 KB · Views: 254


Back
Top