the adjustable tailcap on the RPL is the better choice as the keyed cap is always full blast...but it's a pain in use because ya gotta hit this little hole with some kinda little screwdriver then get the little screwdriver lined up with it's slot-a hassel. so i fabbed a little screwdriver from a brolken drill bit and silver soldered a small washer to make a little "retainer flange" took the adjustable cap apart and made a little xtra room inside with a dremel tool and put it back after installing my little screwdriver from the inside so it sticks out the little hole. after assembly i went to the pile and found a nice knob(plasticW/ a threaded brass insert) and since i was too lazy to thread the little screwdrivers end i used JB quick weld. no more fumbling around... nice external adjuster on the end of the cap looks like it came all the way from china that way and works great...much more convienient. i just hope the laser cops don't pop me for defeating one of the factory built required by law safety features! but don't try this unless you have a quiet soul and lotsa patience. i did this between Tattoos today but i bet it took me 5 hours straight time.

Welcome to Laser Pointer Forums - discuss green laser pointers, blue laser pointers, and all types of lasers
How to Register on LPF | LPF Donations

Navigation
Install the app
How to install the app on iOS
Follow along with the video below to see how to install our site as a web app on your home screen.
Note: This feature may not be available in some browsers.
More options
You are using an out of date browser. It may not display this or other websites correctly.
You should upgrade or use an alternative browser.
You should upgrade or use an alternative browser.
RPL300 cap mod
- Thread starter tatman
- Start date


jayrob
0
- Joined
- Sep 21, 2007
- Messages
- 9,862
- Points
- 113
That sounds like the ticket! I have an RPL-350 on the way and I would like to do the same thing. How about a couple of pictures...
Jay
Jay

I haven' yet, but plan to put a dimple on the knob and another on the cap to at least indicate the off position and if i like it i may indicate each power level even though i can count. i make the dimples with a dremel tool then fill the dimples with any kinda paint...nail polish,model paint, even white out.
jayrob
0
- Joined
- Sep 21, 2007
- Messages
- 9,862
- Points
- 113
That's awesome man...is it difficult to do a little picture tutorial? I realize you would have to take it apart to do this so, if it is a pain then forget I asked. But, that's a great modification that I'm sure others besides me would like to see more information about just how you did it!
Jay
Jay
i will try to put something together , but it's really just a 1/4 inch long screwdriver with a thin washer silver soldered only about 1/16 inch from the flat blade of the screwdriver. you install it from inside(the washer keeps it there), and when you put it back you gotta put some small washers under the board screws so it doesn't bind. pix will be better. i'll show ya.
jayrob
0
- Joined
- Sep 21, 2007
- Messages
- 9,862
- Points
- 113
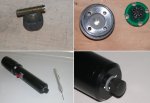
tatman, I used your idea to do my own cap modification. Here are some pictures for those who are interested...
* I used a brass machine screw which I machined down so that some of the head was still there to hold it in place from the inside.
* Then, file/sand/cut until you have the perfect fit for the slot screw driver end.
* On the outside, I used a thin plastic washer to rest between the end cap and the knob. The knob just has to be thread locked in the correct tightness which you just do by 'feel'.
* After the lock tight is dried, you just line up your custom screw driver tip before you re-install the inner part.
* I also liked your suggestion about using a drill to make divets and fill with paint! I just marked the off position and the optimal position...which in my case is position 4. I figure you can just count if you want to adjust anything different from there.
* Jack, if you check this thread, this cap mod shouldn't void the laser warranty should it? After all, there is no modification to the electronics or the laser....just an easy way to turn the monster on and off...
Thanks for this great idea tatman!
Jay
Attachments