Welcome to Laser Pointer Forums - discuss green laser pointers, blue laser pointers, and all types of lasers

Buy Site Supporter Role (remove some ads) | LPF Donations

Links below open in new window

ArcticMyst Security by Avery | Browser Hide by Avery

Is it worth replacing the expanding lens of this module?

proccc

New member
Joined
Sep 21, 2024
Messages
5
Points
3
When i was doing a mosfet switch mod on a 303 green laser, i put a piece of kapton tape on the expanding lens to protect it. While testing i turned it a bit too long and melted a hole in the tape and also slightly deformed the concave geometry of the lens. Now the unfocused beam looks like this:
DSC_4942.JPG

Now i want to know what is the best way to get the lens from another crystal/lens assembly and use it to replace my melted lens. Is super glue and a pc fan to blow away the vapors suitable?
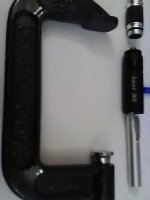
This is the module:
DSC_4941.JPG

This is the crystal/lens assembly that i plan to take the lens off of:
DSC_4945.JPG

This is the laser:
DSC_4943.JPG

Turns out i got a very good laser 303 with a proper driver and strong output power. Testing the laser diode wired up to a power supply, consuming 450ma at the point where it stops getting brighter, since i dont have a lpm, what could the max output power be at this current?

Also, this is my first post on here. Hi to all!


Yes they usually max out at around 430mah.

You would be very lucky if you aligned that lens correctly.
I would just buy another 301, 303 style for the $10 they usually go for on ebay. Other sights will try to scam you with paying more money.

Sanwu Lasers sells these 303's that are metered at 80mw or more for I think $18? Could be cheaper but you at least know what your getting.

Some like to buy 3 or 4 because the power can be anywhere from 40mw to 90mw on any given one.

I think using super glue isn't a good idea for the reason you mentioned.
 
Last edited:
Yes they usually max out at 430mah.

You would be very lucky if you aligned that lens correctly.
I would just buy another 301, 303 style for the $10 they usually go for on ebay. Other sights will try to scam you with paying more money.

Sanwu Lasers sells these 303's that are metered at 80mw or more for I think $18? Could be cheaper but you at least know what your getting.

Some like to buy 3 or 4 because the power can be anywhere from 40mw to 90mw on any given one.

I think using super glue isn't a good idea for the reason you mentioned.
I got this 303 a year ago from a local shop that sells all things chinese, but after i deformed the lens, i went to buy two more. Only to notice later it was marked "JD-303" with only slight changes to the case and the box it was in was identical to the older one. These were press fit compared to the threaded laser module, so it did take some banging. The diode was fine and maxed out @ 250ma, the diode package is a plastic rectangle in an aluminum 6mm standard package. Couldn't even make black rubber smoke when focused. Should i try pushing them to 500ma or so?

At the end i got a cheap laser sight that i got the diode (@310ma) from it and made a linear driver and a 3d printed case for it.
DSC_123624347.JPG

But the original 303 i have is still the most powerful. So maybe i should extract the diode and put it in an another host?

Also any advice for testing the limits of diodes of green dpss lasers?
 
  • Like
Reactions: GSS
The 301's 302's and 303's are basicly the exact same with maby one having star caps or a key switch.

There was a member "Pman" who lived for modding these 532's. He was the one that found that 430mah was the best setting before role back.
Some might not even reach 430mah and some might not even have a "pot" screw on the driver. Ive seen that with the newer ones.
Some older ones have a brass module and some new ones have a weird ribbed aluminum sleeve that goes over a plastic as a module.
Alot that newer style is on the pen types but still on the 301's at times.

Yup the insides are pressed in tight and some have alot of glue which just makes it almost impossible to not brake anything.
I lucked out and found a perfect piece of AL tubing that was wide enough to clear the driver and touch the back of the module and notched it to go over and clear the side button and used a C clamp to press out the module.

I'm not even sure that someone has ever swapped diodes between these 303's etc.

Lots of members want to take these apart and fix them but it just doens't work 90% of the time. I'm not saying your not gifted with your hands but its just not worth it as the insides are somewhat fragile plus they are case negative and everything is exposed and can easily be shorted.
I would go on ebay and find a US seller for fast shipping and buy 3 or 4 of them for $8, $9 or $10 each.

Keep the old one and learn more from it!

Nice 3D build by the way!

EDIT: I meant to say they are case "Positive" my bad!
 
Last edited:
proccc, It was brought to my attention by member "Encap"
I meant to say they are case "POSITIVE" and thats why they can be shorted out easily as when you take the module out from the host and everything on the module is exposed and can easily be touched by the wrong wire from the power source.
 
Last edited:
proccc, It was brought to my attention by member "Encap"
I meant to say they are case "POSITIVE" and thats why they can be shorted out easily as when you take the module out from the host everything on the module is exposed and can easily be touched by the wrong wire from the power source.

I wouldn't try to run these open unless you have a lot of experience doing so. I would rather have it mostly put back togather before trying anything like that.
 
  • Like
Reactions: GSS
Nice 3D build by the way!
Glad you like it!

Yeah, these use acrylic lenses. Cyanoacrylate will melt them every time.
Good to know, i remember when i tried to clean one with alcohol it fogged up


proccc, It was brought to my attention by member "Encap"
I meant to say they are case "POSITIVE" and thats why they can be shorted out easily as when you take the module out from the host and everything on the module is exposed and can easily be touched by the wrong wire from the power source.
I dont know if that is so easy to mess up, the way i do it is when i have the module with the pcb out, i put the ground clip to the battery spring and touch the positive to the brass. To test the diode i desolder it from the board and directly connect it directly to the power supply.

Btw it did take a lot of beating with a flathead screwdriver and a heavy object to pop out, the pressed in laser module, but if you take care the module pops out safely, it should be ok. But thats the JD-303, original 303's are much better for disassembling.
 
  • Like
Reactions: GSS
Answer to your original question is no it is not worth the cost in time, effort ,and materials to change the lens, generally speaking.

Do you have a reason, goal, or purpose in mind for disassembling several throw away quality, low cost, low end ,mass produced laser pointers not meant to be disassembled or repaired or are you just curious about how they work?

You can buy 100 mW and 200mW 532nm DPSS modules of several types on eBay if you need for one for a particular reason or purpose for not a lot of $s. Search 200mW 532nm laser module on eBay.
See: https://www.ebay.com/sch/i.html?_from=R40&_trksid=p4432023.m570.l1312&_nkw=200mW+532nm+laser+module&_sacat=0
Alternatively, you can buy a 200mW 303 green pointer for $20, much lower than the cost of focusable modules here: https://www.laserpointerpro.com/las...cus-kaleidoscopic-flashlight-type-p-3965.html
 
Last edited:
Answer to your original question is no it is not worth the cost in time, effort ,and materials to change the lens, generally speaking.

Do you have a reason, goal, or purpose in mind for disassembling several throw away quality, low cost, low end ,mass produced laser pointers not meant to be disassembled or repaired or are you just curious about how they work?
I got them for about $6 at a local shop, some can be disassembled very easily, no glue, thats if youre lucky. If the pointer is good enough i just keep it intact and have fun with it. But with the rest, i get the laser modules for random projects like for a fat beam IR illuminator for a modified camera. Mostly need them for a long distance vector projector i made some time ago. I can send pictures of it if anyone wants to see.

Though i might need a 400 - 900mW 520-525 diode for under $30 for a custom pointer, if theres even any for that price.
 
Glad you like it!


Good to know, i remember when i tried to clean one with alcohol it fogged up


I dont know if that is so easy to mess up, the way i do it is when i have the module with the pcb out, i put the ground clip to the battery spring and touch the positive to the brass. To test the diode i desolder it from the board and directly connect it directly to the power supply.

Btw it did take a lot of beating with a flathead screwdriver and a heavy object to pop out, the pressed in laser module, but if you take care the module pops out safely, it should be ok. But thats the JD-303, original 303's are much better for disassembling.
A 6 inch C- clamp and the proper piece of tubing that goes inside the makes it slide out instead of the kinda violent banging.
You will need a tiny bit of a extension tube, even something like a rachet socket for the module to slide in on the one end of the C-clamp.
Having little to no glue on the 301 build helps bigtime..
 
Last edited:
A 6 inch C- clamp and the proper piece of tubing that goes inside the makes it slide out instead of the kinda violent bagging.
You will need a tiny bit of a extension tube, even something like a rachet socket for the module to slide in on the one end of the C-clamp.
Having little to no glue on the 301 build helps bigtime..
All the pointers i got have a plastic piece that holds the board with the button, i put my flathead through the piece, reaching the laser module and then hammer it out, changing position where the flathead hits def helps. Maybe you can punch the plastic piece together with the laser module by putting a metal tube slightly smaller than the inner diameter, but im not sure. Sometimes you can take out the plastic piece with tweezers if its not that tight in there.
Just sharing my experience with these pointers in case someone wants to do the same.
Give me a minute, i'm going to post a couple pics and yup I know about the plastic support piece for the driver and button switch..
 
I found some pieces of a hollow round aluminum rods that I think were from a cheap Walmart standup lamp.
You can see I crudely notched it as I cut it on my coffee table and that notch was made so it could clear the button switch inside.
With long nose needle nose pliers or what ever else might work that plastic support piece can be pulled out easily without breaking off the driver from the module or the back of the diode.
You will need to take out that plastic support piece for the notched tubing to work.

The lens and cap is off as you cans see.
I just happened to take off the battery extension tube form the 303 host because I cut the AL tubing kinda short
Once I put the AL tube in the host the C-clamp will clear.

Like I mentioned I lucked out big time that the AL tube cleared the the width of the driver inside and hit the back of the module right on its outer edges all while clearing the inner button setup because the tube is notched for clearance.

The 6 inch C-clamp gives some nice strength and pressing power.
You can see another piece of tubing at the tip of the 303 host. ""Its longer than needed but just grabbed it for show"" because as your screwing the C-clamp down the module starts to slide out from the host and needs that spacer tubing to go into so it can fall out.
 

Attachments

  • IMG_0337.jpg
    IMG_0337.jpg
    112.6 KB · Views: 6
Last edited:


Back
Top