Welcome to Laser Pointer Forums - discuss green laser pointers, blue laser pointers, and all types of lasers

Buy Site Supporter Role (remove some ads) | LPF Donations

Links below open in new window

FrozenGate by Avery

Help needed for assembling a laser!

Joined
Aug 17, 2008
Messages
1,368
Points
0
I need help building a blu-ray laser.  I already have all of the needed parts, and I know all of the safety aspects of building the laser.  This is not one of the million threads overflowing LPF where some new guy comes asking about what parts he will need to buy and what current he will need to set the driver to...etc.  

The problem is, I suck at DIY.  I am using jayrob's MXDL tutorial, but I can't build my laser straight off the page.  I need more detailed instructions.  If anyone can help me with an in-depth step-by-step tutorial, please do.  I would greatly appreciate your help, and I'm sure many other first-time laser builders will as well.

Tutorial link: http://www.laserpointerforums.com/forums/YaBB.pl?num=1217045236

Parts list:

-3W MXDL host
-Micro Flexdrive V2
-Jayrob heatsink
-PHR-803T diode pre-mounted in Aixiz module

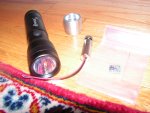
I can't figure out how to attach more than one picture at a time straight from my computer, so I will just post a couple.  I have better close-ups of everything, so just let me know if you need a better picture of a specific part.

Thanks,
Mark
 

Attachments

  • All_laser_parts.JPG
    All_laser_parts.JPG
    655.9 KB · Views: 202


Re: Assembling a blu-ray laser

This is where i say, if people cant build one even looking at the instructions, just have someone built it for you and pay abit more. its much easier and you get a quality laser.

But you dont need to use the whole aixiz module just the top half, unsrew the bottom tube , you then prob have to undo the soldering holding the LD to the board, cause you would need to rearange the board so it sits flat against the heatsink. the top half of the module goes into the heatsink, and you screw the little screw with a phillip head screw driver to hold it into place. once you figure how to get the top bit onto the heatsink and attach the driver so its not in the way of anything hwen you put everything together, than your done.


Sounds easier said than done, but good luck.

Tommy
 
Re: Assembling a blu-ray laser

BluRay said:
This is where i say, if people cant build one even looking at the instructions, just have someone built it for you and pay abit more. its much easier and you get a quality laser.

But you dont need to use the whole aixiz module just the top half, unsrew the bottom tube , you then prob have to undo the soldering holding the LD to the board, cause you would need to rearange the board so it sits flat against the heatsink. the top half of the module goes into the heatsink, and you screw the little screw with a phillip head screw driver to hold it into place. once you figure how to get the top bit onto the heatsink and attach the driver so its not in the way of anything hwen you put everything together, than your done.


Sounds  easier said than done, but good luck.

Tommy

Buying a premade laser would cost twice as much, ruin the personal value, and I already have the parts.  Thanks for the help, though.  I will unscrew the bottom half of the module and mount it in the heatsink. (What's the purpose of the bottom half if it's not even used?) Anyway, why would I need to undo the soldering?  I don't quite understand.  

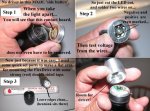
Here are the things I don't understand in the tutorial. (Picture of instructions attached.)

-How do I cut the LED out?
-How do I test voltage from the wires?
-Do I thread the wires up from where I soldered them on and then add the quick-set putty?
-What should I attach the wires from the laser diode to?
-Should I solder wires to the Flexdrive?  If so, where should I connect them to?

If anyone is willing to answer these questions for me, it would be a huge help.  And thanks BluRay for telling me to remove the bottom half of the module.

-Mark
 

Attachments

  • Tutorial_instructions.jpg
    Tutorial_instructions.jpg
    77.9 KB · Views: 573
Can someone please help me? I'm really desperate to make this laser, I've been wanting to do this since I joined. I finally have all the parts, I just need someone who is willing to help.

-Mark
 
The LED is 'snipped' out with wire snips.

After you solder on two lead wires (one at the positive, and one at the negative), put your batteries in and use a DMM to test the voltage. You should have just over 4.5 volts with new batteries.

Then just make a flat spot with the quick set putty and have the wires coming up near the edges to allow room to 'stick' the FlexDrive there with double sided tape. (strong red) Watch the outer edges...leave room for the heatsink to sit flat on the metal as the picture shows.

You will have instructions for the driver connections with the driver. If not, then here they are:
http://hacylon.case.edu/laser/lavadrive2/Micro_Flex_Drive_User_manual_ V2.pdf

Correctly soldering the driver, testing current with a load, and finally connecting the driver to your leads from the LD, are the trickiest part of any DIY laser.

Do not power the FlexDrive without a test load. This can damage it. Read about soldering the 'jumper' for the higher current range as well. (I like to remove the batteries and short the two wires together as a precaution after setting current, and before connecting the LD leads)

Take the time to learn about the driver and soldering connections as well as how to test and set the current with a test load!

It is very easy once you learn how, but there is a learning curve that every new builder must go through. The reward is worth the effort...
Jay
 
jayrob said:
The LED is 'snipped' out with wire snips.

After you solder on two lead wires (one at the positive, and one at the negative), put your batteries in and use a DMM to test the voltage. You should have just over 4.5 volts with new batteries.

Then just make a flat spot with the quick set putty and have the wires coming up near the edges to allow room to 'stick' the FlexDrive there with double sided tape. (strong red) Watch the outer edges...leave room for the heatsink to sit flat on the metal as the picture shows.

You will have instructions for the driver connections with the driver. If not, then here they are:
http://hacylon.case.edu/laser/lavadrive2/Micro_Flex_Drive_User_manual_ V2.pdf

Correctly soldering the driver, testing current with a load, and finally connecting the driver to your leads from the LD, are the trickiest part of any DIY laser.

Do not power the FlexDrive without a test load. This can damage it. Read about soldering the 'jumper' for the higher current range as well. (I like to remove the batteries and short the two wires together as a precaution after setting current, and before connecting the LD leads)

Take the time to learn about the driver and soldering connections as well as how to test and set the current with a test load!

It is very easy once you learn how, but there is a learning curve that every new builder must go through. The reward is worth the effort...
Jay

Thank you so much jayrob!  You are a huge help!  I think I mostly understand it now!  Mikeeey sent me a great diagram for the Flexdrive, with clearly-labeled instructions on what to solder.  I just have three quick questions (I'll be posting pictures, but I only know how to post one at a time, so I'll have to make multiple posts)-

jayrob said:
Do not power the FlexDrive without a test load. This can damage it. Read about soldering the 'jumper' for the higher current range as well. (I like to remove the batteries and short the two wires together as a precaution after setting current, and before connecting the LD leads)

-I have my Flexdrive current preset at 120mA.  Will I need to take this step and buy a test load, or do I not need to worry about this part?

-I think I have cut the LED out properly, but I wanted to make sure that this is correct.  Should I snap out the rest of the center thing, or just leave it there?

-Where are the "tabs" on the battery case that I need to snap?

Thank you,
Mark
 

Attachments

  • LED_Circuit_Board_001.jpg
    LED_Circuit_Board_001.jpg
    78.2 KB · Views: 223
I forgot one thing! If the negative wire soldered to the Flexdrive needs to make contact with the case, how can I solder it to the negative terminal for the LED? Where should I solder it to?

-Mark
 

Attachments

  • Flexdrive_Info.png
    Flexdrive_Info.png
    962.6 KB · Views: 447
Looks like you didn't cut the LED all the way out... After you remove it, you will solder two wires onto where the tabs of the LED were soldered. One will be marked positive, and one will be marked negative. These two wires go to the FlexDrive positive and negative input.

Then two wires will go from the FlexDrive output. This is where you will test current (recommended) before you make the final connections from those leads, to the leads coming form your LD.
Jay
 

Attachments

  • Image1_004.jpg
    Image1_004.jpg
    88.1 KB · Views: 209
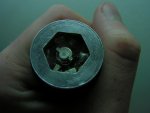
The first picture was before I cut the diode out. Here's what it looked like after (I have already snapped the tab you labeled in the diagram).

-Mark
 

Attachments

  • LED_Cut_Out.JPG
    LED_Cut_Out.JPG
    655.8 KB · Views: 299
jayrob said:
you will solder two wires onto where the tabs of the LED were soldered. One will be marked positive, and one will be marked negative. These two wires go to the FlexDrive positive and negative input.

Then two wires will go from the FlexDrive output.
Jay

I assume this means then that I will not need to solder the negative wire to the case. So two wires to the terminals and two wires to the diode? Got it.

Would this setup work to test current? (I don't have a test load.)

-Mark
 

Attachments

  • Testing_current.jpg
    Testing_current.jpg
    18.6 KB · Views: 242
Nice diagram. Yes, that will work for testing current, but you take the chance of killing the diode if the current is too high. Also, do not adjust current with the LD connected. The pot is very sensitive and can 'jump' to over 500mA's easily.

About the LED heatsink. The flat heatsink that the LED was mounted on has solder points. (blobs of solder) Solder one wire to one of the positive points, and another wire to the negative points. Any negative point on the star heatsink will be a direct connection to the host. (negative) Any positive point will be a connection to the positive side of the batteries when the host is switched on.

Connect the wires, test voltage...
Jay

P.S. Please give us the link to where you bought the host!
 
jayrob said:
Nice diagram. Yes, that will work for testing current, but you take the chance of killing the diode if the current is too high. Also, do not adjust current with the LD connected. The pot is very sensitive and can 'jump' to over 500mA's easily.

About the LED heatsink. The flat heatsink that the LED was mounted on has solder points. (blobs of solder) Solder one wire to one of the positive points, and another wire to the negative points. Any negative point on the star heatsink will be a direct connection to the host. (negative) Any positive point will be a connection to the positive side of the batteries when the host is switched on.

Connect the wires, test voltage...
Jay

P.S. Please give us the link to where you bought the host!

I think I will test the current like this, and I am not planning on adjusting it.  I just want to make sure that it is 120mA as I ordered.  If the current has not been preset as I have requested, any use of the diode at all would kill it, regardless of whether or not I test it.  

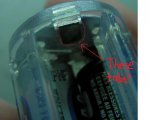
I just realized something worrying to me.  If I accidentally put in the battery case the wrong way, would this kill the diode?  And I'm not quite sure what you mean about the tabs to snap.  If I snap these tabs (as shown below), there doesn't seem to be any other metal that would touch the positive terminal of the battery and allow a connection.

I bought the flashlight at http://www.ledshoppe.com/Product/ledp/LP1011.htm

With all of the information you have given me, I will build this laser tomorrow.  I will post updates!

Thanks,
Mark
 

Attachments

  • Tabs.jpg
    Tabs.jpg
    29.4 KB · Views: 195
Not those tabs, the plastic tabs... if necessary.

side5.jpg


The current is adjustable, if you do not have a rkcstr test load, you can use 6 silicon diodes for a blu-ray 'dummy load'. See this diagram from rog881. This is showing a DDL driver and 4 silicon diodes to test a red. The principal is the same for any driver. Use 6 for a blu-ray. Notice the polarity of the silicon diodes:
http://www.laserpointerforums.com/forums/YaBB.pl?num=1197651171#1
Jay
 
Oh okay, thanks for clearing up that misconception!

Would there be any consequences (e.g. killing the diode) if I were to load the battery holder the wrong way?

Thanks,
Mark
 
I believe the FlexDrive has reverse polarity protection built-in, but just so you know, you will be putting the positive end of the battery pack towards the front. The negative towards the tail cap.

120mA's with an 803T and an AixiZ acrylic should give you around 105mW's...
Jay
 
jayrob said:
I believe the FlexDrive has reverse polarity protection built-in, but just so you know, you will be putting the positive end of the battery pack towards the front. The negative towards the tail cap.

120mA's with an 803T and an AixiZ acrylic should give you around 105mW's...
Jay

Okay, gotcha. Thanks for the info! I snapped out the tabs, and all that's left now is testing the Flexdrive/diode and building the laser!

-Mark


Back
Top