djQUAN
0
- Joined
- May 27, 2013
- Messages
- 1,154
- Points
- 63
Here's my latest build. (It's Christmas vacation - no work! so I have a lot of free time ") )
)
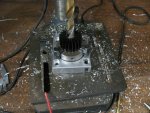
I started with a block of aluminum to make a heatsink.

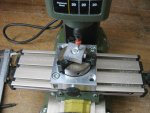
I don't have a lathe so this is how I make round stuff on a mill. I use the dividing attachment and rotate it by hand while gradually letting the mill eat deeper into the material.

Hole for the 12mm module done, now to make it round.

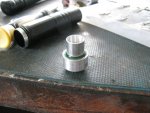
Completed heatsink

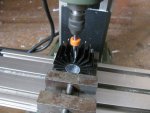
Now, we machine another heatsink. This one will attach from the front and will bear most of the heat dissipating duties.

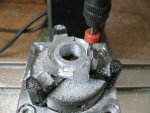
Once the inside is drilled to accept the 12mm module, we drill and tap the setscrew hole

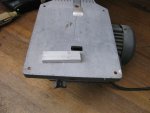
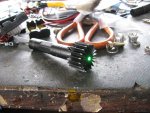
Here's the host. It's a single AA cheapie flashlight. We drill a hole for another setscrew to hold the inner heatsink and 12mm module in place.

back part of the module glued into the heatsink

Here's the 12mm module from DTR with built in microboost.
I didn't want to cut the silicone wire so I desoldered it and used the shorter offcuts that I have. The long ones will be used in future projects

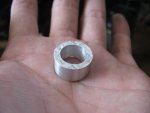
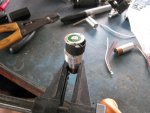
Back part in place, put in the plastic spacer and connect the contact board.

Put in an AW 14500, test if it's still working then adjust focus to infinity. This won't be used for burning so it's a fixed focus build.

Here's why it's called Spikey, I don't think you'd want to keep this in your pocket. An unfortunate incident mangled the front heatsink. The drill caught the heatsink and it spun from the clamp causing that damaged anodizing at the front. :yabbem:

The heatsink damage makes it look ugly so I painted it flat black

Then the paint on the heatsink started rubbing off and bare aluminum started showing up again which is ugly so I decided to try another route....
Since any form of repainting or anodizing will rub or scratch off at the sharp edges, why not fully remove it instead? I can also round off the sharp corners so it won't shred my pocket
Mounted the heatsink to a bolt and attached it to the drill. While spinning, I sanded the fin edges to get that bare aluminum.

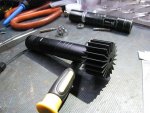
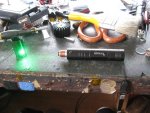
This is what it looks like now. Love it or hate it, it's here to stay


It's still too early for beamshots so this will have to do for now (along with my red build)

Night time beam shots!!!
Solo beam shot

Christmas colors with the red rebuild

Comparison pic with the 77mW lab laser which peaks at over 80mW.
The difference is more noticeable in the pic compared to real life. Maybe my eye is broken


)I started with a block of aluminum to make a heatsink.
I don't have a lathe so this is how I make round stuff on a mill. I use the dividing attachment and rotate it by hand while gradually letting the mill eat deeper into the material.
Hole for the 12mm module done, now to make it round.
Completed heatsink
Now, we machine another heatsink. This one will attach from the front and will bear most of the heat dissipating duties.
Once the inside is drilled to accept the 12mm module, we drill and tap the setscrew hole
Here's the host. It's a single AA cheapie flashlight. We drill a hole for another setscrew to hold the inner heatsink and 12mm module in place.
back part of the module glued into the heatsink
Here's the 12mm module from DTR with built in microboost.
I didn't want to cut the silicone wire so I desoldered it and used the shorter offcuts that I have.
The long ones will be used in future projectsBack part in place, put in the plastic spacer and connect the contact board.
Put in an AW 14500, test if it's still working then adjust focus to infinity. This won't be used for burning so it's a fixed focus build.
Here's why it's called Spikey, I don't think you'd want to keep this in your pocket.
An unfortunate incident mangled the front heatsink. The drill caught the heatsink and it spun from the clamp causing that damaged anodizing at the front. :yabbem:The heatsink damage makes it look ugly so I painted it flat black
Then the paint on the heatsink started rubbing off and bare aluminum started showing up again which is ugly so I decided to try another route....
Since any form of repainting or anodizing will rub or scratch off at the sharp edges, why not fully remove it instead? I can also round off the sharp corners so it won't shred my pocket
Mounted the heatsink to a bolt and attached it to the drill. While spinning, I sanded the fin edges to get that bare aluminum.
This is what it looks like now. Love it or hate it, it's here to stay
It's still too early for beamshots so this will have to do for now
(along with my red build)Night time beam shots!!!
Solo beam shot
Christmas colors with the red rebuild
Comparison pic with the 77mW lab laser which peaks at over 80mW.
The difference is more noticeable in the pic compared to real life. Maybe my eye is broken
Attachments

Last edited:


 Ran it for a few minutes and the front heatsink is barely warm. Couldn't test for a longer time since the 14500 is almost empty. Got another one already in the charger.