

- Joined
- Jul 27, 2010
- Messages
- 154
- Points
- 18
Just like this one, but smaller, with details -
http://laserpointerforums.com/f65/dorky-overkill-heatsink-445nm-54490.html
Mini Dorky Overkill Heatsink
1- Put wires (and TVS, if you want ESD protection) on your laser module. See my posting about inexpensive ESD protection here -
http://laserpointerforums.com/f51/inexpensive-esd-static-protection-55979.html
2- Take one small heat sink from a junker computer.
3- Cut a mounting plate out of copper or aluminum. Thickness should be 0.100 to 0.125 inches thick. Copper is MUCH better than aluminum, both for thermal and for strength reasons.
4- Using progressively larger drills, drill a hole in the center of your mounting plate. Carefully finish with a 27/64 drill or something just under 11mm in diameter.
5- Use an 11mm x0.5mm tap to thread the laser module mounting hole.
6- Set or clamp the mounting plate to the heat sink.
7- Looking at the heat sink fins, mark the mounting plate edge where there are gaps in the heat sink fins. This will allow you to miss drilling into the fins when adding the hold-down screws.
8- On the mounting plate, use a straight edge to draw lines marking where the gaps in the fins are.
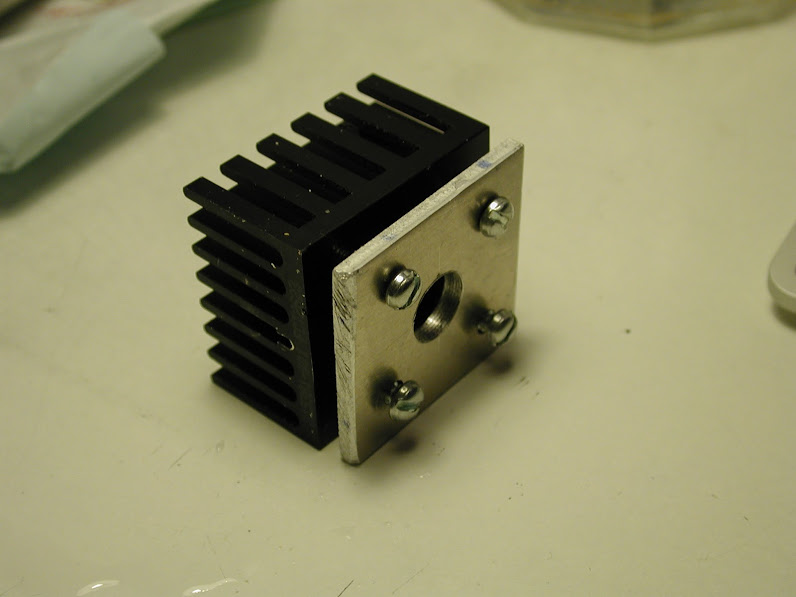
9- Pick four places on the mounting plate and drill four holes through the plate and down through the heat sink. I used a drill sized for tapping 6-32 holes.
10- Remove the mounting plate and re-drill the four holes with a drill slightly larger than a #6 screw.
11- Tap the four screw holes in the heat sink with a 6-32 tap.
12- Add screws to verify placement! It should now look like this.
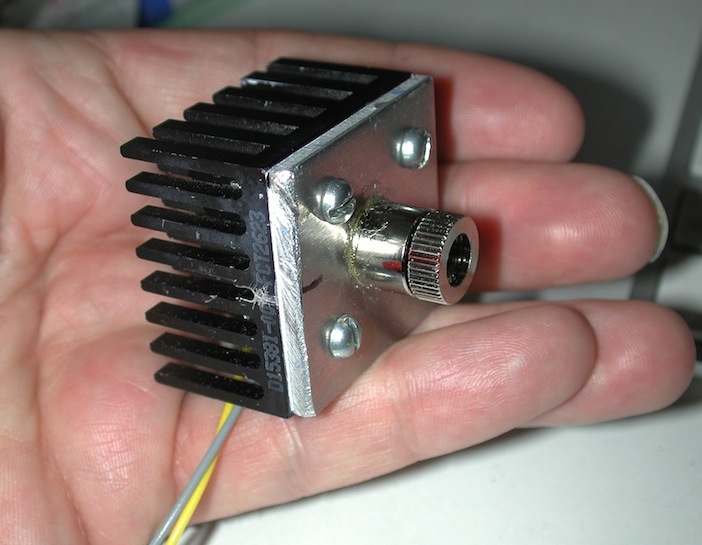
13- Drill a hole ~1/8" in the center of the 11mm module mounting hole.

14- Thread the laser module into the hole. If you used aluminum, you may want to glue the module in as well because of the relative softness of the metal.

The most important part of mounting the laser module is that the flat back-side of the module, including the laser diode itself, should be flush and come into contact with as much of the heat sink face as possible. *This is the most effective path to draw heat away from the laser diode!*
15 - Coat the back of the laser module and mounting plate with thermal paste and screw the mounting plate to the heat sink. Clean up the excess paste and you are done!
It's not a sexy host, but it's a good mount for a "lab laser" application where you want to keep the module very cool over long periods of time.
http://laserpointerforums.com/f65/dorky-overkill-heatsink-445nm-54490.html
Mini Dorky Overkill Heatsink
1- Put wires (and TVS, if you want ESD protection) on your laser module. See my posting about inexpensive ESD protection here -
http://laserpointerforums.com/f51/inexpensive-esd-static-protection-55979.html
2- Take one small heat sink from a junker computer.
3- Cut a mounting plate out of copper or aluminum. Thickness should be 0.100 to 0.125 inches thick. Copper is MUCH better than aluminum, both for thermal and for strength reasons.
4- Using progressively larger drills, drill a hole in the center of your mounting plate. Carefully finish with a 27/64 drill or something just under 11mm in diameter.
5- Use an 11mm x0.5mm tap to thread the laser module mounting hole.
6- Set or clamp the mounting plate to the heat sink.
7- Looking at the heat sink fins, mark the mounting plate edge where there are gaps in the heat sink fins. This will allow you to miss drilling into the fins when adding the hold-down screws.
8- On the mounting plate, use a straight edge to draw lines marking where the gaps in the fins are.
9- Pick four places on the mounting plate and drill four holes through the plate and down through the heat sink. I used a drill sized for tapping 6-32 holes.
10- Remove the mounting plate and re-drill the four holes with a drill slightly larger than a #6 screw.
11- Tap the four screw holes in the heat sink with a 6-32 tap.
12- Add screws to verify placement! It should now look like this.
13- Drill a hole ~1/8" in the center of the 11mm module mounting hole.
14- Thread the laser module into the hole. If you used aluminum, you may want to glue the module in as well because of the relative softness of the metal.
The most important part of mounting the laser module is that the flat back-side of the module, including the laser diode itself, should be flush and come into contact with as much of the heat sink face as possible. *This is the most effective path to draw heat away from the laser diode!*
15 - Coat the back of the laser module and mounting plate with thermal paste and screw the mounting plate to the heat sink. Clean up the excess paste and you are done!
It's not a sexy host, but it's a good mount for a "lab laser" application where you want to keep the module very cool over long periods of time.
Last edited:


")
