Welcome to Laser Pointer Forums - discuss green laser pointers, blue laser pointers, and all types of lasers

LPF Donation via Stripe | LPF Donation - Other Methods

Links below open in new window

ArcticMyst Security by Avery

125W Laser Array Driver Help

Joined
Nov 2, 2023
Messages
28
Points
3
Hi guys. Im interested in building a 125W laser diode array driver to of course drive this absolute monster. I already have some basic experience with other high power lasers under 10W but still experience regardless. Ive build a 3.5W 445nm, 1.2W 535nm, 500mw 650nm, 300mw 650nm, 120mw 532nm, 80mw 405nm. and i Want to step up to the big guns (literally haha).
So Can someone walk me step by step through the process of making a relativly simple driver? I dont just want to build it, I also want to understand it too (otherwise theres no point hahaha). Some builders notes will be good too, your own experiences, proper heatsinking advice, advice in general is MUCH appreciated.
I do have proper safety glasses from NoIR.
What do i need to make the driver?
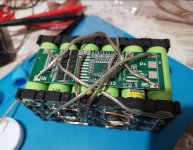
What kind of batteries?
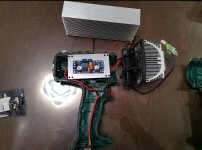
I dont want to run this off of a bentch supply, i want it to run off a battery simple because i think its cooler but also its much more convient.
How should i regulate heat but still keep everything compact?
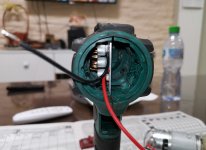
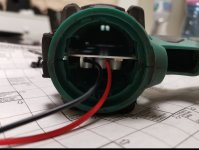
Ill be using the NUBM37 455nm 125W.
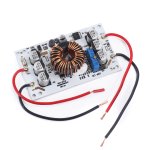


Joined
Jul 10, 2015
Messages
9,914
Points
113
There was one person who passed through selling a kit that was pretty neat, it had a thin sheet aluminum body with his own hand built switching power supply running off a hobby lipo pack, but I can't find it ATM, do some searching.
 

Borislav@87

Active member
Joined
Mar 20, 2022
Messages
355
Points
43
See my thread. I will use two of these 600W drivers. I was going to use one of the 900W ones but mine are not working well. Two of these 600W units will handle the array perfectly. You will power every two rows of 12 diodes with one driver. Now you will adjust them with a multimeter. Each driver should run at about 47-48V at 3/4 amps
 

Attachments

  • 1382982471-1267252303.jpg
    1382982471-1267252303.jpg
    280.6 KB · Views: 13
  • Screenshot_20231218_234500_com.android.gallery3d_edit_701569800649196.jpg
    Screenshot_20231218_234500_com.android.gallery3d_edit_701569800649196.jpg
    473.5 KB · Views: 12
  • Screenshot_20231218_234458_com.android.gallery3d_edit_701561804883572.jpg
    Screenshot_20231218_234458_com.android.gallery3d_edit_701561804883572.jpg
    453.8 KB · Views: 12
  • Screenshot_20231218_234456_com.android.gallery3d_edit_701555283068989.jpg
    Screenshot_20231218_234456_com.android.gallery3d_edit_701555283068989.jpg
    743.4 KB · Views: 13
Joined
Nov 2, 2023
Messages
28
Points
3
See my thread. I will use two of these 600W drivers. I was going to use one of the 900W ones but mine are not working well. Two of these 600W units will handle the array perfectly. You will power every two rows of 12 diodes with one driver. Now you will adjust them with a multimeter. Each driver should run at about 47-48V at 3/4 amps
Wow this is So helpful bro. If i have more questions may i come back to you? Also would this driver would exactly the same for another laser diode array? say i wanted to use a 25W green or a 75W blue would this power-supply used for this laser destroy the other laser diode arrays?
 
Joined
Nov 2, 2023
Messages
28
Points
3
Just to clarify. i need
(https:) //vi.aliexpress.com/item/1005003684974265.html?src=google&aff_fcid=1c331baec2034ed283fe656e8c444060-1702955366550-06372-UneMJZVf&aff_fsk=UneMJZVf&aff_platform=aaf&sk=UneMJZVf&aff_trace_key=1c331baec2034ed283fe656e8c444060-1702955366550-06372-UneMJZVf&terminal_id=d4ac7d4c309b4c6c893c267036c84ed7&afSmartRedirect=y
-2 boost converters (im using the same as yours)
-A heatsink (I have an aluminum block at my collage i think will work well for a heatsink)
-Indium foil for imperfect vallys and hills on the aluminum heatsink
-1 (or 2?) lipo batteries? (how do you actually adjust the voltage on the output of this driver? do i need my own seperate circuitry?)
Step 1: ground workbench and myself so as to not kill the diode array on accident
step 2: drill holes into the aluminum heatsink to attatch the diode
step 3: place indium foil on aluminum heatsink so as to guarantee heat transfer for efficient heatsink
step 4: attatch laser diode array onto heatsink and drill it in
step 5: wire diode array exactly as you have (every 2 rows)
step 5: attatch power supply outputs to laser diode array
Step 6: done.

i assume. This is what ive gathered from the information so far.
 
Joined
Sep 20, 2013
Messages
17,462
Points
113
See my thread. I will use two of these 600W drivers. I was going to use one of the 900W ones but mine are not working well. Two of these 600W units will handle the array perfectly. You will power every two rows of 12 diodes with one driver. Now you will adjust them with a multimeter. Each driver should run at about 47-48V at 3/4 amps

Congratulations on finding a driver that works for you. I'll watch you post with intertest to see how this works out for you.
 

Borislav@87

Active member
Joined
Mar 20, 2022
Messages
355
Points
43
I have been using this driver for quite some time and everything is ok. It will work fine for all arrays without damaging them. I have had three lasers done with it and all work great.
 

Attachments

  • Screenshot_20231105_192625_com.android.gallery3d_edit_29073087963792.jpg
    Screenshot_20231105_192625_com.android.gallery3d_edit_29073087963792.jpg
    344 KB · Views: 18
  • Screenshot_20231109_232829_com.android.gallery3d_edit_186849076244925.jpg
    Screenshot_20231109_232829_com.android.gallery3d_edit_186849076244925.jpg
    490.6 KB · Views: 19
  • Screenshot_20231105_192620_com.android.gallery3d_edit_29058774371085.jpg
    Screenshot_20231105_192620_com.android.gallery3d_edit_29058774371085.jpg
    338.4 KB · Views: 17
Joined
Nov 2, 2023
Messages
28
Points
3
I have been using this driver for quite some time and everything is ok. It will work fine for all arrays without damaging them. I have had three lasers done with it and all work great.
alright cool. What input voltage do you need with the laser drivers bro? Is the driver completely adjustable?
Also as for my list of things i need to make it all work, Is my list accurate?
 

Borislav@87

Active member
Joined
Mar 20, 2022
Messages
355
Points
43
In the specifications of the driver it says about input voltage. I use 20V and 24V, and 12V is no problem. As long as the battery pack is powerful enough. For the NUBM37 I will use 24V from 18 18650 batteries. Or say 3 rows of batteries, with each row having 6 batteries connected in series. Of course everything will go through BMS protection.
 

Attachments

  • Screenshot_20231219_122852_com.android.gallery3d_edit_708134085590902.jpg
    Screenshot_20231219_122852_com.android.gallery3d_edit_708134085590902.jpg
    477.3 KB · Views: 5

Borislav@87

Active member
Joined
Mar 20, 2022
Messages
355
Points
43
The driver has two small adjustment screws. One is for Voltage and other is for Amperage. What do I do on first setup? In the case of the NUBM37 you will need two drivers that run at around 48V and 3 or 4A current depending on your preference. I'll keep mine at 3.7A. To do this, connect the driver to a battery and set it to say 38V from the corresponding voltage regulator. Reduce the amperage from the small screw a few turns beforehand. Then connect the diode to the driver with the negative, and the positive + should go through a multimeter to adjust the amperage. The multimeter must be set to measure amperage in this case. Then you connect the battery to the driver and very slowly start turning the voltage screw. On the multimeter you will only see the amperage, because you need it. At first it will probably show 0.5A. Once you start welding the voltage and amperage screw, you should reach a minimum of 3A. On the upside, it's all about preference for more power. I will set mine to 3.7A. I don't know if you understood me, but the procedure is very quick and easy. In short, with a multimeter you only need to look at the amperage when setting. You don't care about the voltage. It will be how much is needed for the corresponding amperage.
 
Joined
Sep 20, 2013
Messages
17,462
Points
113
I have been using this driver for quite some time and everything is ok. It will work fine for all arrays without damaging them. I have had three lasers done with it and all work great.

That's good to know. I'll be watching with interest to see if you post more photos of this one working. Thanks.
 
Joined
Nov 2, 2023
Messages
28
Points
3
I have been using this driver for quite some time and everything is ok. It will work fine for all arrays without damaging them. I have had three lasers done with it and all work great.
How can i choose an effective heatsink? what do i know will work? Im planning to use a pc fan driven by a 6v high current Li-Ion battery pack + indium foil on the laser diode array. Id preferably like one of those circle heat sinks.
 

Borislav@87

Active member
Joined
Mar 20, 2022
Messages
355
Points
43
A fan from a computer will not do. It will be too weak if the radiator is small. This one is super powerful and I guarantee it will handle even a small radiator. I use these heatsinks and they work great with this fan


For Delta PFC0612DE 12V 1.68A 6038 6CM 60MM high speed cooling fan server for 60*60*38mm

Just found this amazing item on AliExpress. Check it out!
BGN14.35 63%OFF | Electronic Radiator Aluminum Dense Teeth Heatsink Extruded Heat Sink Computer Water Cooling System 100/120/150/200/300x69x36MM
 

kecked

0
Joined
Jun 18, 2012
Messages
952
Points
63
I found these heat sinks with pins a while back and the fans mount on top blowing air down into the pins. I had a 6”x6” that was rated at 1kw dissipation using four computer fans. If you find them let me know I lost the website.
 
Joined
Nov 2, 2023
Messages
28
Points
3
The driver has two small adjustment screws. One is for Voltage and other is for Amperage. What do I do on first setup? In the case of the NUBM37 you will need two drivers that run at around 48V and 3 or 4A current depending on your preference. I'll keep mine at 3.7A. To do this, connect the driver to a battery and set it to say 38V from the corresponding voltage regulator. Reduce the amperage from the small screw a few turns beforehand. Then connect the diode to the driver with the negative, and the positive + should go through a multimeter to adjust the amperage. The multimeter must be set to measure amperage in this case. Then you connect the battery to the driver and very slowly start turning the voltage screw. On the multimeter you will only see the amperage, because you need it. At first it will probably show 0.5A. Once you start welding the voltage and amperage screw, you should reach a minimum of 3A. On the upside, it's all about preference for more power. I will set mine to 3.7A. I don't know if you understood me, but the procedure is very quick and easy. In short, with a multimeter you only need to look at the amperage when setting. You don't care about the voltage. It will be how much is needed for the corresponding amperage.

Wow thats awesome thank you for the note. Good thing i told you otherwise i would of killed this 340$ laser diode.
Which heat sink out of here can you recommend? How do you pick the right heatsink? (LPF didnt let me reply directly to your comment)
I really appreciate the help.
1709839624236.png


EDIT: Nevermind. I have chosen the one shown on screen that you recommended for its decent size. Ill definatly be adding the fan that you recommended too along with the indium foil for garantied heat transfer to the radiator.
Thank you very much for your assistance.
 
Last edited:

Borislav@87

Active member
Joined
Mar 20, 2022
Messages
355
Points
43
Please see what I wrote below. I have uploaded a picture of my radiator. He is bigger. See the photos above.


Top