rog8811
0
- Joined
- Jul 24, 2007
- Messages
- 2,749
- Points
- 0
I had thought of leaving the tutorial until the pointer is finished but I am aware that the the christmas holidays are upon us and other LPF members may be able to find the time to have a go. Enjoy!
Hand held 7 colour laser
Using inexpensive and easy to get parts, build a 7 colour, including of course white, hand held laser.
The following parts will be enough to build a “bare” 7 selectable colour laser, it is up to you to make the housing of your choice. This could easily be built into a project box but I wanted a hand held pointer.")
Basic parts list
2 off Aixiz modules
http://www.dealextreme.com/details.dx/sku.5914
1 off “Standstone11” 5mw green module
http://www.o-like.com/b2b_cpinfo.asp?id=839
1 off “SenKat” red laser diode (fit into Aixiz module)
http://stonetek.org/shop/index.php?main_page=index&cPath=65&zenid=1fbee4eaf3f879a42b204d666a1760bc
1 off PHR 803T sled (fit Blu ray LD into Aixiz module)
Look at group buys
1 off PS3 sled
Look at group buys
1 off Non working DX 5mw green module
We all have them
Additional parts used in this build
3 off Lathe turned adaptors
If you have a lathe no problem if not … you need to improvise.
1 off Rkcstr drive (for the blu ray)
http://www.laserpointerforums.com/forums/YaBB.pl?num=1206947255
1 off DDL LM317 drive (for the red)
http://www.laserpointerforums.com/forums/YaBB.pl?num=1197651171
3 off RCR123A rechargeable batteries
http://www.dealextreme.com/details.dx/sku.11386
Switch gear
1 off 6 position 2 pole rotary switch
1 off DPDT switch (spring on-centre off-spring on)
(This is just one way of doing it, you could use 3 off push buttons)
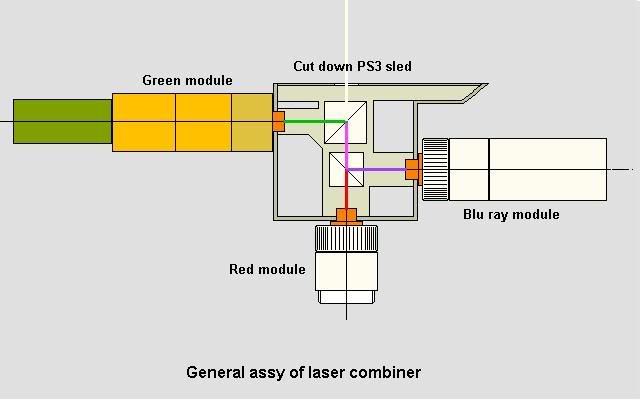
Modding the PS3 sled
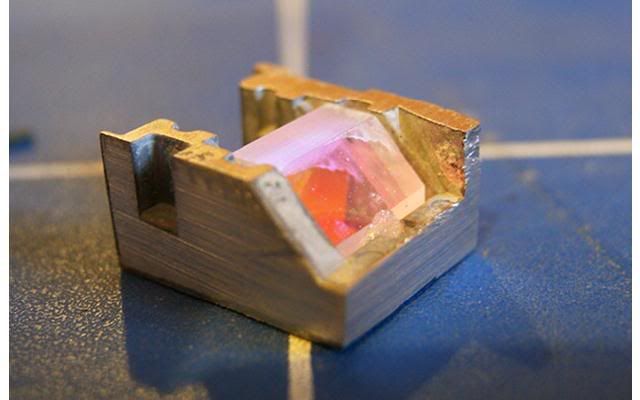
You will need to remove all of the optics EXCEPT the 2 splitter cubes
And the 90 degree prism (remove all the bits marked in red)
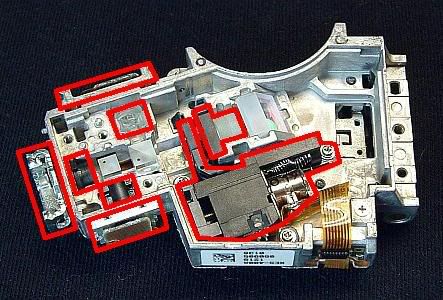
The three holes circled in red below need to be drilled out to 5.0mm dia.
Saw the beam splitter section off, cut along the green line.
Cut out the prism holder marked in purple.
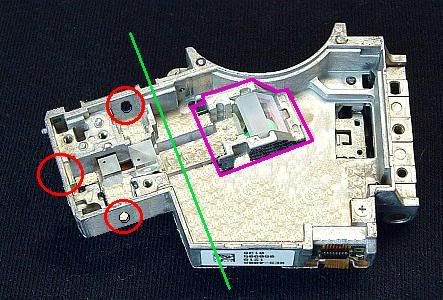
It is best to put the small cover plate back on over the beam splitters to keep them clean (not shown).
Mods to Aixiz modules
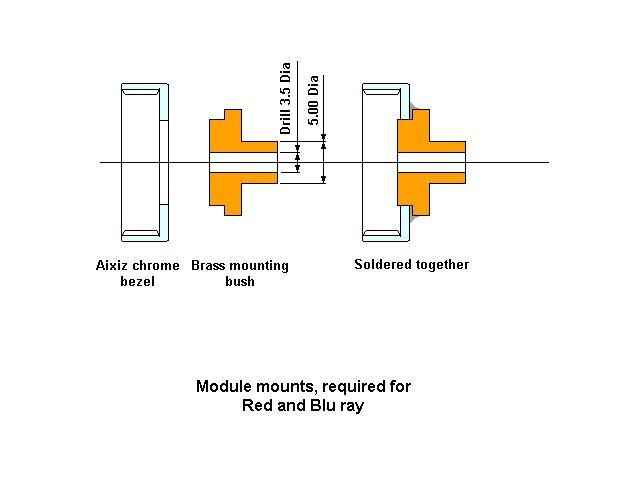
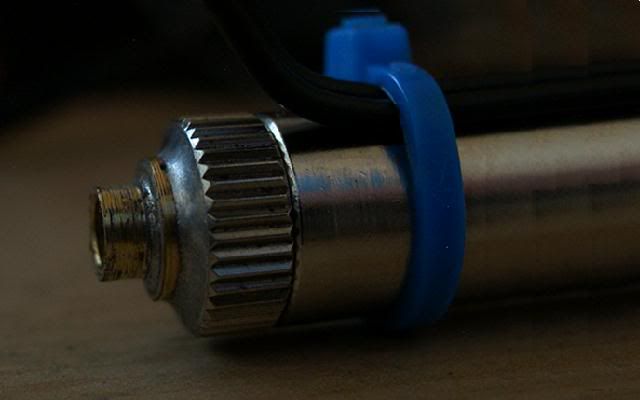
The modules need to be the type with the removable chrome bezel on the lens nut!
To keep the optics straight the module needs to be attached to the cut down sled using the bezel, brass adaptors need to be made that are 5mm at one end and the size of the hole in the bezel the other with a larger diameter in between. Once the adaptors are made the front face of the bezel needs to be sanded to remove the chrome plating so that the parts can be soldered together, see drawing below.
When you assemble the modules the bezel needs to be screwed tight up to the front half of the module (metal to metal, no plastic lens nut showing) at exactly the focus point, this is quite easy for the blue, it is just a case of getting the lens the right distance into the bezel.
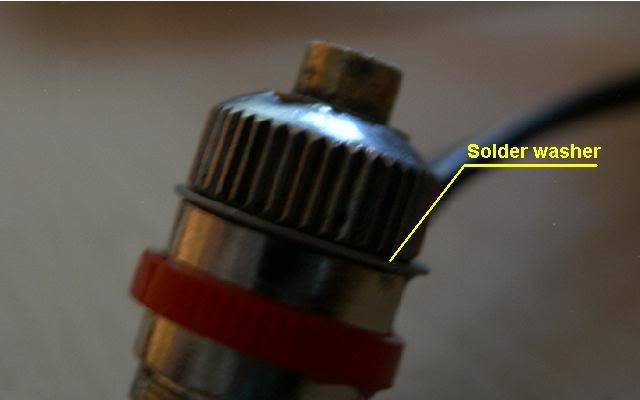
The red will need a thin washer to take up the gap, I used a ring of solder squashed to the right thickness in a vice to get it right.
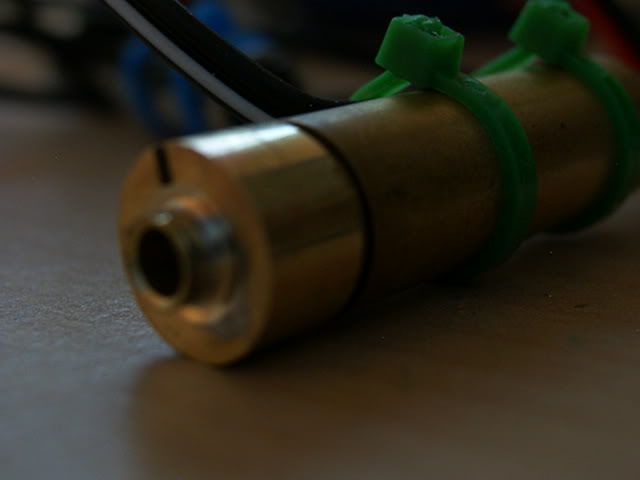
The best green module for the job is the type sold by “standstone11” (Susie) it has a large internal thread at the front, the main part of the adaptor is made from the back part of a DX green module which, amazingly, has the same thread!
Another small brass sleeve needs to be machined up to fit as shown.
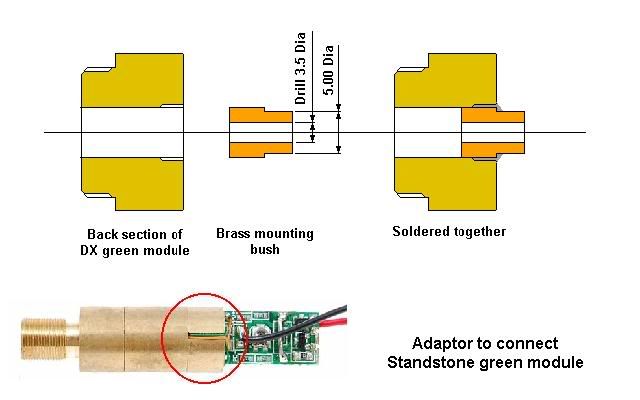
Again the adaptor needs to be screwed tightly to the green module to keep things in line, this is easy for the green as the focus is already set.
Powering it up
You may have concerns about powering this up as the modules have different polarities:-
• Green positive case
• Red negative case
• Blu ray either polarity
I suggest to keep things simple that you supply the green from one set of batteries (3.6v) and the red/blu ray from another set (7.2v). If you go this route do not connect any part of either supply to the case of the finished laser and it will work fine.
First trial assembly
Once the modules are complete and drivers have been set up you can push everything together to get an idea of how close the optics are.
The blu ray and the red modules will need to be rotated to get the best output as they are both polarised by the splitter blocks, you may need to tweak the modules to get the beams to coincide,
The green is not polarised which is useful as, like nearly every green I have ever had, the beam does not emerge straight, so you will need to rotate it to get the best match with the other beams.
The modules will need to be assembled to the sled with Araldite (or similar) whilst clamped in the correct position, spend time getting this right as once it is glued up there is little chance of adjusting it.
You should now have an assembly capable of 7 different colours!
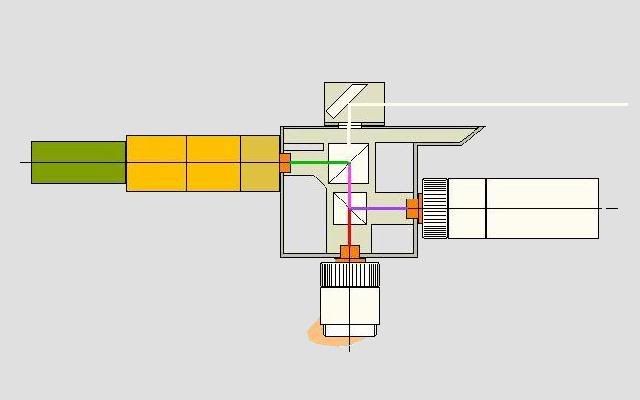
Making a pointer
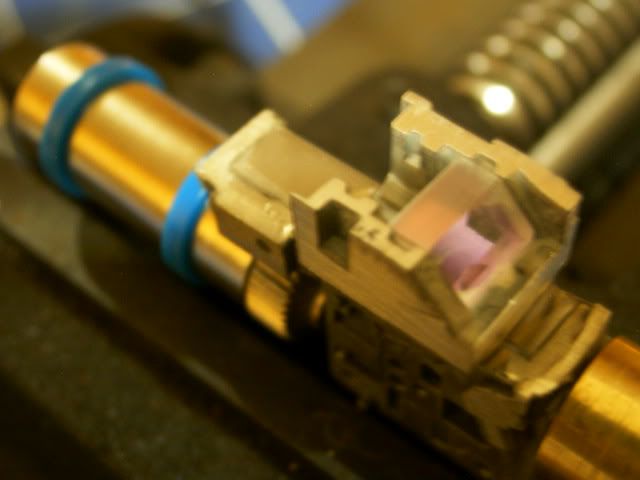
To make this into a reasonably sized hand held I needed to turn the output through 90 degrees for this I used what I have called the “prism”.
It needs to be stuck onto the optical block like this
Preparing the optical block
To get a flat surface to mount the prism block you will need to cut, drill and bend the stainless cover that came off the back of the sled. This was carefully glued in place with Araldite.
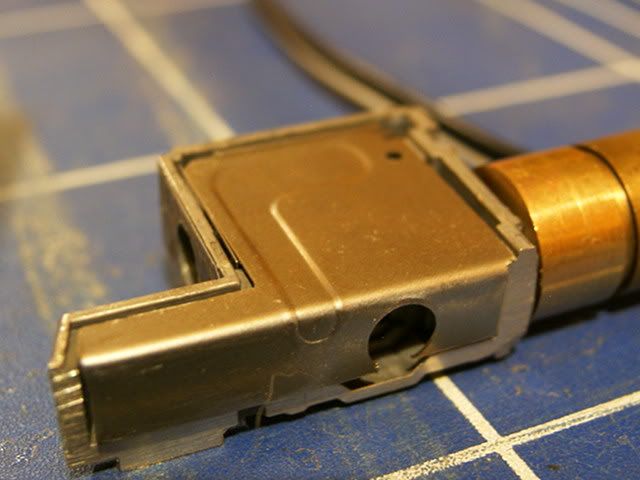
The prism was then glued in place, I wired up the LD’s temporarily to make sure that I was gluing this on straight, it is held in place with Araldite.
Once it had dried I used some more Araldite to fillet the edges to ensure a strong mounting.
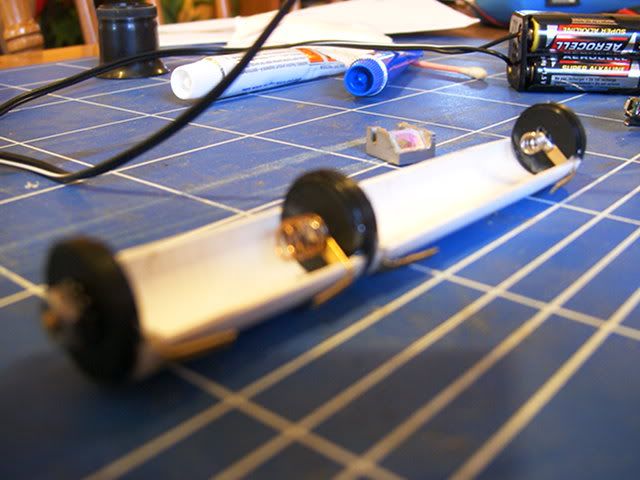
Battery holder
I decided to use 2 supplies so built a battery holder for 2off RCR123A and 1off CR123A, it is made from a piece of plastic tube cut down the middle.
Spacers were cut from plastic scrap
Contacts were odd bits of brass sheet
1 spring came from the green module
The other was just knocking around
The whole lot was assembled with superglue and Araldite.
With batteries in place
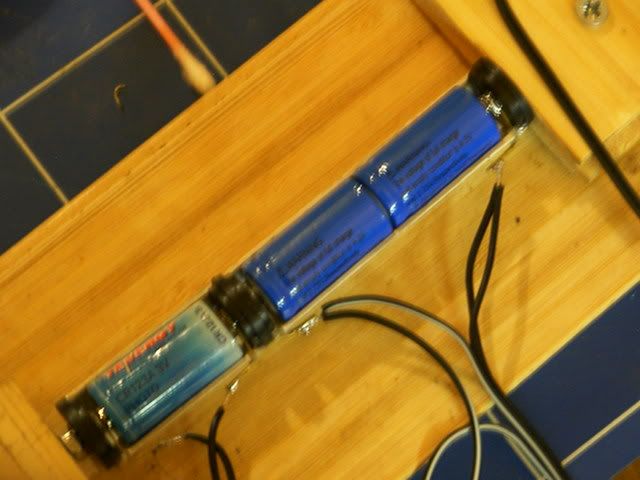
It is worth making the battery holder at an early stage as you will want a relialbe way of powering the LD's when setting them up.
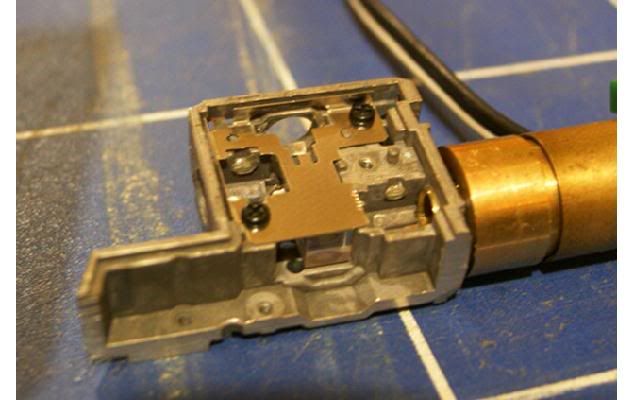
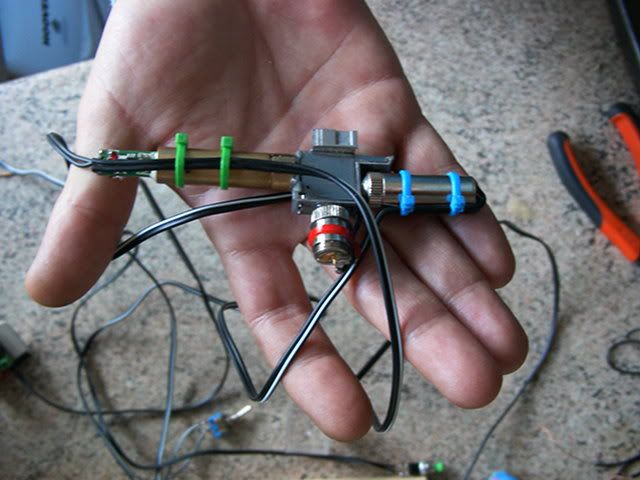
This is what the completed optics assembly looks like
That is it for the moment Regards rog8811
Hand held 7 colour laser
Using inexpensive and easy to get parts, build a 7 colour, including of course white, hand held laser.
The following parts will be enough to build a “bare” 7 selectable colour laser, it is up to you to make the housing of your choice. This could easily be built into a project box but I wanted a hand held pointer.
Basic parts list
2 off Aixiz modules
http://www.dealextreme.com/details.dx/sku.5914
1 off “Standstone11” 5mw green module
http://www.o-like.com/b2b_cpinfo.asp?id=839
1 off “SenKat” red laser diode (fit into Aixiz module)
http://stonetek.org/shop/index.php?main_page=index&cPath=65&zenid=1fbee4eaf3f879a42b204d666a1760bc
1 off PHR 803T sled (fit Blu ray LD into Aixiz module)
Look at group buys
1 off PS3 sled
Look at group buys
1 off Non working DX 5mw green module
We all have them
Additional parts used in this build
3 off Lathe turned adaptors
If you have a lathe no problem if not … you need to improvise.
1 off Rkcstr drive (for the blu ray)
http://www.laserpointerforums.com/forums/YaBB.pl?num=1206947255
1 off DDL LM317 drive (for the red)
http://www.laserpointerforums.com/forums/YaBB.pl?num=1197651171
3 off RCR123A rechargeable batteries
http://www.dealextreme.com/details.dx/sku.11386
Switch gear
1 off 6 position 2 pole rotary switch
1 off DPDT switch (spring on-centre off-spring on)
(This is just one way of doing it, you could use 3 off push buttons)
Modding the PS3 sled
You will need to remove all of the optics EXCEPT the 2 splitter cubes
And the 90 degree prism (remove all the bits marked in red)
The three holes circled in red below need to be drilled out to 5.0mm dia.
Saw the beam splitter section off, cut along the green line.
Cut out the prism holder marked in purple.
It is best to put the small cover plate back on over the beam splitters to keep them clean (not shown).
Mods to Aixiz modules
The modules need to be the type with the removable chrome bezel on the lens nut!
To keep the optics straight the module needs to be attached to the cut down sled using the bezel, brass adaptors need to be made that are 5mm at one end and the size of the hole in the bezel the other with a larger diameter in between. Once the adaptors are made the front face of the bezel needs to be sanded to remove the chrome plating so that the parts can be soldered together, see drawing below.
When you assemble the modules the bezel needs to be screwed tight up to the front half of the module (metal to metal, no plastic lens nut showing) at exactly the focus point, this is quite easy for the blue, it is just a case of getting the lens the right distance into the bezel.
The red will need a thin washer to take up the gap, I used a ring of solder squashed to the right thickness in a vice to get it right.
The best green module for the job is the type sold by “standstone11” (Susie) it has a large internal thread at the front, the main part of the adaptor is made from the back part of a DX green module which, amazingly, has the same thread!
Another small brass sleeve needs to be machined up to fit as shown.
Again the adaptor needs to be screwed tightly to the green module to keep things in line, this is easy for the green as the focus is already set.
Powering it up
You may have concerns about powering this up as the modules have different polarities:-
• Green positive case
• Red negative case
• Blu ray either polarity
I suggest to keep things simple that you supply the green from one set of batteries (3.6v) and the red/blu ray from another set (7.2v). If you go this route do not connect any part of either supply to the case of the finished laser and it will work fine.
First trial assembly
Once the modules are complete and drivers have been set up you can push everything together to get an idea of how close the optics are.
The blu ray and the red modules will need to be rotated to get the best output as they are both polarised by the splitter blocks, you may need to tweak the modules to get the beams to coincide,
The green is not polarised which is useful as, like nearly every green I have ever had, the beam does not emerge straight, so you will need to rotate it to get the best match with the other beams.
The modules will need to be assembled to the sled with Araldite (or similar) whilst clamped in the correct position, spend time getting this right as once it is glued up there is little chance of adjusting it.
You should now have an assembly capable of 7 different colours!
Making a pointer
To make this into a reasonably sized hand held I needed to turn the output through 90 degrees for this I used what I have called the “prism”.
It needs to be stuck onto the optical block like this
Preparing the optical block
To get a flat surface to mount the prism block you will need to cut, drill and bend the stainless cover that came off the back of the sled. This was carefully glued in place with Araldite.
The prism was then glued in place, I wired up the LD’s temporarily to make sure that I was gluing this on straight, it is held in place with Araldite.
Once it had dried I used some more Araldite to fillet the edges to ensure a strong mounting.
Battery holder
I decided to use 2 supplies so built a battery holder for 2off RCR123A and 1off CR123A, it is made from a piece of plastic tube cut down the middle.
Spacers were cut from plastic scrap
Contacts were odd bits of brass sheet
1 spring came from the green module
The other was just knocking around
The whole lot was assembled with superglue and Araldite.
With batteries in place
It is worth making the battery holder at an early stage as you will want a relialbe way of powering the LD's when setting them up.
This is what the completed optics assembly looks like
That is it for the moment Regards rog8811