Welcome to Laser Pointer Forums - discuss green laser pointers, blue laser pointers, and all types of lasers

LPF Donation via Stripe | LPF Donation - Other Methods

Links below open in new window

ArcticMyst Security by Avery

Some Pics of my new Dorcy Jr Build

Joined
Dec 8, 2008
Messages
196
Points
0
Here it is (sorry there in a scroll box don't know why that happened) :D
DSC01319-1.jpg

DSC01323.jpg

DSC01338.jpg

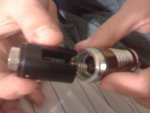
And here is the breakdown of the build this might help some people.
DSC01342.jpg

DSC01326.jpg

DSC01327.jpg

And here are some of the beam shots and night shots and the squiggly ones are long exposure
DSC01462.jpg

DSC01463.jpg

DSC01468.jpg

DSC01469.jpg

DSC01464.jpg

DSC01365.jpg


Tell me what you think
Thanks'
Justin


Joined
Aug 30, 2008
Messages
6,891
Points
83
nice :)

does the spring on the driver touch directly against the battery? if so, with how much force? thats scares me.

makes me wonder if it was too much force, would it bend the spring's solder points or the diode leads first?

but i have never made a build from a dorcy so i've no clue how it all works together.
 
Joined
Dec 8, 2008
Messages
196
Points
0
Yes the spring does contact the positive terminal of the battery directly, but not with much force. I had a hell of a time getting the spring the right length.

Suprisingly the leads on the diode are pretty strong. I thought the diode was dead so I pushed it out with a empty 22 then hooked it up when I had it out and it worked fine. So then I got mad and had to press it back into the module with the driver attached. Needless to say there was alot of pulling and pushing on the drover and the diode and the leads heald strong, which suprised me.

hope this helps,
Justin
 
Joined
Nov 22, 2008
Messages
1,506
Points
48
Hi, how easy is it to attach the diode to the driver? I am soon going to be building a Dorcy Jr. red laser, and I've broken diodes before due to heat. Any advice? I'm guessing you just pre-tin it and work quickly with plenty of solder, but do you have any tips or tricks?
 
Joined
Aug 30, 2008
Messages
6,891
Points
83
charlie bruce said:
Hi, how easy is it to attach the diode to the driver? I am soon going to be building a Dorcy Jr. red laser, and I've broken diodes before due to heat. Any advice? I'm guessing you just pre-tin it and work quickly with plenty of solder, but do you have any tips or tricks?

make sure the pads and the leads are pre tinned, then have a little bit of solder paste flux on the pads

the solder should flow nicely with the flux on it.
 
Joined
Nov 24, 2007
Messages
2,735
Points
0
charlie bruce said:
Hi, how easy is it to attach the diode to the driver? I am soon going to be building a Dorcy Jr. red laser, and I've broken diodes before due to heat. Any advice? I'm guessing you just pre-tin it and work quickly with plenty of solder, but do you have any tips or tricks?
It's really freakin' easy if you have soldering experience.

Don't sweat it ;)
 

Danjoo

0
Joined
Sep 18, 2008
Messages
202
Points
0
Small remark,

I think some hotglue to stabilize tho board to the diode will give this laser a longer lifetime.

Daniel
 
Joined
Mar 20, 2008
Messages
1,341
Points
0
Danjoo said:
Small remark,

I think some hotglue to stabilize tho board to the diode will give this laser a longer lifetime.

Daniel

It would be hard to replace the diode...
 
Joined
Nov 24, 2007
Messages
2,735
Points
0
Danjoo said:
Small remark,

I think some hotglue to stabilize tho board to the diode will give this laser a longer lifetime.

Daniel
I don't recomend using hot glue.
Use some quick set epoxy.
 
Joined
Nov 22, 2008
Messages
1,506
Points
48
Thanks for the advice Spyderz and Mohrenburg, I'm hoping flux-core solder will be enough, (if not I'm going to cut it open and scrape out the flux), I have several years of soldering experience and recently got a nice power-controlled low wattage iron.

I broke 1 or 2 diodes in the past from heat, but I would be inclined to blame the soldering iron - i lost the original screw, and it had corroded so badly I had to pull the tip out with hefty pliers. Where is the best place (UK) to get quick-set epoxy? I'm guessing home-depot type places would have it...
 
Joined
Nov 24, 2007
Messages
2,735
Points
0
charlie bruce said:
Thanks for the advice Spyderz and Mohrenburg, I'm hoping flux-core solder will be enough, (if not I'm going to cut it open and scrape out the flux), I have several years of soldering experience and recently got a nice power-controlled low wattage iron.

I broke 1 or 2 diodes in the past from heat, but I would be inclined to blame the soldering iron - i lost the original screw, and it had corroded so badly I had to pull the tip out with hefty pliers. Where is the best place (UK) to get quick-set epoxy? I'm guessing home-depot type places would have it...
I use a 15 watt soldering iron, and solder with quick dabs, and it gets soldered fine.
Yes, Home Depot has it...
 
Joined
Dec 8, 2008
Messages
196
Points
0
Yeah soldering is not that hard once you know how it going to act just do it quick, don't have the iron the diode for longer than 3 seconds tops! And tin or flux the tips before hand and let the diode cool all the way before you put the iron back to it.
 
Joined
Nov 22, 2008
Messages
1,506
Points
48
I was just re reading this thread and after receiving my Dorcy, I saw that the spring does not actually contact the battery as iknitsteel said. There's a second board in the "body" that the spring touches, so there's less wear and tear every time you replace the batteries. That was one of my fears with the build, and I've already fallen in love with it, even before putting the diode inside! That emitter is the brightest thing I've seen in a long time (This is the UK so we don't have real sunlight for about 11 months of the year ;) )
 

daguin

0
Joined
Mar 29, 2008
Messages
15,989
Points
113
charlie bruce said:
I was just re reading this thread and after receiving my Dorcy, I saw that the spring does not actually contact the battery as iknitsteel said. There's a second board in the "body" that the spring touches, so there's less wear and tear every time you replace the batteries. That was one of my fears with the build, and I've already fallen in love with it, even before putting the diode inside! That emitter is the brightest thing I've seen in a long time (This is the UK so we don't have real sunlight for about 11 months of the year  ;) )

That second "board" is the original driver for the flashlight.  It should be removed. The black plastic "positioner/insulator" should be placed back into the host. If you want to use the second "board" as the contact point, then you should remove the electronics from it so that it does not interfere with your laser's driver.

Peace,
dave
 
Joined
Dec 8, 2008
Messages
196
Points
0
charlie bruce said:
I was just re reading this thread and after receiving my Dorcy, I saw that the spring does not actually contact the battery as iknitsteel said. There's a second board in the "body" that the spring touches, so there's less wear and tear every time you replace the batteries. That was one of my fears with the build, and I've already fallen in love with it, even before putting the diode inside! That emitter is the brightest thing I've seen in a long time (This is the UK so we don't have real sunlight for about 11 months of the year  ;) )

The spring in my build does touch the battery I removed all the electronics.  That board at the top of the battery is the original driver for the 1 watt LED that is in the Dorcy.  There are several variations for the Dorcy "Jr" build, you can use the stock driver that comes with the flashlight with a resister, but I don't recommend this because the original driver can have a voltage spike that might fry the diode, or you can use a different driver but this requires you to remove the stock LED driver that is in the flashlight.

In my build I removed all the electronics and the black spacer/insulator to allow room for the spring that I used to contact the positive terminal of the battery, also I used a full body heat sink made by Dark_Horse to hold the Aixiz module, which has the diode and the driver attached. I am using a Dr. Lava Flex drive which is a stable boost driver unlike the stock Dorcy driver.
 
Joined
Dec 8, 2008
Messages
196
Points
0
here is a picture

sorry for the bad quality

As you can clearly see (since the picture is so big) the spring will touch the battery when fully assembled, the spring is the positive and the heat sink and the flashlight body itself is the negative.
 

Attachments

  • IMG_0230.jpg
    IMG_0230.jpg
    381.8 KB · Views: 87


Top