Welcome to Laser Pointer Forums - discuss green laser pointers, blue laser pointers, and all types of lasers

LPF Donation via Stripe | LPF Donation - Other Methods

Links below open in new window

ArcticMyst Security by Avery

PHR- 803T 405nm stainless steel pen build

Joined
May 7, 2016
Messages
139
Points
28
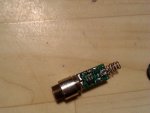
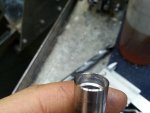
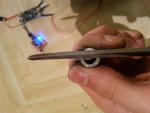
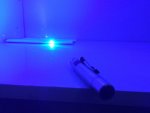
I made a new laser, this one is for BobMC, i hope he will enjoy it! Its a stainless steel pen laser with a phr-803T diode in there set at 100mA. It is powerful enough to ignite fireworks fuse trough coated double pane glass and a car window. The fluorescence is bright and i could see the beam at night without fog.

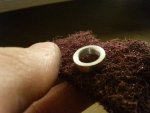
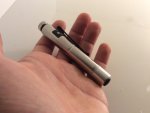
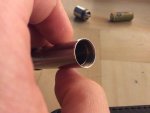
The nice thing about this laser is that it feels solid and awesome. The stainless steel is austenitic (the quality stuff) and strong. Its also water resistant, meaning no water could enter the optics and electronics. It feels heavy too which makes it solid. Its powered from a 10280 battery and you could carry this thing everywhere due to its size.

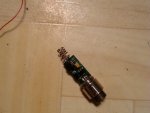
The laser is case negative for corrosion prevention and its reverse polarity protected. Its shock resistant too. This tank ain't gonna break from drops.
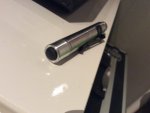
I dropped my laser once on a edge of a solid steel block. That hit was awful to the ears, all damage that was done was a dent smaller then 1/5 of a millimeter, you couldn't see it unless you are looking for it. Thats how strong this host is. It probably did more damage to that steel block. And no the diode window wouldn't loosen from that, diodes are structurally strong.

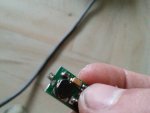
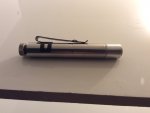
The clip could be removed to and the tailcap is a self made aluminum reverse click. I will post pictures of that soon! Overall an awesome complex little build :)
 

Attachments

  • IMG_1679.JPG
    IMG_1679.JPG
    80.1 KB · Views: 112
  • IMG_1680.JPG
    IMG_1680.JPG
    76.8 KB · Views: 122
  • IMG_1681.JPG
    IMG_1681.JPG
    128 KB · Views: 106
  • IMG_1682.JPG
    IMG_1682.JPG
    96.4 KB · Views: 101
  • IMG_1678.JPG
    IMG_1678.JPG
    64 KB · Views: 134
  • IMG_1716.JPG
    IMG_1716.JPG
    86.6 KB · Views: 95
Last edited:


Joined
May 7, 2016
Messages
139
Points
28
This is the electronics. Note, i had to jump the spring to the positive lane in order to make it case negative. I also used insulation tape to make the PCB sit tight in there so it wouldn't move around at all. Later i added hot glue to the diode pins and module to make it stronger and seal it. Also, i used PTFE tape to seal the aixiz module. I drilled 9mm to the back of the module tube so the spring could go trough, and the edge it pressing the driver against the module so this driver and solder connections can't break at all
 

Attachments

  • IMG_1713.JPG
    IMG_1713.JPG
    116 KB · Views: 91
  • IMG_1714.JPG
    IMG_1714.JPG
    107.1 KB · Views: 83
  • IMG_1711.JPG
    IMG_1711.JPG
    112.8 KB · Views: 91
  • IMG_1710.JPG
    IMG_1710.JPG
    120.7 KB · Views: 93
  • IMG_1709.JPG
    IMG_1709.JPG
    113.7 KB · Views: 83
Joined
May 7, 2016
Messages
139
Points
28
Machining the host on the lathe. It tuned out great. Austenitic stainless steel, non magnetic version
 

Attachments

  • IMG_1707.JPG
    IMG_1707.JPG
    201.4 KB · Views: 98
  • IMG_1708.JPG
    IMG_1708.JPG
    157.6 KB · Views: 91
  • IMG_9942.JPG
    IMG_9942.JPG
    115.9 KB · Views: 82
Joined
May 7, 2016
Messages
139
Points
28
The aluminum tailcap ring. I grinded it, filed it to size and polished it up. I pressed this in the tailcap slightly and sealed it off. The tailcap push rubber fits tight inside the hole whereas it would seal. No water can go trough this. It looks awesome.
 

Attachments

  • IMG_1702.JPG
    IMG_1702.JPG
    114.4 KB · Views: 90
  • IMG_1705.JPG
    IMG_1705.JPG
    117.1 KB · Views: 81
  • IMG_9939.JPG
    IMG_9939.JPG
    136.8 KB · Views: 99
  • IMG_1704.JPG
    IMG_1704.JPG
    128.1 KB · Views: 89

Sta

0
Joined
Jan 27, 2014
Messages
1,737
Points
83
PHR... Well that's a name I haven't heard in a long time!

Impressive build! :D
 

BobMc

0
Joined
Apr 23, 2016
Messages
3,685
Points
113
She's done, and a beauty she is. Man that's a whole lot of real intricate work you've done. Wow, simply awesome! I appreciate all the time/work/skill you put into this build. She will make a great EDC a tiny little pocket laser/burner. Will be something great to show off. Bet it's going to be a real "crowd pleaser". Love these tiny builds like this, thanks again for undertaking such a tiny/tough and gorgeous build! She's going to a good home and will be well taken care of. :gj: and :thanks:
 
Joined
May 7, 2016
Messages
139
Points
28
She's done, and a beauty she is. Man that's a whole lot of real intricate work you've done. Wow, simply awesome! I appreciate all the time/work/skill you put into this build. She will make a great EDC a tiny little pocket laser/burner. Will be something great to show off. Bet it's going to be a real "crowd pleaser". Love these tiny builds like this, thanks again for undertaking such a tiny/tough and gorgeous build! She's going to a good home and will be well taken care of. :gj: and :thanks:

Hi, thanks. No problem! I enjoyed building this laser. It took a long time, since end october. But time pay's. It looks awesome. Definitely something unique. Especially with the materials used!

I hope you would enjoy this laser:)
 

BobMc

0
Joined
Apr 23, 2016
Messages
3,685
Points
113
Hi, thanks. No problem! I enjoyed building this laser. It took a long time, since end october. But time pay's. It looks awesome. Definitely something unique. Especially with the materials used!

I hope you would enjoy this laser:)

Oh, I'm quite sure I'm gonna! Thanks again, she's sure is a beauty!


Top