- Joined
- Nov 2, 2012
- Messages
- 626
- Points
- 43
SD-Laser "301" and "303" host breakdown.
Update - 7/1/2014
I started this thread just over a year ago after a long, frustrating, and ultimately futile search for technical information concerning the Laser 301, 303, and similar laser pointers. Reading over it now, I can see that the information is very sparse and that it leaves much to be desired. Over the next few days I will be correcting that.
Expect new photos, a much more thorough host breakdown, comparison and contrasting of host variants, and general information such as thread sizes and whatnot.
Introduction: Laser "301" and "303"
If you're interested in lasers, you can't get very far into the hobby before you encounter the "301" and "303" handheld lasers. These lasers seem to be everywhere. Ebay searches involving "laser" will turn them up by the dozen, and they're sold on scores, if not hundreds of websites specializing in cheap Chinese exports. The 301 and 303 are a common sight at music festivals, block parties, and other large outdoor events as well, due to their brightness, ease of use, and low cost.
Despite being easy and fun to use, the 301/303 lasers do have frequent quality control issues and are often derided as junk by experienced builders.
I have to wonder, also, if LPF as we know it would even exist without the 301. For a lot of now-established members, myself included, the 301 was the first laser (or one of the first) that we ever owned; its low cost made the laser hobby accessible to us when it otherwise would not have been. At least a few of those members have advanced to become experts in the hobby - builders, machinists, artists.
But even though the 301 and 303 are probably the most common handheld lasers in the world, almost no information about them is publicly available. Technical info about the lasers and hosts, manufacturer info... I've spent hundreds of hours looking for it, and have found very little. I'm not the only one who is curious - we get questions about the 301/303 posted here on LPF all the time, and it's always the same questions... what lens do I need, how do I correct the focus, can I replace the diode/dpss module if it dies, etc.
Everything after this point still needs to be updated.
EDIT 6/5/14: The laser below is a 532nm DPSS laser. That is why the module looks as it does; if your 301 is just a diode laser (i.e. not DPSS) then the internals will look similar, except you will see the laser diode rather than the pre-expander lens that you see below. Direct diode lasers also have slightly different dimensions for the focusing barrel, but the general layout is the same. The host is still a PITA to work on in any case.")
I couldn't find an explicit breakdown diagram for the 301's, but they are pretty common, so I decided to make my own. Hopefully the info will be helpful!
HOST BREAKDOWN:
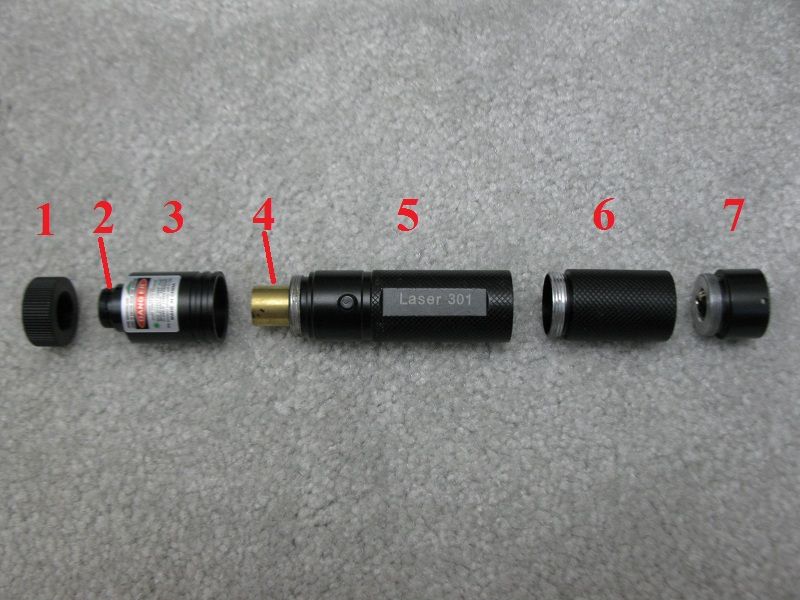
1 - Crown, a.k.a. focusing knob.
2 - Focus barrel. The lens barrel screws into this part. The focus barrel can be unscrewed from (3) but don't bother unless you need to replace the lens. It's easy to get this part cross-threaded when re-installing it, so be careful about that.
3 - Front end outer casing
4 - Laser module. This one is DPSS but direct diodes can look similar.
5 - Main host body. The laser module is press-fit into this part. The driver is located beneath the button.
6 - Battery compartment extender. With extender in place, the laser fits one 18650 cell. With extender removed, one 16340.
7 - Tailcap and key switch. The switch may be threaded or press-fit into the tailcap.
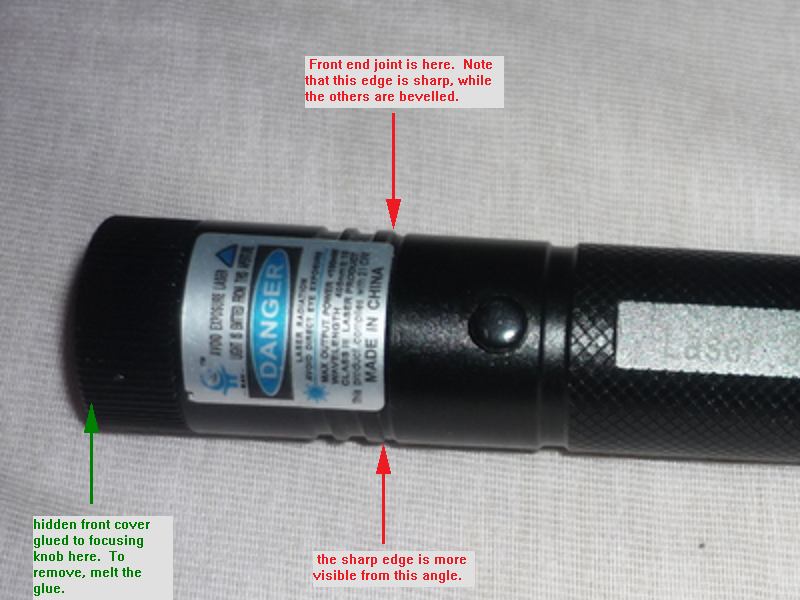
Unscrewing (3) from (5) can be a hassle. They are screwed together very tightly, and usually there is glue/thread locker. I resorted to using channel locks to get them apart. I needed two pairs, one to grip the host body (5) and the other to rotate the front end (3). This did leave tool marks, but they aren't bad. You do need to grip the tools TIGHTLY because the anodizing is very slick. If you don't grip them tight, the tools will slide and tear up the anodizing. I will say that even with tools it did take a fair amount of force to break the parts loose. After you open the laser the first time, subsequent openings will generally be easier unless you re-glue the threads.
I tried using a strap wrench in place of channel locks; it didn't work. The host was too small and too smooth for the strap to get a good grip, and the wrench just slid. I don't recommend using a pipe wrench either - they are prone to sliding before they can establish a good grip, and that would likely tear up the anodizing.
Warning: You can power up the laser with the front end (3) removed and shine it on a wall to check the cavity output. Don't look into the exposed laser cavity while the laser is on. With the front end removed, there is nothing between your eyes and the active laser apparatus. The pump diode is IR and puts out 100's of mW. The vanadate crystal will be lasing 1064nm as well, figure another ~100mW there. Your yellow safety glasses will NOT protect you from ANY of that - with IR it will be as if the safety glasses were not even there. IR-safe glasses will have an explicit statement and O.D. rating to that effect. If yours don't, then you must assume that IR will pass through with zero attenuation - please be careful!
LENS ASSEMBLY:
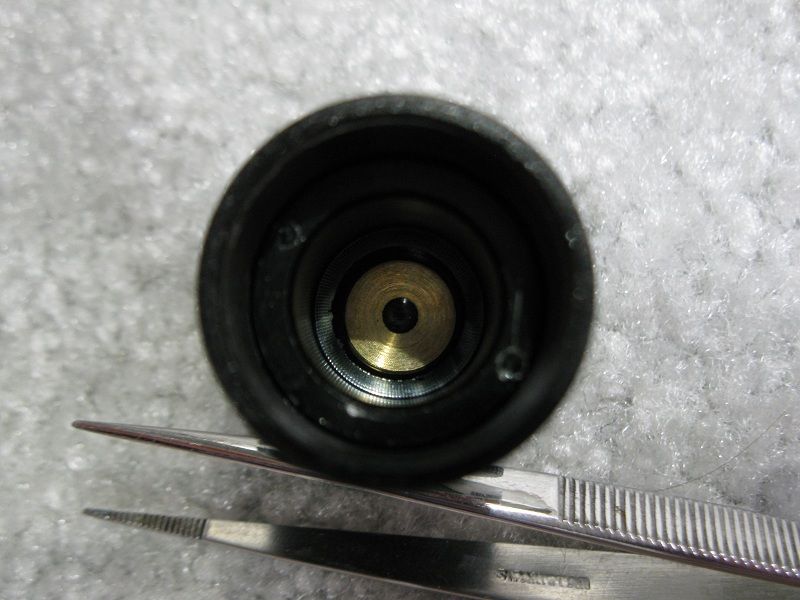
Close-up of lens barrel (2) inside lens barrel housing (3) plus the tweezers I used to adjust focus. The barrel and housing are threaded. Normally the crown and lens barrel are screwed and thread-locked together and rotate as one unit. This makes the laser focusable.
The lens is plastic and is extremely delicate. Compressed air in a can is the best way to keep it clean. Anything remotely abrasive will scratch it. If crud does get on the lens and canned air doesn't remove it, I honestly don't have any good advice for you. A botched cleaning attempt is what ruined my lens and brought about this "project" in the first place. NEVER use paper of any kind to clean the lens - doing so will ruin it. Avoid touching the lens, getting anything (grease, metal particles, dust, ANYTHING) on it, don't let your tools touch it either. Spray it often with compressed air throughout the project just to be safe.
If the focus is wrong, it can be adjusted. Focus is adjusted by loosening crown threads and rotating the lens barrel relative to the crown. The tweezers fit into the small holes and make a good "driver" for rotating the lens barrel while the crown is held stationary. This is a bit of a hassle because the crown never wants to stay put once you've found the right focus. But, with a bit of finagling you can eventually get it into the right place. Apply thread-locker to hold the crown in place.
ETA: On thinking about focusing these, if one is willing to adjust the lens carrier itself, perhaps the following would be best: Remove focus knob (1) from adjuster barrel (2), leaving the lens assembly (3) installed on main host body (5). Screw adjuster barrel into lens assembly until adjuster barrel bottoms out against host body. Adjust lens carrier to set this position as focused to infinity, or whatever else you want. Then, apply a little thread-locking compound to the lens carrier's threads. Avoid getting compound on lens. Apply compound to threads at top of adjuster barrel, and reinstall the adjustment knob. Adjustment knob should be turned down until it is firmly stopped, but don't over-tighten. Allow thread-locker to cure and, unless I'm missing something, that should be foolproof every time.
The brass lens carrier itself can also be adjusted inside the focus barrel, but don't bother. It's a hassle (glued threads), it isn't necessary, and your tools come dangerously close to the lens (high risk of ruining it!).
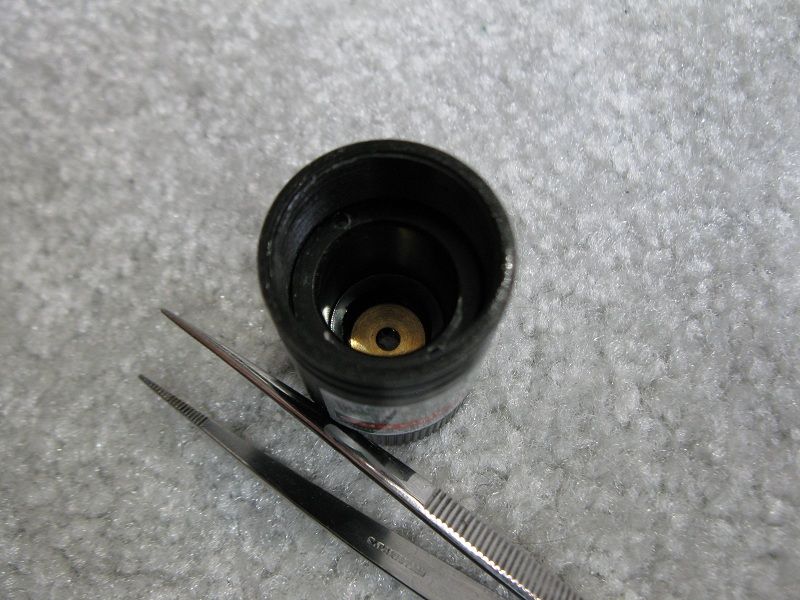
LASER MODULE:
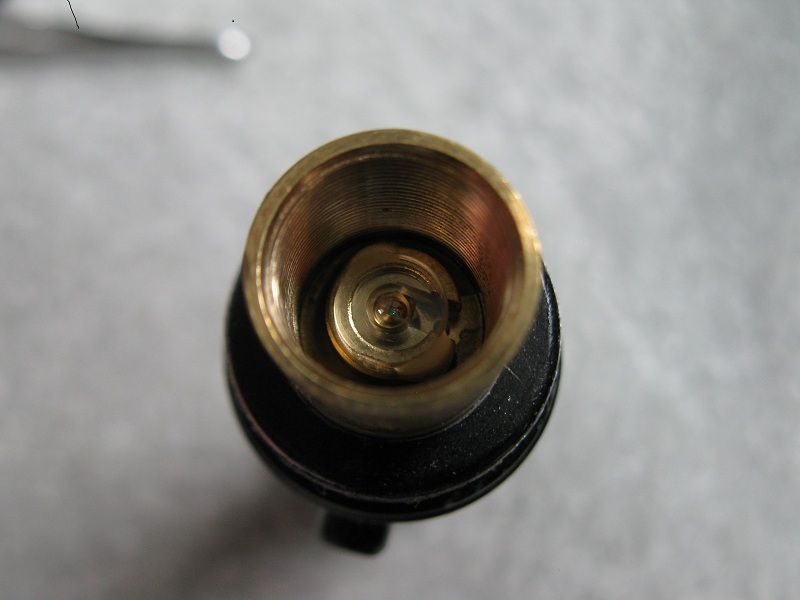
Close-up of the laser module. I'm pretty sure it's press-fitted into the host and probably glued as well. Chilling the module might make it easier to remove it. Would an Aixiz module fit in there? Laser 301's are cheap ($15 from Amazon, last I checked), maybe it would be worthwhile for experienced builders to buy them just for the hosts.
The 405nm units have a similar module, but there is only the laser diode. The diodes are small, probably 3.8mm. It would be interesting to see a 520nm direct green custom build.
Before and after pics:
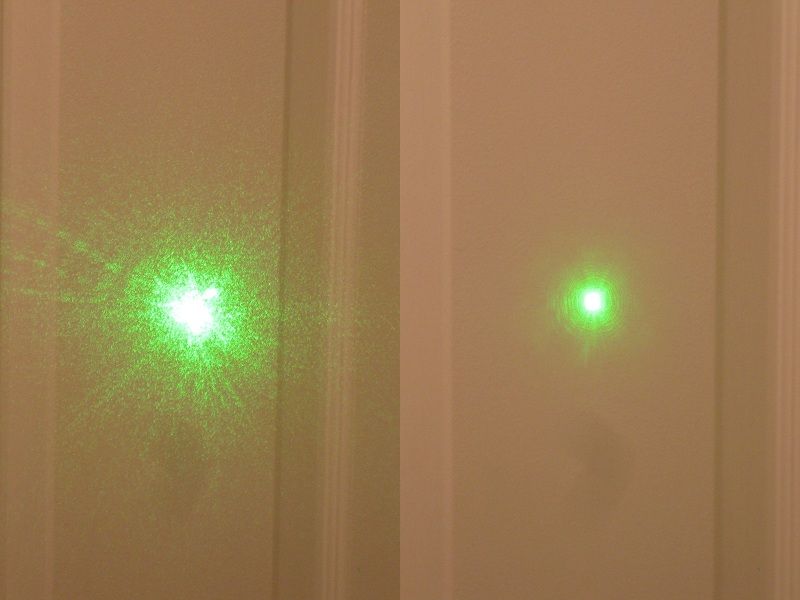
This is the good laser cavity with bad lens (left) and its shiny new good lens (right).
Update - 7/1/2014
I started this thread just over a year ago after a long, frustrating, and ultimately futile search for technical information concerning the Laser 301, 303, and similar laser pointers. Reading over it now, I can see that the information is very sparse and that it leaves much to be desired. Over the next few days I will be correcting that.
Expect new photos, a much more thorough host breakdown, comparison and contrasting of host variants, and general information such as thread sizes and whatnot.
Introduction: Laser "301" and "303"
If you're interested in lasers, you can't get very far into the hobby before you encounter the "301" and "303" handheld lasers. These lasers seem to be everywhere. Ebay searches involving "laser" will turn them up by the dozen, and they're sold on scores, if not hundreds of websites specializing in cheap Chinese exports. The 301 and 303 are a common sight at music festivals, block parties, and other large outdoor events as well, due to their brightness, ease of use, and low cost.
Despite being easy and fun to use, the 301/303 lasers do have frequent quality control issues and are often derided as junk by experienced builders.
I have to wonder, also, if LPF as we know it would even exist without the 301. For a lot of now-established members, myself included, the 301 was the first laser (or one of the first) that we ever owned; its low cost made the laser hobby accessible to us when it otherwise would not have been. At least a few of those members have advanced to become experts in the hobby - builders, machinists, artists.
But even though the 301 and 303 are probably the most common handheld lasers in the world, almost no information about them is publicly available. Technical info about the lasers and hosts, manufacturer info... I've spent hundreds of hours looking for it, and have found very little. I'm not the only one who is curious - we get questions about the 301/303 posted here on LPF all the time, and it's always the same questions... what lens do I need, how do I correct the focus, can I replace the diode/dpss module if it dies, etc.
Everything after this point still needs to be updated.
EDIT 6/5/14: The laser below is a 532nm DPSS laser. That is why the module looks as it does; if your 301 is just a diode laser (i.e. not DPSS) then the internals will look similar, except you will see the laser diode rather than the pre-expander lens that you see below. Direct diode lasers also have slightly different dimensions for the focusing barrel, but the general layout is the same. The host is still a PITA to work on in any case.
I couldn't find an explicit breakdown diagram for the 301's, but they are pretty common, so I decided to make my own. Hopefully the info will be helpful!
HOST BREAKDOWN:
1 - Crown, a.k.a. focusing knob.
2 - Focus barrel. The lens barrel screws into this part. The focus barrel can be unscrewed from (3) but don't bother unless you need to replace the lens. It's easy to get this part cross-threaded when re-installing it, so be careful about that.
3 - Front end outer casing
4 - Laser module. This one is DPSS but direct diodes can look similar.
5 - Main host body. The laser module is press-fit into this part. The driver is located beneath the button.
6 - Battery compartment extender. With extender in place, the laser fits one 18650 cell. With extender removed, one 16340.
7 - Tailcap and key switch. The switch may be threaded or press-fit into the tailcap.
Unscrewing (3) from (5) can be a hassle. They are screwed together very tightly, and usually there is glue/thread locker. I resorted to using channel locks to get them apart. I needed two pairs, one to grip the host body (5) and the other to rotate the front end (3). This did leave tool marks, but they aren't bad. You do need to grip the tools TIGHTLY because the anodizing is very slick. If you don't grip them tight, the tools will slide and tear up the anodizing. I will say that even with tools it did take a fair amount of force to break the parts loose. After you open the laser the first time, subsequent openings will generally be easier unless you re-glue the threads.
I tried using a strap wrench in place of channel locks; it didn't work. The host was too small and too smooth for the strap to get a good grip, and the wrench just slid. I don't recommend using a pipe wrench either - they are prone to sliding before they can establish a good grip, and that would likely tear up the anodizing.
Warning: You can power up the laser with the front end (3) removed and shine it on a wall to check the cavity output. Don't look into the exposed laser cavity while the laser is on. With the front end removed, there is nothing between your eyes and the active laser apparatus. The pump diode is IR and puts out 100's of mW. The vanadate crystal will be lasing 1064nm as well, figure another ~100mW there. Your yellow safety glasses will NOT protect you from ANY of that - with IR it will be as if the safety glasses were not even there. IR-safe glasses will have an explicit statement and O.D. rating to that effect. If yours don't, then you must assume that IR will pass through with zero attenuation - please be careful!
LENS ASSEMBLY:
Close-up of lens barrel (2) inside lens barrel housing (3) plus the tweezers I used to adjust focus. The barrel and housing are threaded. Normally the crown and lens barrel are screwed and thread-locked together and rotate as one unit. This makes the laser focusable.
The lens is plastic and is extremely delicate. Compressed air in a can is the best way to keep it clean. Anything remotely abrasive will scratch it. If crud does get on the lens and canned air doesn't remove it, I honestly don't have any good advice for you. A botched cleaning attempt is what ruined my lens and brought about this "project" in the first place. NEVER use paper of any kind to clean the lens - doing so will ruin it. Avoid touching the lens, getting anything (grease, metal particles, dust, ANYTHING) on it, don't let your tools touch it either. Spray it often with compressed air throughout the project just to be safe.
If the focus is wrong, it can be adjusted. Focus is adjusted by loosening crown threads and rotating the lens barrel relative to the crown. The tweezers fit into the small holes and make a good "driver" for rotating the lens barrel while the crown is held stationary. This is a bit of a hassle because the crown never wants to stay put once you've found the right focus. But, with a bit of finagling you can eventually get it into the right place. Apply thread-locker to hold the crown in place.
ETA: On thinking about focusing these, if one is willing to adjust the lens carrier itself, perhaps the following would be best: Remove focus knob (1) from adjuster barrel (2), leaving the lens assembly (3) installed on main host body (5). Screw adjuster barrel into lens assembly until adjuster barrel bottoms out against host body. Adjust lens carrier to set this position as focused to infinity, or whatever else you want. Then, apply a little thread-locking compound to the lens carrier's threads. Avoid getting compound on lens. Apply compound to threads at top of adjuster barrel, and reinstall the adjustment knob. Adjustment knob should be turned down until it is firmly stopped, but don't over-tighten. Allow thread-locker to cure and, unless I'm missing something, that should be foolproof every time.
The brass lens carrier itself can also be adjusted inside the focus barrel, but don't bother. It's a hassle (glued threads), it isn't necessary, and your tools come dangerously close to the lens (high risk of ruining it!).
LASER MODULE:
Close-up of the laser module. I'm pretty sure it's press-fitted into the host and probably glued as well. Chilling the module might make it easier to remove it. Would an Aixiz module fit in there? Laser 301's are cheap ($15 from Amazon, last I checked), maybe it would be worthwhile for experienced builders to buy them just for the hosts.
The 405nm units have a similar module, but there is only the laser diode. The diodes are small, probably 3.8mm. It would be interesting to see a 520nm direct green custom build.
Before and after pics:
This is the good laser cavity with bad lens (left) and its shiny new good lens (right).
Last edited: