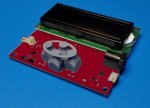
I designed a case, sensor base, and cover for my 15W Hyperion LPM.
I decided to make more and sell them.
Here are the listings on eBay if your interested in purchasing one. They offer many benefits to tidy up the LPM and make it easier to use and store the sensor.
There are 4 color combos for now.
ebay item 233452841689
ebay item 233452874935
ebay item 233452881011
ebay item 233452898919
Sorry, I cannot post direct links because I do not have 20 posts. You can just search the item number on eBay.
You will receive an assembled case as shown in the first 6 pictures of the listings. The other pictures are shown to display the final assembly once you add your Hyperion LPM board, sensor, and 9V battery (items not included).
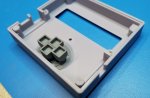
This now includes a drop over adapter for the short switches used on the older red boards! This kit will fit the white long switch boards or the short switch red boards. See the instructions link below.
The case will come assembled as shown in the first 6 pictures.
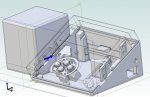
The case assembly is built using all the parts shown in the last picture.
This case assembly offers these great features:
-Allows easy replacement of your 9V battery with no screws
-Easy assembly (only 2 screws)
-Power switch so you do not have to disconnect the battery or cable each use
-An external power supply can still be used by simply disconnecting the pigtail and plugging in your external power source
-Bigger buttons to ease usage
-Protective cover for your sensor
-Easier compact storage of the LPM and sensor
-Sensor stand makes it easier to set the sensor anywhere needed.
-Easier transportation due to everything being in one case
-Higher quality hard plastic battery connector
Directions for installing your Hyperion LPM board and sensor:
dropbox.com/s/pcmg2hifhovvoim/Case%20Assembly%20Instructions%20for%20Hyperion%20Laser%20Power%20Meter%20.pdf?dl=0
The plastic items are 3D printed using a high quality 3D printer, but you will still see layer lines and the normal aspects of a 3D printed part.
If you have any questions at all, please ask before purchasing.
Thank you!


I decided to make more and sell them.
Here are the listings on eBay if your interested in purchasing one. They offer many benefits to tidy up the LPM and make it easier to use and store the sensor.
There are 4 color combos for now.
ebay item 233452841689
ebay item 233452874935
ebay item 233452881011
ebay item 233452898919
Sorry, I cannot post direct links because I do not have 20 posts. You can just search the item number on eBay.
You will receive an assembled case as shown in the first 6 pictures of the listings. The other pictures are shown to display the final assembly once you add your Hyperion LPM board, sensor, and 9V battery (items not included).
This now includes a drop over adapter for the short switches used on the older red boards! This kit will fit the white long switch boards or the short switch red boards. See the instructions link below.
The case will come assembled as shown in the first 6 pictures.
The case assembly is built using all the parts shown in the last picture.
This case assembly offers these great features:
-Allows easy replacement of your 9V battery with no screws
-Easy assembly (only 2 screws)
-Power switch so you do not have to disconnect the battery or cable each use
-An external power supply can still be used by simply disconnecting the pigtail and plugging in your external power source
-Bigger buttons to ease usage
-Protective cover for your sensor
-Easier compact storage of the LPM and sensor
-Sensor stand makes it easier to set the sensor anywhere needed.
-Easier transportation due to everything being in one case
-Higher quality hard plastic battery connector
Directions for installing your Hyperion LPM board and sensor:
- 1) Remove the two screws from the bottom with a #2 phillips screwdriver
- 2) Remove the faceplate
- 3) *Optional Step* - Drop the switch adapter over your switches if you have a red board with short switches
- 4) Drop your Hyperion LPM board into the base (Hyperion LOM board not included!)
- 5) Reinstall the face-plate of your Hyperion board making sure everything lines up
- 6) Reinstall the two #2 phillips screws. DO NOT OVER TIGHTEN.
- 7) Press the sensor base onto the two studs coming out the bottom of your sensor. The indention of the base should be installed towards your sensor to allow the wires clearance. (Sensor not included!)
- 8) Plug the sensor into the board on the left side
- 9) Set the assembled sensor base in the left pocket of the main assembly and coil the wires on the right side of the sensor in that area
- 10) Slide the sensor cover over and snap it in place. BE SURE NOT TO PINCH THE WIRES WHEN INSTALLING THE COVER OR YOU MAY DAMAGE THEM!
- 11) Install the battery by removing the battery cover. You should be able to apply a small pressure to the tab with your fingernail and pull out. Connect the battery to the battery connector. Slide the battery into the case. Reinstall the battery cover by putting the left side tab in the slot and then press it closed. The top tab should go above the battery. This keeps the battery from bouncing around and hitting the Hyperion board.
dropbox.com/s/pcmg2hifhovvoim/Case%20Assembly%20Instructions%20for%20Hyperion%20Laser%20Power%20Meter%20.pdf?dl=0
The plastic items are 3D printed using a high quality 3D printer, but you will still see layer lines and the normal aspects of a 3D printed part.
If you have any questions at all, please ask before purchasing.
Thank you!
Attachments

Last edited:


")