Unpairedelectron01
New member
- Joined
- Nov 15, 2018
- Messages
- 26
- Points
- 3
Those of you who have seen my thread Argon Ion Laser (Worth the Gamble?) will know I have been on the lookout for an argon ion laser to kick-start my gas laser collection. Through the process of purchasing and operating such a laser, I have gained experience and knowledge about some things that I wish I could have known before embarking on this quest. I want this thread to be a useful resource for those of you who want to buy and operate your very own gas laser. Sam’s FAQ is an excellent resource that provides in-depth information about the theory of Argon laser operation, but it can be a little time consuming at times to dig through all of his wisdom when you just want to get one up and running, and so this thread will address only the essentials.
Note: Most photos used in this guide are not my own, but rather taken from seller listings.
Buying a (Working) Argon Ion Laser
There are several things to consider when buying a second-hand argon laser. Obviously, you want a laser that is functional for your first argon. This can be a simple question to answer if the seller shows photos of the laser in use and guarantees that it works. However, this is the most expensive route, because it is likely the seller knows a thing or two about the value of such lasers, making it difficult to get a good deal.
It is much more likely to find sellers that have lasers/power supplies in unknown condition, claiming that they either don’t know how to test it or they don’t have the required equipment to test it. In this case, it’s a gamble as to if the laser is still good, but here are a few tips:
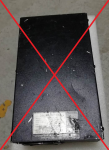
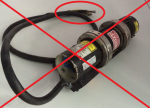
Examples of lasers and power supplies I would avoid:
Connector Types
If buying the tube and the power supply separately, then you need to pay attention to the brand to ensure they are compatible. The mains types of connectors I have seen are those by JDS Uniphase (JDSU for short) and Melles Griot. The JDSU type can be identified because it splits into two connectors, one is a square nine pin and the other a round fourteen pin, as shown below:
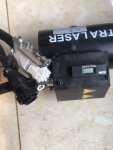

The Melles Griot system uses only one round connector:

Keep in mind that just because the connectors of a laser tube fit into the power supply doesn’t mean the power supply is suitable for running the laser, but this should at least give you a starting point when buying a matching system.
Cylindrical vs. Rectangular Form Factor
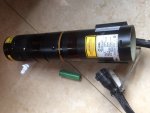
Another consideration for the type of laser you are buying is if the laser head is in a cylindrical or rectangular form factor. The cylindrical type requires additional ducting and a fan for air cooling, whilst the rectangular one has an on-board fan. The cylindrical type is advertised as being more optically stable for critical applications since the vibrations from the fan are not transmitted to the laser itself, but this shouldn’t be much of a concern in a hobbyist laser. Most cylindrical lasers do not come with a fan, so be prepared to purchase one yourself if you choose that type.

Multiline vs. Single Line
As you will see in a later section, once you have the laser on hand it is a straightforward matter to determine if it is a multiline or single line. However, how can you tell what type it is from the seller’s listing? Here are a few ways I have found useful:
Shipping and Handling
Now that you have identified and purchased a promising laser, it is important for you to contact the seller about shipping. Not all will listen to you, but you increase your chances of receiving an undamaged tube if you do. Argon ion laser heads are FRAGILE, and without proper packing it WILL break during shipment. A thick layer of bubble wrap/foam is critical, and double-boxing is a good idea. Again, the tube will not survive a drop of a few feet unless packed very well.
I got lucky with my purchase in that the seller sent me photos of how he was packing it and listened to any advice I gave him. It just so happened that the recycled outer cardboard box was labeled “Fresh Raw Eggs”, which probably didn’t hurt . To be extra safe, I had my package framed using pallet wood as well.
Remote Interface Pin-outs
The remote interface on the power supply is used to control virtually all aspects of the laser. The 25-pin connector located on the top right of the model 300 power supply is meant to be connected to a controller, but these are rarely included in second hand sales of the laser assembly. However, by understanding what each pin is for, it is possible to use jumper cables and thus control the laser manually. Many of the pins on the Melles Griot power supply share similar functions as the corresponding pins of the JDSU 20xx series supplies and other argon laser PSUs, but there are some notable differences that I had to figure out using trial and error. I have included the results of my experimentation below to hopefully help those of you who end up with a Melles Griot laser.
Turning On the Laser
Pins 1 & 3 – Beam Interlock
These two pins must be connected together for the PSU to send power to the laser. The red LED marked “Interlock” to the right of the key will turn on when this is done correctly. The same is true for any JDSU laser as well.
Pins 19 & 21 – Safety Interlock
Unlike other laser systems, the Melles Griot laser also has an additional safety interlock circuit that needs to be completed to power on the laser. Do so by connecting together pins 19 and 21.
After these two pairs are wired correctly, the key may be turned to the right, and after 30-45 seconds the laser should fire up. However, at this stage the laser will be in low power mode, and you will not be able to control the output.
Pins 4 & 12 – Standby Mode
If it is desired to run the laser as low as possible to extend tube lifetime, jumping pin 12’s +15V output to the standby input (pin 4) will set the laser to minimum output. For my laser this was around 10mw at 4A tube current. Keep in mind this overrides any current control to the tube, so if you wish to adjust the power then continue reading.
Monitoring Tube Current and Output Power
Moving forward, it will be useful to have a way to see just how much current is being sent to the laser and what the laser power is. To do so, the following three pins will be needed.
Pin 11
This is the common ground pin, and all voltages will be referenced to it. The same pin is used for such in most other laser PSUs as well.
Pin 8
This is the laser power output monitor pin. By measuring the voltage between it and pin 11, the mW output of the laser can be determined. According to the manual, the accuracy is within 5%. Every 0.1V is 1mW, so 4.2V would mean 42 mW. The same pin configuration applies for most other laser systems. *Important Note*: The power output estimate is only accurate for matching tubes and power supplies. If you are running a mix-and-match then DO NOT rely on these values to be correct.
Pin 9
This is the current monitor. By measuring the voltage between it and pin 11, the current being sent into the laser tube can be determined. Every 0.1V is 1A, so 0.65V would mean 6.5A of tube current. The same pin configuration is true for most other laser systems. *Important Note*: Just like the laser power output, the values will only be accurate for matching laser systems.
Controlling Laser Power
At this point you may want to know how you can control the current entering the laser, and hence the output power of the beam. In the middle of the power supply, there is a knob labeled “power adjust”. However, you will find that turning it doesn’t change the readings you measure from pins 8 and 9. This also confused me for the while, until I realized that the knob doesn’t control the power directly. Instead, it controls the voltage on pin 18. How this is used to control the tube current is explained below.
Pin 18
This is the potentiometer output, also known as the power adjust knob output. The voltage on this pin depends on the position of the knob, and ranges between 0 and +5Vdc. In other words, when turned all the way to the left, the voltage here is 0, and when turned all the way to the right, the voltage is 5V.
Pin 6
This is the current control pin, and it adjusts the tube current based on how much voltage it receives, with 0V being the same as standby (minimum current) up to 5V (maximum current). You can now see that by connecting pin 18 to pin 6 you will be able to adjust the power of the laser using the control knob on the power supply.
The above pin-out information should be enough for 99% of our needs as amateur laser enthusiasts. If you would like more information, please reference the attached Melles Griot Model 300 power supply manual – Attachment 1. If you end up with a JDSU laser system, check out the 2010 series operating manual here (file too big to attach).
Tip for connecting the pins:
The remote interface on the PSU has numbers indicating the pin number. However, I was fortunate enough to receive the cut off ribbon connector cable that would have been fed into the control unit. This makes it much easier to wire together specific pins, but I discovered the pins correspond to the wires in an alternating pattern. Thus, starting at the red wire and moving right, instead of being 1-2-3-4-5-6…etc, the relationship between the wires and the pins was actually 1-14-2-15-3-16-4-17-5-18-6-19-7-20-8-21-9-22-10-23-11-24-12-25-13. If you do not have this ribbon connector (most likely the case), you can connect the required pins by sticking a short piece of thin wire into the correct holes.
Tip for locating manuals, datasheets, other information:
Those who have tried will notice that the original Melles Griot website at www.mellesgriot.com has been replaced with https://www.idex-hs.com/. In fact, Melles Griot no longer makes gas lasers, and therefore it is no longer possible to find gas laser files on their website. Luckily, there is a website called The Wayback Machine, which saves copies of web pages and online files. By entering www.mellesgriot.com (or another laser company's website that no longer exists) you can find datasheets and other information that would otherwise be gone.
Determining Wavelength:
If, like me, you were unable to locate a datasheet about your specific laser, there is a simple way to see if it is single line or multiline. Get a CD or DVD, and reflect the beam off the shiny side. The tracks on the disk will form a diffraction pattern, and you will be able to clearly see all the wavelengths your laser produces. To find the actual wavelength produced, do the following:
This guide was written by a first-time gas laser owner. Those of you who are gas laser veterans please don’t hesitate to point out mistakes, oversights, or things that should be added or changed.
Thank you!
-Unpaired01
Note: Most photos used in this guide are not my own, but rather taken from seller listings.
Buying a (Working) Argon Ion Laser
There are several things to consider when buying a second-hand argon laser. Obviously, you want a laser that is functional for your first argon. This can be a simple question to answer if the seller shows photos of the laser in use and guarantees that it works. However, this is the most expensive route, because it is likely the seller knows a thing or two about the value of such lasers, making it difficult to get a good deal.
It is much more likely to find sellers that have lasers/power supplies in unknown condition, claiming that they either don’t know how to test it or they don’t have the required equipment to test it. In this case, it’s a gamble as to if the laser is still good, but here are a few tips:
- Look at the cosmetic condition of the tube. Are there any major dents in the metal casing? Does the paint look excessively worn? Is the umbilical cord cut or damaged? All of these are signs it has had a hard life and it would be best to avoid such a laser.
- Have the seller shake the laser head gently, and report if there are any rattling sounds (or any sound) coming from it. If there is, don’t buy it, as it most likely has a broken laser tube.
- If the seller can get power to the laser, ask them to tell you what the hour meter reads. In most cases this is an LCD display towards the back of the tube, and it shows how long the tube has been used for. Below 1000hrs and the tube is practically brand new, ~5000ish is typical of a second-hand tube, and over 8000 hours the tube could be reaching its end of life. The actual lifespan of a tube depends on how much current it was being run at, but the above numbers are a good rule of thumb.
Examples of lasers and power supplies I would avoid:


Connector Types
If buying the tube and the power supply separately, then you need to pay attention to the brand to ensure they are compatible. The mains types of connectors I have seen are those by JDS Uniphase (JDSU for short) and Melles Griot. The JDSU type can be identified because it splits into two connectors, one is a square nine pin and the other a round fourteen pin, as shown below:


The Melles Griot system uses only one round connector:

Keep in mind that just because the connectors of a laser tube fit into the power supply doesn’t mean the power supply is suitable for running the laser, but this should at least give you a starting point when buying a matching system.
Cylindrical vs. Rectangular Form Factor
Another consideration for the type of laser you are buying is if the laser head is in a cylindrical or rectangular form factor. The cylindrical type requires additional ducting and a fan for air cooling, whilst the rectangular one has an on-board fan. The cylindrical type is advertised as being more optically stable for critical applications since the vibrations from the fan are not transmitted to the laser itself, but this shouldn’t be much of a concern in a hobbyist laser. Most cylindrical lasers do not come with a fan, so be prepared to purchase one yourself if you choose that type.


Multiline vs. Single Line
As you will see in a later section, once you have the laser on hand it is a straightforward matter to determine if it is a multiline or single line. However, how can you tell what type it is from the seller’s listing? Here are a few ways I have found useful:
- See what the model number of the laser is, and look it up on Google. For some of the more common types of lasers you may even be able to locate its datasheet.
- Even if you can’t find the exact model online, the model number itself may provide some clues. For instance, JDSU laser serial numbers can include the letters SL or ML, standing for single line and multi-line respectively. They may also indicate the power level. As an example, a 2218-010SLCPEB is a type 2218 single line argon laser with a 10mw output. Melles Griot’s numbering system is much more confusing, and the only information I was able to obtain from my particular model number (35-IMA-830-012) is that the IMA stands for internal mirror assembly.
- Check the safety label, as it often includes a wavelength or range of wavelengths. If only one wavelength is shown, such as 488nm, then the laser is most likely single line. If the full range is shown, such as 458-515, then it could either be a single line or a multiline as manufacturers will oftentimes use the same label for all their lasers. If it shows a partial range, such as on the laser I bought (457-488nm), then it probably is a restricted multiline laser. One thing the keep in mind is that the power rating state on the label is nowhere near the true output, and is there merely to give an indication to the power class of the laser.
Shipping and Handling
Now that you have identified and purchased a promising laser, it is important for you to contact the seller about shipping. Not all will listen to you, but you increase your chances of receiving an undamaged tube if you do. Argon ion laser heads are FRAGILE, and without proper packing it WILL break during shipment. A thick layer of bubble wrap/foam is critical, and double-boxing is a good idea. Again, the tube will not survive a drop of a few feet unless packed very well.
I got lucky with my purchase in that the seller sent me photos of how he was packing it and listened to any advice I gave him. It just so happened that the recycled outer cardboard box was labeled “Fresh Raw Eggs”, which probably didn’t hurt
Remote Interface Pin-outs
The remote interface on the power supply is used to control virtually all aspects of the laser. The 25-pin connector located on the top right of the model 300 power supply is meant to be connected to a controller, but these are rarely included in second hand sales of the laser assembly. However, by understanding what each pin is for, it is possible to use jumper cables and thus control the laser manually. Many of the pins on the Melles Griot power supply share similar functions as the corresponding pins of the JDSU 20xx series supplies and other argon laser PSUs, but there are some notable differences that I had to figure out using trial and error. I have included the results of my experimentation below to hopefully help those of you who end up with a Melles Griot laser.
Turning On the Laser
Pins 1 & 3 – Beam Interlock
These two pins must be connected together for the PSU to send power to the laser. The red LED marked “Interlock” to the right of the key will turn on when this is done correctly. The same is true for any JDSU laser as well.
Pins 19 & 21 – Safety Interlock
Unlike other laser systems, the Melles Griot laser also has an additional safety interlock circuit that needs to be completed to power on the laser. Do so by connecting together pins 19 and 21.
After these two pairs are wired correctly, the key may be turned to the right, and after 30-45 seconds the laser should fire up. However, at this stage the laser will be in low power mode, and you will not be able to control the output.
Pins 4 & 12 – Standby Mode
If it is desired to run the laser as low as possible to extend tube lifetime, jumping pin 12’s +15V output to the standby input (pin 4) will set the laser to minimum output. For my laser this was around 10mw at 4A tube current. Keep in mind this overrides any current control to the tube, so if you wish to adjust the power then continue reading.
Monitoring Tube Current and Output Power
Moving forward, it will be useful to have a way to see just how much current is being sent to the laser and what the laser power is. To do so, the following three pins will be needed.
Pin 11
This is the common ground pin, and all voltages will be referenced to it. The same pin is used for such in most other laser PSUs as well.
Pin 8
This is the laser power output monitor pin. By measuring the voltage between it and pin 11, the mW output of the laser can be determined. According to the manual, the accuracy is within 5%. Every 0.1V is 1mW, so 4.2V would mean 42 mW. The same pin configuration applies for most other laser systems. *Important Note*: The power output estimate is only accurate for matching tubes and power supplies. If you are running a mix-and-match then DO NOT rely on these values to be correct.
Pin 9
This is the current monitor. By measuring the voltage between it and pin 11, the current being sent into the laser tube can be determined. Every 0.1V is 1A, so 0.65V would mean 6.5A of tube current. The same pin configuration is true for most other laser systems. *Important Note*: Just like the laser power output, the values will only be accurate for matching laser systems.
Controlling Laser Power
At this point you may want to know how you can control the current entering the laser, and hence the output power of the beam. In the middle of the power supply, there is a knob labeled “power adjust”. However, you will find that turning it doesn’t change the readings you measure from pins 8 and 9. This also confused me for the while, until I realized that the knob doesn’t control the power directly. Instead, it controls the voltage on pin 18. How this is used to control the tube current is explained below.
Pin 18
This is the potentiometer output, also known as the power adjust knob output. The voltage on this pin depends on the position of the knob, and ranges between 0 and +5Vdc. In other words, when turned all the way to the left, the voltage here is 0, and when turned all the way to the right, the voltage is 5V.
Pin 6
This is the current control pin, and it adjusts the tube current based on how much voltage it receives, with 0V being the same as standby (minimum current) up to 5V (maximum current). You can now see that by connecting pin 18 to pin 6 you will be able to adjust the power of the laser using the control knob on the power supply.
The above pin-out information should be enough for 99% of our needs as amateur laser enthusiasts. If you would like more information, please reference the attached Melles Griot Model 300 power supply manual – Attachment 1. If you end up with a JDSU laser system, check out the 2010 series operating manual here (file too big to attach).
Tip for connecting the pins:
The remote interface on the PSU has numbers indicating the pin number. However, I was fortunate enough to receive the cut off ribbon connector cable that would have been fed into the control unit. This makes it much easier to wire together specific pins, but I discovered the pins correspond to the wires in an alternating pattern. Thus, starting at the red wire and moving right, instead of being 1-2-3-4-5-6…etc, the relationship between the wires and the pins was actually 1-14-2-15-3-16-4-17-5-18-6-19-7-20-8-21-9-22-10-23-11-24-12-25-13. If you do not have this ribbon connector (most likely the case), you can connect the required pins by sticking a short piece of thin wire into the correct holes.
Tip for locating manuals, datasheets, other information:
Those who have tried will notice that the original Melles Griot website at www.mellesgriot.com has been replaced with https://www.idex-hs.com/. In fact, Melles Griot no longer makes gas lasers, and therefore it is no longer possible to find gas laser files on their website. Luckily, there is a website called The Wayback Machine, which saves copies of web pages and online files. By entering www.mellesgriot.com (or another laser company's website that no longer exists) you can find datasheets and other information that would otherwise be gone.
Determining Wavelength:
If, like me, you were unable to locate a datasheet about your specific laser, there is a simple way to see if it is single line or multiline. Get a CD or DVD, and reflect the beam off the shiny side. The tracks on the disk will form a diffraction pattern, and you will be able to clearly see all the wavelengths your laser produces. To find the actual wavelength produced, do the following:
- Make some scratches on the paint of a CD, apply duct table over the scratched area and quickly rip off the tape to remove the reflective coating.
- Set the CD parallel to a wall a known distance, and shine the laser beam perpendicular to the part with the removed coating.
- Measure the distance from central bright spot to the first secondary spot.
- Use the formula: wavelength=dsin(x), where x is the angle between the central bright dot and first secondary spot and d is the track spacing (1.6 micrometers for CD, 0.72 micrometers for DVD), to calculate the wavelength.
- Repeat with all of the other lines.
This guide was written by a first-time gas laser owner. Those of you who are gas laser veterans please don’t hesitate to point out mistakes, oversights, or things that should be added or changed.
Thank you!
-Unpaired01
Attachments
Last edited:


