Welcome to Laser Pointer Forums - discuss green laser pointers, blue laser pointers, and all types of lasers

LPF Donation via Stripe | LPF Donation - Other Methods

Links below open in new window

ArcticMyst Security by Avery

Need help with disassembly

maggot

0
Joined
Dec 27, 2013
Messages
6
Points
0
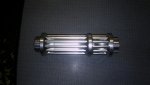
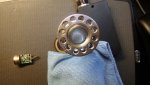
I have a 1.2 - 1.4 watt blue laser in a gatling housing. When I received it, the negative terminal spring was bent, and after swapping batteries a few times, it bent to the point where it is resting on the inside wall of the host (pic #4). I emailed pics of the problem to the seller and voiced my concern about it shorting out, and now I have a free replacement in the mail and I get to keep the old laser.

I bought some protected 16340 batteries, and found that when inserted the spring compressed enough to no longer be touching the inside wall. However, the last time I inserted batteries, when going to screw on the tail cap, I accidentally touched the side of the cap to the positive battery terminal and the host, causing the laser to turn on briefly. Unfortunately, I believe the spring didn't have enough pressure to pull itself away from the inside of the host when that happened. After I finished screwing on the tail cap, I turned the laser on. It ran about 7-10 seconds, then died. After taking the batteries out, the inside of the laser smells like burnt electrical components.

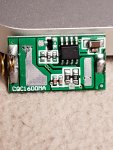
I was able to slide a paper barrier between the spring and the inside host wall, unreasonably hoping it was a short that was keeping the laser from powering on, but to no avail. Now I'm hoping it's just the board that is fried but the diode is still good.

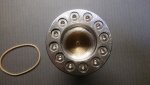
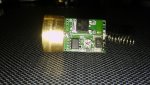
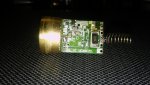
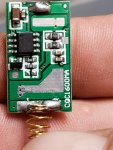
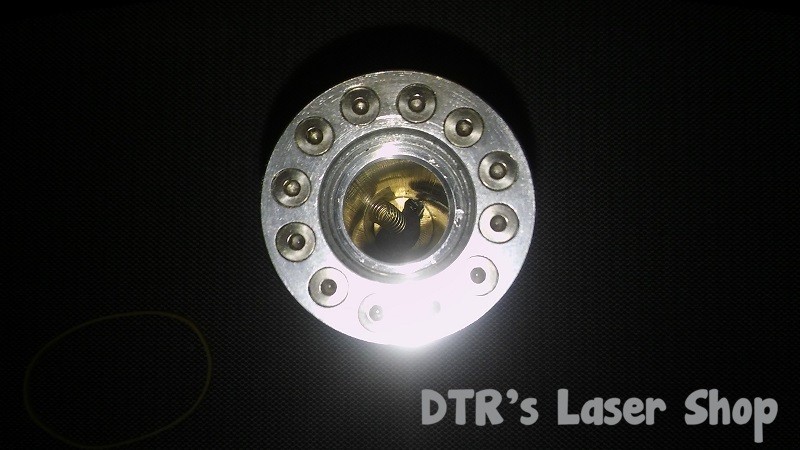
My problem now is that I can't figure out how to get the components out of the host. I don't see any threading for the components to screw into, so I'm assuming they are pressed in. Is this correct? Might it be glued in place, as I can see some sort of black substance on the inside seams between the component's housing and the host, or might that be some sort of thermal paste? I have tried gently tapping out the components from both ends, but nothing seemed to move. I was afraid to tap very hard in fear of damaging the diode which I'm hoping is still good.

I searched the forums for disassembly pictures / instructions. I found some pics from a few years ago that showed the host being in two pieces (after you remove the 12 rails), but it appears I have a newer model that is all one piece. I also couldn't tell exactly how the component housing was mounted inside the host.

Any information on how to disassemble this thing would be greatly appreciated. If it's pressed together and I need to bust out a hammer and punch, I can do that. If doing so might damage the potentially good diode inside, but that's the only way to get it apart, so be it. I'd just like to know I'm doing the right thing before I start hammering away.

Thank you for any help you can give on the matter, and thank you for the highly informative forums.
 

Attachments

  • 20160623_224633.jpg
    20160623_224633.jpg
    191.9 KB · Views: 215
  • 20160623_224743.jpg
    20160623_224743.jpg
    203 KB · Views: 211
  • 20160623_224813.jpg
    20160623_224813.jpg
    104.9 KB · Views: 193
  • 20160623_224849.jpg
    20160623_224849.jpg
    98 KB · Views: 187


Sta

0
Joined
Jan 27, 2014
Messages
1,737
Points
83
Welcome to the forum!
I don't know that much about this particular host, as I don't own one, but I wouldn't recommend any hammering. The diodes used inside are typically as cheap (and thus low-quality) as possible and most likely won't withstand the shock.
 
Joined
Dec 11, 2015
Messages
1,628
Points
113
Not necessarily cheap diodes Sta, at least not anymore. The more recent ones use more modern and "well known" diodes, but I have the same host but with the old diode. But still, I agree, don't bang it with a hammer :p

From looking at mine it looks like tube things going across the host can be unscrewed with some sort of hex bit, but you'll have to look around a hardware store for that. Also I can see a separation or seam between the battery bay and the module, that looks like it can somehow pry apart once the tube things are off.
 
Last edited:

maggot

0
Joined
Dec 27, 2013
Messages
6
Points
0
Thanks for the replies.

Yea, getting the 12 tubes removed was the easy part (2mm hex head). From what I'm seeing, the newer host is all one piece. I saw pics of the older host, and it definitely separates in 2 pieces. If it did come apart that way, I might be able to access the guts of the laser without removing the inner assembly that seems to be pressed in. Unfortunately, I'm not that lucky.
 

Attachments

  • 20160624_025800.jpg
    20160624_025800.jpg
    227.5 KB · Views: 238
  • 20160624_025835.jpg
    20160624_025835.jpg
    208.4 KB · Views: 358

GSS

0
Joined
Apr 28, 2015
Messages
5,069
Points
113
Thanks for the replies.

Yea, getting the 12 tubes removed was the easy part (2mm hex head). From what I'm seeing, the newer host is all one piece. I saw pics of the older host, and it definitely separates in 2 pieces. If it did come apart that way, I might be able to access the guts of the laser without removing the inner assembly that seems to be pressed in. Unfortunately, I'm not that lucky.
With all hope of you fixing it, i'm seeing with all the tubes removed it looks alot more comfy to hold and handle as others have mentioned it is kinda weird to the hand. Looks good that way also. I can't see those tubes helping with heat but could be wrong.
Good luck with figuring it out:)
 
Last edited:

maggot

0
Joined
Dec 27, 2013
Messages
6
Points
0
To me, it feels worse in my hand with all the tubes removed. The longer part of the host isn't long enough to grip it comfortably. Plus there are lots of semi-sharp edges exposed where they didn't deburr the machined holes.
 
Joined
Apr 24, 2013
Messages
549
Points
43
I have both new and old units and the new one is a press fit. There should have been a rubber bushing around the (-) contact. I would try to see if the seller will replace it as it was not complete from the start.
Ed
 

maggot

0
Joined
Dec 27, 2013
Messages
6
Points
0
There is a rubber bushing around the negative contact, but it sits at a 45 degree angle, so it really only covered about 1/2 the open area. I have since moved it farther to get a better look at the inside.

I have a new one on the way already, and they let me keep the defective unit as well. All I'm looking to do now is get the old guts out of the host so I can put something else in it.

I think I'll just give up on trying to preserve the diode since it may very well be toast already. I've also come to the conclusion that the black stuff around the pressed in unit is some sort of glue. I was able to scrape some out and it is like no thermal paste I've ever seen. It's way to tough and rubbery.

I think I might try spraying some gun cleaner inside and dissolve as much glue as I can before I try to hammer out the guts. If I totally destroy whatever is inside in the process, I'll have the same thing I have now, a broken laser. And since a replacement is on the way, I'm effectively working on a broken laser that I picked up for free, so no loss.

Thanks for your input and I'll be sure to post my results when I have them.
 

maggot

0
Joined
Dec 27, 2013
Messages
6
Points
0
VICTORY!

So I decided to spray a tiny bit of gun cleaner around the inside edges of the heat sink to loosen up the glue. I used a set of long, sharp point tweezers to jab the cleaner as deep into the glue as I could, plugged up the end to keep it from evaporating, and let it sit for two hours. After that I was able to tap it out with a center punch and hammer with 8 moderately firm hits, four on one side, then four on the other. I tapped it out while it sat on a small board that was on my lap to try to minimize the shock, trying not to damage the diode that's most likely toasted anyways. I was kind of surprised that it came out as easily as it did. The disassembled pieces and the tools I used are in the first pic.

The rubber bushing around the negative contact spring was 1/2 melted on the inside. The black / burnt crap on the end of the pcb is residue from that. The solder point for the negative contact spring had completely failed. The only thing keeping it in it's hole was a bend in the wire. I'm wondering if the resistance from that failing solder joint produced enough heat to melt the rubber bushing, or if it was from to much contact with the board since it was originally installed at about a 45 degree angle. I'd like to think it didn't melt from leaving it on too long. The manufacturer said for ever 2 minutes on, give it 30 seconds off. I never ran it longer than 90 seconds max on a few occasions. Leaving it on that long it would start to warm up, and I'd always wait for it to cool down to near or at idle temperature, which usually took about 5 minutes. So my nastiest duty cycle would be 1.5 minutes on, 5 minutes off.

It looks like my next step is to clean up that board, resolder that joint, and see if anything still works. I do have 2 more questions though.

1. Where is the positive terminal? I'm assuming it is running through the heat sink since that was the only part that made contact with the host, and I know the host body is part of the circuit (like a flashlight or mechanical e-cig).

2. How do I unmount the diode from the heat sink? Is that pressed in as well?
 

Attachments

  • 20160624_125621.jpg
    20160624_125621.jpg
    175.6 KB · Views: 229
  • 20160624_130350.jpg
    20160624_130350.jpg
    178.4 KB · Views: 228
  • 20160624_130604.jpg
    20160624_130604.jpg
    160.7 KB · Views: 334
  • 20160624_130644.jpg
    20160624_130644.jpg
    148.3 KB · Views: 246

maggot

0
Joined
Dec 27, 2013
Messages
6
Points
0
And now for the final results.

After resoldering the negative contact, it still would not power on. I wasn't able to read any activity from the driver board at all, so I unsoldered the diode and hooked it up to a different power supply. Low and behold, the diode still lives! I feel like that's rather remarkable after all it's been through. Now all I need to do is find a suitable replacement driver and I'm back in business (any recommendations?). Plus, I have a replacement laser in the mail on it's way to me already. It took a days worth of work but in the end I'll have 2 lasers for the price of 1 + a new driver.

Thanks to all for their input and thanks to all again for the forums!
 

seaward451

New member
Joined
Apr 22, 2019
Messages
1
Points
1
And now for the final results.

After resoldering the negative contact, it still would not power on. I wasn't able to read any activity from the driver board at all, so I unsoldered the diode and hooked it up to a different power supply. Low and behold, the diode still lives! I feel like that's rather remarkable after all it's been through. Now all I need to do is find a suitable replacement driver and I'm back in business (any recommendations?). Plus, I have a replacement laser in the mail on it's way to me already. It took a days worth of work but in the end I'll have 2 lasers for the price of 1 + a new driver.

Thanks to all for their input and thanks to all again for the forums!

Hello. I have the same issue except I'm trying to put mine back together but I don't know exactly were the wires go. do you any pictures of that?
 

Attachments

  • 20190423_170056.jpg
    20190423_170056.jpg
    1,002.6 KB · Views: 37
  • 20190423_170108.jpg
    20190423_170108.jpg
    817 KB · Views: 33
  • 20190423_181717.jpg
    20190423_181717.jpg
    896.9 KB · Views: 27
  • 20190423_181724.jpg
    20190423_181724.jpg
    869.9 KB · Views: 27

DTR

0
Joined
Jun 24, 2010
Messages
5,684
Points
113
That spring is much safer on this than the one pictured in the OP. The only picture I see of the side where I assume the output pads are you did not take a picture of the whole board. I assume the case pin of the diode goes to the pad at the top of the side you pictured three times for the case connection so should not need any wires at all and again assume there is some king of retainer that holds it in place from getting damaged when you push the battery up against it. Anyway if you can take pic of the top of the board. Also are you replacing the diode or diode and driver. A lot of those were built with used diodes so 1.6A may be a bit too hopeful for any life out of the diode if so. Not sure the quality of the driver but does look to be one of the better ones like that I have seen.🍺


Just had to note this is a pipe bomb waiting to happen. Spring can make contact with the wall and the battery contact by the looks of it. Probably after a few exploded maiming people they changed the spring on the driver. Probably realized no repeat business if they are dead. :whistle:


Oh the Gatling. The prime example of china salesmanship. At one point I know several of the sellers were building those hots with used diodes from spent A130 cores. That was a while ago and now since new M-Type out of actual real new M141 Japan series are just not being sold out there(or you do offer them and never sell any as people think your price is about 3X higher than other ones they see). M140 pulled M-Type and A-Type are many years out of projection and from used units I would bet they would just go with one of the other cheap but new 450nm 1W+ diodes which may have just a slightly higher cost but will reduce return rates.

A note of caution specially if listed as "seller refurbished" but some sold as "NEW" Be careful if you see M140 series China made units or M141 series Japan being sold from non factory authorized dealers with the intention of pulling diodes as there are an unlimited number of new M140/M141 series bodies clean as a whistle, zero hours on the clock and in original packaging that have been stocked up for many years and now a unlimited supply of spent used end of life units being dumped for nothing. Buying a "void if removed" stickers is pretty easy and the manufacturer is familiar with how the particular ones should look for the model and production range. This can be tricky if buying to sell diodes as "New Pulls"

After getting one of these as a M256 that was said to be "New" I got a great idea for my own pile of units missing arrays. I am about to start shoving NUMB46 blocks in my endless numbers of shinny XJ-V2 projectors as soon as I can workout the PCB to keep from tripping the tamper kill switch as all the ones I pulled off the blocks I cut in the middle to make it easy to desolder. Should have been thinking on that one. Of course I will not deceive anyone on what they are and I know it works. For near nothing they are up and running. It will be random though how much life has been used on the blocks but it will be luck of the draw just like every time you buy a NUB block with a PCB or tinned pins.:p

If you are thinking about buying a dlp projector these days more important than ever to get from an authorized dealer that has something to loose if they get caught by the manufacture selling a new shinny box with a near dead light source all nicely repackaged. I think this is going to get interesting going forward.
 
Last edited:

gazer101

Well-known member
Joined
Feb 23, 2020
Messages
700
Points
63
Sorry to semi-necro but I feel it is better than starting a brand new thread:
I am very curious, who actually makes these things? I know there are like 50 resellers, but who is the source (that could hopefully sell me an empty gatling laser host--I don't want to dismantle a perfectly functional laser)?
 

Encap

0
Joined
May 14, 2011
Messages
6,123
Points
113
Sorry to semi-necro but I feel it is better than starting a brand new thread:
I am very curious, who actually makes these things? I know there are like 50 resellers, but who is the source (that could hopefully sell me an empty gatling laser host--I don't want to dismantle a perfectly functional laser)?
LOL Just buy a gatling style pointer for $20 on Ebay from a reseller.

Have you ever seen a gatling host for sale anywhere on the planet, ever, that is not a complete laser pointer?
Even if you could find out, do you imagine any company who makes gatling laser pointers or makes hosts for the gatling laser pointer maker factories is going to bother selling you 1 empty complete host?
Would be more hassle, cost more in time, money and paperwork than it is worth--not worth the time of day to bother with. IMO
 
Last edited:

gazer101

Well-known member
Joined
Feb 23, 2020
Messages
700
Points
63
Fair enough, that's what I figured as well; the manufacturer (if there even is one, perhaps multiple companies just copy the same design and make their lasers from the ground up) probably only sells in mass quantities

I'll stick with my flashlight hosts for the time being
 

cippi

New member
Joined
May 20, 2021
Messages
1
Points
1
Hi I have a question about the gatling laser, that I bought. Which kind of diode is inside? Because I think my is not 1W. I can´t light a paper and from candle I get only smoke and I saw people with this type of laser to set fires. I am thinking about replacing the diode with 2W M140 from nichia. Is that possible with current driver inside? Or should I buy a new driver for it? Thanks. I bought a new st of batteries as the batteries could be a problem too.


Top