Welcome to Laser Pointer Forums - discuss green laser pointers, blue laser pointers, and all types of lasers

LPF Donation via Stripe | LPF Donation - Other Methods

Links below open in new window

ArcticMyst Security by Avery

Star Trek "Boomerang" Phaser Build

Joined
Oct 8, 2012
Messages
40
Points
0
Hey all,

I figure starting with a nifty build is a fine way to begin my life here :yh:

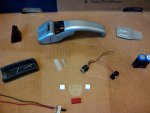
The laser module is a 2W, 445nm diode, Lazerer X-Drive driver, and 405-G-2 glass lense. Bought as a package from dtr-lpf on eBay.

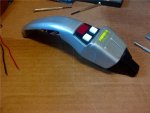
While in the process of looking for a host, I was watching Star Trek: Voyager and had a sort of epiphany- "I'll make a phaser!" so I bought a resin cast of a phaser body partially hollowed out for electronics (also from eBay).

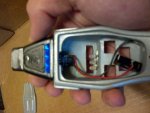
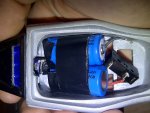
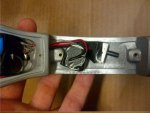
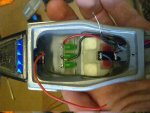
Electronics are pretty simple, batteries are stored in the phaser head, hidden in the grip is a master on/off switch which is linked to both the "fire" button and three blue LEDs which will be placed under the "power setting" indicator. This way, when the thing is powered on the lights will glow letting me know it's hot.

PICS TO COME
Later today
 
Last edited:


IsaacT

0
Joined
Aug 25, 2010
Messages
5,947
Points
83
I look forward to seeing the finished product....and pics, lots and lots of pics!
 
Joined
Oct 8, 2012
Messages
40
Points
0
Pictures!

These are all the major components (the only thing excluded being wire and some battery leads).

Note: I will be replacing the master power switch (located lower left of the "all the parts layout" picture) with one that has six prongs rather than three, allowing me to solder easier. The LEDs will be running off a secondary power source (most likely a cell battery in the handle) so that they aren't draining my main batteries. Originally I was going to add sound effects, but there isn't any room in the body for a sound chip/speaker
 

Attachments

  • phaser (5).jpg
    phaser (5).jpg
    226.9 KB · Views: 2,349
  • phaser (6).jpg
    phaser (6).jpg
    205.8 KB · Views: 488
  • phaser (4).jpg
    phaser (4).jpg
    271.8 KB · Views: 569
  • phaser (3).jpg
    phaser (3).jpg
    241.7 KB · Views: 443
  • phaser (2).jpg
    phaser (2).jpg
    208.1 KB · Views: 536
  • phaser (1).jpg
    phaser (1).jpg
    215.7 KB · Views: 511
Joined
Oct 8, 2012
Messages
40
Points
0
Ruh-row...
I was trying to run my module at a lower power to make sure all the beam came out while adjusting it to fit properly, and I turned the "coarse" rather than the "fine" adjustment knob on my power supply. Now it won't work. I believe it went up to 15V... I tested to see if there was any power comming from the driver to the diode by conecting it to it's intended power source and touching the leads with a voltmeter but nothing showed up. Did my driver take the full force of the power and save my diode, or is the whole thing garbage?
 
Last edited:
Joined
Oct 8, 2012
Messages
40
Points
0
It's alive! Well, no, but it works splendidly. Just finished it up after getting the diode and driver back from fixing. Everything works as designed :) Sorry, no pictures right now. It's been a long day and I've still got other (non-laser) work to do. I'll try to post pics/video by the weekend
 
Joined
Jul 10, 2009
Messages
1,476
Points
63
Is the only heatsinking for this diode the copper module it is pressed into? I saw one of the pictures have the module wrapped in electrical tape which is just going to help to insulate it... I wouldn't run this for very long at all considering at that output power and just a copper module, you could overheat it very fast.
 
Joined
Oct 8, 2012
Messages
40
Points
0
You are correct, there isn't a true heat sink. Only the resin emitter body and some light epoxt to hold the copper module in place. I've taken that into account though. I dont run it any more than 10sec on/5sec off, really more like 3-5sec on/2-10sec off. Mind you, I don't have a need to run it much longer than that, so it works well :)

Pictures!

Shown in the "armed" state in the first picture, green LEDs worked out well. I think I may (if there's room) hook up the batteries to a male/female chargeing setup then just shrink wrap them in that configuration so as to make charging much easier (getting them in and out is a VERY large pain)

I'll get some fireing shots up when I've got the time, batteries are currently recharging :whistle:
 

Attachments

  • 3.jpg
    3.jpg
    358.1 KB · Views: 4,094
  • 1.jpg
    1.jpg
    435 KB · Views: 614
  • 2.jpg
    2.jpg
    480.8 KB · Views: 791
Last edited:


Top