Welcome to Laser Pointer Forums - discuss green laser pointers, blue laser pointers, and all types of lasers

LPF Donation via Stripe | LPF Donation - Other Methods

Links below open in new window

ArcticMyst Security by Avery

FS: >110mW PHR, >140mW 4x & >170mW 6x Blu-Rays

IgorT

0
Joined
Oct 24, 2007
Messages
4,177
Points
0
I know what you mean ..... LOL !

What chip is that? Looks very simple... Do you use the toner transfer method from label backing for an etching mask? :D


My driver used to be so crowded in the early version, that capacitors had to stand on other capacitors... :angel:

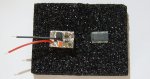
Here is a photo of the upper side of an older (v2 - now i'm at v4) driver, there is a huge coil and a schottky on the other side...

Problem was, in this version, there was no room for the output caps next to the diode pins - i had to solder a "capacitor-sculpture" ON TOP of the diode pins AFTER it was soldered to the driver... :yabbem:


I managed to rearrange it in later versions, so it has more room now around diode pins... No more capacitor sculptures.. :crackup:


This is 13x9mm, i put it next to a complex TEC driver IC for the photo, just for the size comparison...
The two resistors in the bottom right corner have jumpers next to them, for higher current selection...


EDIT: Ahem, this pic is not very flattering, i need to take a new one of the latest version. :angel:
 

Attachments

  • BR driver and TEC driver IC.JPG
    BR driver and TEC driver IC.JPG
    65.1 KB · Views: 330
Last edited:


HIMNL9

0
Joined
May 26, 2009
Messages
5,318
Points
0
LOL, that is just my linear LDO module, based on LM1117 ..... and the pcb is one of the prototypes, made with adhesive sheet (cutting away the parts that have to be corroded), and vias made with copper wires (can be more small, but it need to dissipate heath, so i kept it 9x17mm, aixiz-size) ..... i also don't sell my drivers, cause i don't have time for make them in a decent industrial way (other than for the lack of time, also, just imagine if i have to make them in serie and sell them in this horrible prototype-like aesthetic way, LOL).

Sometimes, when i need a little serie, i use that blue foil that you have to "laser print" and thermally transfer (i don't know how you exactly call it, here is called press-n-peel) ..... not exceptional, but for middle sized tracks, it works ..... for thin tracks, i was using photoresist (the negative paint type, that need that you use these orange films for made negatives), but at the moment my bromograph is broken, and i don't have time to build a new one .....

What do you use, for your incision system ? ..... HCl and hydrogen peroxyde ?

I'm still experimenting with boost ones, need to find something decent as circuit and layout, before try to reduce it in "aixiz-size" (actually, i'm having some decent results, also if not exceptionals, with MAX8715 ..... also if it have the usual 5V Vin limit, can go til 12V as Vout ..... decent conversion, some stability problems, and i still need to find a workaround for made it working correctly in current-limiter configuration, cause it's not designed to work in this way, but if i reach, it may be a good solution for those BR that need more than 5,5 / 6V FV.

BTW, what's wrong with "capacitor sculpture" ? :) ..... electronic sculptures are good, you know ? ;) ..... some of my prototypes looks like "components packages", more that pcb ..... like this one, as example :p (Also if i have to admit that some others, instead, looks like a designer nightmare :crackup:)
 

IgorT

0
Joined
Oct 24, 2007
Messages
4,177
Points
0
Sometimes, when i need a little serie, i use that blue foil that you have to "laser print" and thermally transfer (i don't know how you exactly call it, here is called press-n-peel) ..... not exceptional, but for middle sized tracks, it works ..... for thin tracks, i was using photoresist (the negative paint type, that need that you use these orange films for made negatives), but at the moment my bromograph is broken, and i don't have time to build a new one .....

What do you use, for your incision system ? ..... HCl and hydrogen peroxyde ?

I just use Avery labels, peel labels away (and discard them) and print with laser onto the label backing (which can't be touched, but has to be scratched with a card for the toner to stick)...

Then i use a clothes iron to transfer the toner onto copper, fix traces with precision markers, and etch in Sodiumpersulphate... :yh:

Works like a charm, regardless of trace width. But i do make multiple prints and discard the ones with flaws...


After the thermal transfer i have to let it cool, then i peel the label backing off carefully, if i'm lucky, there is not much left to repair with a marker..


I'm still experimenting with boost ones, need to find something decent as circuit and layout, before try to reduce it in "aixiz-size" (actually, i'm having some decent results, also if not exceptionals, with MAX8715 ..... also if it have the usual 5V Vin limit, can go til 12V as Vout ..... decent conversion, some stability problems, and i still need to find a workaround for made it working correctly in current-limiter configuration, cause it's not designed to work in this way, but if i reach, it may be a good solution for those BR that need more than 5,5 / 6V FV.
I'm lucky when it comes to this.. My driver can already go to 10V, or if i change two capacitors, 25V... :angel:

I talked to Maxim engineers a while ago, presenting them my requirements, and they said they had nothing of the kind i need, but i guess they didn't think of converting a voltage source to a current source. They must have been thinking of a single chip solution... :thinking:

You'll probably be using an op-amp or a current sensing IC in combination with the booster, to avoid wasting too much efficiency on the high reference voltage, right?


There are chips, made to do it all in one go and at a high efficiency, but are usually made for LED flashlights, where stability of the current doesn't really matter, and a +/-5% drift is considered "stable"... :undecided:

I guess i'm just spoiled by the chip i'm using now... :thinking:


BTW, what's wrong with "capacitor sculpture" ? :) ..... electronic sculptures are good, you know ? ;) ..... some of my prototypes looks like "components packages", more that pcb ..... like this one, as example :p (Also if i have to admit that some others, instead, looks like a designer nightmare :crackup:)
Well, i didn't say there is something wrong with capacitor sculptures... I find them useful, when i'm out of space, and can only build upwards.. :yabbem:

For example, when i was testing my BR driver on a scope, i had to reduce the output noise....
No matter what capacitor i used, some noise would always remain, until i put another, smaller value capacitor on top of the main diode protection capacitor... :crackup:

That's when the capacitor sculptures started - and then they grew to the side too (in the end i had a 10uF on diode, a 47uF ON TOP of the 10uf and a 1uF ON THE SIDE of the 47uF)! :crackup:


Problem was, i had to remove this entire sculpture, to get to the diode at all.... :whistle:

Until i redesigned the whole board, that is... Now the diode is completelly free, but just as protected.. ;)


EDIT: What's wrong with capacitor sculptures you ask? Nothing, if the one making the sculptures is the only one handling them....

But imagine what would happen if someone with my laser but a burnt out diode would try to replace the diode temselves, but would find such a triple-capacitor sculpture on top of the diode's pins? :yabbem:

That's why i HAD to redesign the driver, to get rid of the sculptures, before using the drivers in lasers... :angel:
 
Last edited:

HIMNL9

0
Joined
May 26, 2009
Messages
5,318
Points
0
Uhm, never tried to print directly on the siliconed support foil ..... one time, i have to try also this, i suppose :)

But, basically, the blue foils works in the same way ..... take the toner from the printer, then transfer it with a clothes iron ..... probably, the back foil of the labels is more cheap, cause here, those blue foils, they ask 10 Euro for 5 sheets (14 $, more or less)

For the corrosion, i actually use HCl and oxygen peroxyde ..... started times ago with ferric perclorure, but i always hated it (especially for the ruined dresses, LOL), and find other chemicals is not too easy, so switched on the "easy to find and cheap" solution :p

You're right about all-in-one drivers, i made some working units in the past with LM3410 ..... not too bad, for fixed current, but a nightmare if you want to made it variable AND stable ..... can use them for PHR, but i really don't feel to put one of them on an 8x or more costly diode :p ..... Unfortunately, all the producers have in mind only "normal" fields of employ, when they design their ICs ..... i guess none of them thought a single time about us poor LD hobbysts :p :D

Actually i'm trying to get mine work with a current sensing IC in "feedback" loop on the FB pin, for use a common trimmer, but having some stability problem ..... also tried with a resistor directly connected on it, in serie with the LD, but it have to hold the same current of the LD, then, and this means at least 1 W for long and happy life ..... and also putting a resistor, with in parallel a trimmer with another resistor in serie of it, need to use low values half watt trimmers, and not found them in SMD .....

Anyway, tried an LT6106 (the only one i can find til now) with not too good results (BTW, i think also Erdabyz is experimenting something similar, and having the same problems, more or less) ..... i recently found the datasheet of the MAX4172 and MAX4372T, that have some promising characteristics, and want to try them too (must find it somewhere in the market, i don't think i can ask Maxim again for samples, i already have done it one time) ..... anyway, as i already said, i do this just for hobby in the free time, so it can take some long time too :p

And, btw, right also about who use the "sculptures" :D .....
 

IgorT

0
Joined
Oct 24, 2007
Messages
4,177
Points
0
Glenn: Looks like First Class Air can be quick sometimes as well!

I just got the two CR2 Keychain hosts from Jayrob, with the tiny heatsink!

I'll put them together as soon as the current batch is done!
 

mgc8

0
Joined
Jan 10, 2009
Messages
38
Points
8
Hey Igor, nice work and great news about all the developments going on with your lasers! Just wanted to leave a quick note as we discussed on e-mail to count me in any "mini-gb" for the lenses, if and when you decide to do it. I'd like two of your "medium" lenses for my (soon to be two Igor-branded) lasers :) -- Mihnea
 
Joined
Dec 21, 2008
Messages
1,223
Points
0
if you still need someone, i'll fill in the last 8x spot.

Well those optical drives have long since been turned into diodes (awaiting extraction form original heatsinks by the Professor) and I venture to say it's just a matter of days before they're shipped off to the EU for testing & further production steps... .

Of course it wouldn't be the first time that someone has to bail "after the fact" due to financial status changes, so asking never hurts, but you may be better off doing so in the GB thread (see below for the link).

EDIT: OPENING FILLED!! Click here for the LG 8x Mini GB if you want to know what it's about. EDIT: Opening was filled immediatelly, so currently, there is no NEED for more....
But IF someone still really badly wants one, it might still be possible to squeeze one in.
 
Joined
Nov 24, 2008
Messages
475
Points
0
Oh, I see.

I just saw this: "To get them at yesterday's price, it can only work if i order 9 drives at once, and for that i need AT LEAST one more person (interested in an 8x diode or an 8x laser)...."

And thought he needed another.

I tend to miss seeing the large text for some unknown reason.
 

IgorT

0
Joined
Oct 24, 2007
Messages
4,177
Points
0
Oh, I see.

I just saw this: "To get them at yesterday's price, it can only work if i order 9 drives at once, and for that i need AT LEAST one more person (interested in an 8x diode or an 8x laser)...."

And thought he needed another.

I tend to miss seeing the large text for some unknown reason.


That was an Express ONE DAY GB.. Well, it happened over two days, one day there was the nice price, next day we were ready, but the price went up.

I managed to convince NewEgg to sell at "Yesterday's" price for 10+, but then one person left the Express GB, so i posted that...


But it didn't take long, before someone jumped in. If it did, we couldn't get that price a week later.


However, even so, i have a second batch of 8x laser requests slowly growing. So when the time is right, i'll have to make another big 8x Drive purchase....
 
Joined
Sep 7, 2008
Messages
396
Points
18
So, IgorT, do you have a tutorial for the little AAA build, or something? I like it, but I don't want to have a bunch of money to buy a pre-made one, I want to do all the work myself.
 

IgorT

0
Joined
Oct 24, 2007
Messages
4,177
Points
0
So, IgorT, do you have a tutorial for the little AAA build, or something? I like it, but I don't want to have a bunch of money to buy a pre-made one, I want to do all the work myself.

The Tiny AAA laser is not complicated to make, but it does require a specially machined module! You can't make it with a normal AixiZ module...
I had a small number of modules machined for this purpose, i could sell you one at the price i paid for it...


Other than that, you just have to solder a short boost driver directly to diode pins, and solder a spring to the driver's positive input, that's it!
Everything is inside the module, which then simply screws into the host's head.. I apply thermal paste at the step, where the module and host contact at the very top, since the host is pretty much the only heatsink...

The only other thing is securing the driver, so it doesn't bend (pressure from battery) and cause a short or break the diode pins...
 
Last edited:

HIMNL9

0
Joined
May 26, 2009
Messages
5,318
Points
0
Just as idea ..... for those that need to glue or fix modules and similar in heatsinks, with the need to keep them aligned or secured ..... i tried the thermal conductive glue that DX is selling, the FUJIK one (this one, that i finally got from them), and it seem work good ..... not same as alumina dual components from Arctic Silver, but anyway good enough, it transfer heat at a decent rate (i tried it with the professional "finger burn" test :p ..... left a piece become hard, 10x15mm, 3mm thick, then holding one side, put the soldering iron on the other side ..... finger started to burn in less than 3 seconds, so i suppose it's good enough :p)

It have only one thing that can cause problems ..... like any other silicone based glues, more the layer is deep, more time you need for all the glue become hard (can solidify in few hours at the surface, and remain liquid inside for 3 or 4 days), but once solidified, is a bit more rigid of common silicone, with almost the same resistance ..... can be used for fill space between module and heatsinks, like the grease, but with the advantage that also glue, or also for fill the space from the driver and the module, so also the driver become heatsinked (i used this system for some of my mounts, too) ..... and, same as silicone, is more easy to unglue than bicomponent resin, if need to dismantle something (still not too easy, but can be done, where instead, with bicomponent resin, once you glued it, it's permanent)
 

IgorT

0
Joined
Oct 24, 2007
Messages
4,177
Points
0
I know what you mean, sometimes there is nothing holding the driver but the diode pins.

I sometimes use a hot-glue gun in those cases. I can later cut away what is too much using a scalpel, and it can always be removed if you're careful...

But in most cases, if you lean the PCB directly against the module, when soldering the diode pins to the driver, the only thing you need to worry about is the driver bending back and forth...

In those cases a ring of plastic around the spring, stuck into the module, is enough to prevent the bending, while pressure itself will be transferred through the PCB onto the metal module and not the diode pins.

But it does require very careful assembly.
 
Joined
Sep 7, 2008
Messages
396
Points
18
The Tiny AAA laser is not complicated to make, but it does require a specially machined module! You can't make it with a normal AixiZ module...
I had a small number of modules machined for this purpose, i could sell you one at the price i paid for it...


Other than that, you just have to solder a short boost driver directly to diode pins, and solder a spring to the driver's positive input, that's it!
Everything is inside the module, which then simply screws into the host's head.. I apply thermal paste at the step, where the module and host contact at the very top, since the host is pretty much the only heatsink...

The only other thing is securing the driver, so it doesn't bend (pressure from battery) and cause a short or break the diode pins...

So is it like the one in the second picture on the first page, just the lens is sticking out?
 
Joined
Oct 5, 2009
Messages
150
Points
0
Hmm, looks like i suddenly have two batches almost at once!

The 8x's will take a while to get here, so i'll do 6x Batch #5 now, while waiting for the 8x MURDER EXPERIMENT candidates (and 8x Batch #1 diodes) to arrive.... :evil:


I'll be checking here, emails and PMs regularly, regardless of how much work i have, but response time may be a bit slower than usual for a few days (till i'm done with the first part of the work)...
How is batch #5 goin?


Top