Welcome to Laser Pointer Forums - discuss green laser pointers, blue laser pointers, and all types of lasers

LPF Donation via Stripe | LPF Donation - Other Methods

Links below open in new window

ArcticMyst Security by Avery

DIY - Two-Colour Combiner Optic Project - for the C2

rhd

0
Joined
Dec 7, 2010
Messages
8,475
Points
0
Btw, Do you have any idea's for a retaining "plate" that can be placed between the heatsink and host walls that would would be either polished aluminum or just a piece of black plastic with an aperature hole? That would ovbiously ensure dust protection and better looks. You probably could also glue a high transmitting lens which would make the whole thing water and dust proof (If the rest of your host is waterproof)

I guess my final recommendation would be using a host like the nf-009 or similar which allows for more headroom which would also let you move the two holes a bit to the side so the output isn't exiting the host completely to one side.

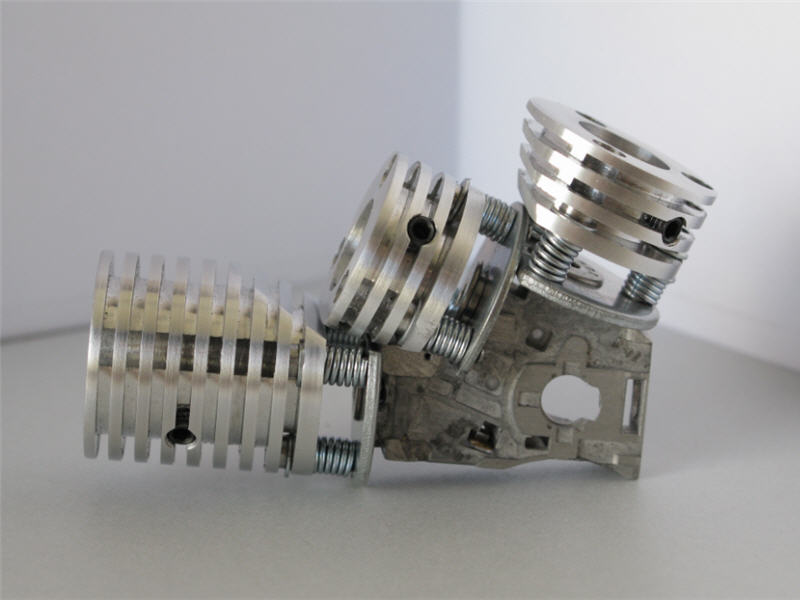
Yes, probably a simple circular disc with a hole drilled through it would work. We could even combine that either with a smaller window underneath, or literally sandwich it entirely on top of the stock glass flashlight window (would avoid needing to affix the glass to the metal). That said, this is something that I think we'd be better off getting a machinist in the forum to do. I don't think CNC is required, and it would substantially push up the costs even given the simplicity, if I sourced it through eMachineShop also.

Regarding the NF-009, I looked at that, and my initial take is that while it has a larger diameter, it doesn't really allow for additional height. Height is what we may need a bit more of. The additional diameter could allow for more of a centered output though - I hadn't thought of that. It might also allow us to hollow out the unused side of the combiner, and turn it into a pill for driver heat-sinking.

The other thing I'll probably do is create a simple PCB for a dual-diode driver based on dual STCS1 or LM1117s.

RHD, I like how you started off here by copying the Chinese. (Vs how it usually goes :) )

(You've enhanced the design since but...) -- turnabout is *such* fair play in this situation :)

I know, I was conscious of the humor in that as well.

- and also conscious of not wanting to upset... anyone ;)


Joined
May 31, 2009
Messages
3,239
Points
63
I really like this idea!

I've been trying to think of ideas to increase the heat transfer.... and I came up with a pretty simple idea... No idea if it will work.. so please correct me if I am wrong or if you have some suggestions.

What if we use the same setscrew and pivot point idea, but only use it for the front part of the module which houses the lens. My idea is to cut out the piece that holds the diode but use the section after that. Then you will be able to pressfit the diode into the actual heatsink and adjust the lens.

Sorry for crappy picture... but this is what I was trying to describe...

heatsinkidea.jpg


I have a feeling that the lens will not redirect the light downwards or upwards if the angle was adjusted... So I would like more input from people who know more about optics than I.

-Adrian
 
Last edited:

rhd

0
Joined
Dec 7, 2010
Messages
8,475
Points
0
Unfortunately, you're correct. Adjusting the lens doesn't really alter the beam path. Give it a shot with a any old diode/lens combo. Just unscrew the lens from an aixiz module, but hold it right in front. You'll get a big dot of course, but you'll still get the idea. Adjust the lens - the dot stays more or less stationary.

Something else to be aware of. The "chinese" units we see tend to be ~300mW of combined output power.

I'm fairly comfortable saying that we could run a Mits 635 and a typical multimode 445 at ~500mW each, and even after optics, see an output power of about double the "chinese units", while still staying within the thermal capabilities of this design.

Properly filled with thermal compound, I think running a 445 at 500mW shouldn't be any more of a problem than running a 445 at 2W in a proper typical heatsink would be. Duty cycles will still matter here - but 500mW is not going to create drop-dead heat in the presence of at least some (admittedly poor) heatsinking.
 
Last edited:

rhd

0
Joined
Dec 7, 2010
Messages
8,475
Points
0
Damn... Well back to the drawing board :thinking:

Well, the proper approach would be to integrate adjustable dichro mounts.

That would be neat, but that would also be a level I'm not capable of taking my design skills to. For one, it would introduce at least one addition separate part, and if not, potentially two. Cost would go up, part complexity would go up, and this project would probably be beyond me. I'm also guessing that the "chinese" company didn't go that route for a reason.
 
Joined
May 31, 2009
Messages
3,239
Points
63
Well I have another idea... I'm going to do some testing first. It looks promising so far... I'll report back with my findings...

But I know what you mean... KISS rule... keep is simple stupid! No point over complicating something if it doesn't need to be!
 

rhd

0
Joined
Dec 7, 2010
Messages
8,475
Points
0
Well I have another idea... I'm going to do some testing first. It looks promising so far... I'll report back with my findings...

But I know what you mean... KISS rule... keep is simple stupid! No point over complicating something if it doesn't need to be!

What's the basic concept?
 
Joined
May 31, 2009
Messages
3,239
Points
63
Some sort of split pin pivot where you only have movement in 2 axises. Basically you have pins running from a heatsink that surrounds your diodes module into metal that houses the dichros ets... the pins will hold the module at 2 o clock and 7 o clock, and 4 o clock and 9 o clock. I think it would work but would be a bit difficult to align...so thats what I'm trying to test.

I got the inspiration from sightfx...

7%20color%20Laser%20Kit.jpg


But hopefully mine will be more compact and Won't need any additional lathing or milling after the 12mm hole is drilled in it.
 
Last edited:

rhd

0
Joined
Dec 7, 2010
Messages
8,475
Points
0
I think I have a much better combiner almost finished. The design is effectively done, I'm just working through clearing the CAD errors.

It's a much more design-complex setup, but in the end, it's the more "proper" way to do things. No heatsinking issues, and likely a better ability to adjust in the end anyway.

Will post photos as soon as possible - hopefully this evening if I can get the kinks cleared.
 

rhd

0
Joined
Dec 7, 2010
Messages
8,475
Points
0
Ok, so here's the better way of doing it.

  • Pivoting module idea is gone. Instead, we have normal 12mm module holders, full heatsinking. Yay. No thermal concerns (beyond the reality that you'll have two diodes creating heat)

  • Mirror is stationary.

  • The forward/backward positioning of the dichro and mirror should never need adjustment because of the placement of the surfaces that they attach to in this design. Even dichro/mirror thickness won't matter if you think about the way the attachment surfaces are positioned, and take into account which surface the beams are actually bouncing off of. In other words, your beam should hit the mirror, and then hit the dichro, exactly where the other beam is passing through. This portion should be closer to perfect than the previous approach. In fact, it should be perfect, save for any tolerance issues introduced by your 12mm module, or the pressing of the diode into it. But even then, your beams should be exiting the dichro at pretty much the exact same spot.

  • The dichro tilt (aiming) becomes adjustable with set screws. Essentially, the dichro is on a platform, that is raised up on a 1mm x 1mm cylinder that is 4mm tall. Counting on the fact that 1mm x 1mm of aluminum that is 4 mm in height can bend slightly with the force of set screws. I'm fairly certain that it can. There are four set screws positioned to tilt the dichro platform.

It was absolutely a nightmare to get all of the cuts such that they wouldn't conflict or create problems for the machinery, but I've now cleared all of the errors. There are a few warnings in areas where a square corner will in fact be rounded.

If anyone tries to tell me that the combiner should be press-fit instead of accepting 12mm modules, I'll shoot you ;)

3D View:
attachment.php


Optical Path from Above:
attachment.php


Optical Path from Below (where the adjustments take place):
attachment.php
 

Attachments

  • aa View 1.png
    aa View 1.png
    19.2 KB · Views: 474
  • aa Optical Path.png
    aa Optical Path.png
    34.6 KB · Views: 588
  • aa Optical Path 2.png
    aa Optical Path 2.png
    30.1 KB · Views: 533
Last edited:

benmwv

0
Joined
Sep 10, 2010
Messages
1,380
Points
48
Very nice design!

Im sure that the 1mmx1mm aluminum will be plenty flexible for this application.

Surely, though, you don't expect the beams to intersect at exactly the right spot on the dichro. I think you will probably end up having to use small shims or adjust while the epoxy dries to get them lined up perfect.
 

rhd

0
Joined
Dec 7, 2010
Messages
8,475
Points
0
Very nice design!

Im sure that the 1mmx1mm aluminum will be plenty flexible for this application.

Surely, though, you don't expect the beams to intersect at exactly the right spot on the dichro. I think you will probably end up having to use small shims or adjust while the epoxy dries to get them lined up perfect.

It actually should be pretty close to perfect.

For the mirror, the beam is reflecting off the surface closest to diode (assuming an FS mirror). It's that surface that would be pressed right up against that 45 degree wall. So assuming the beam exits the 12mm module pretty close to center, we know exactly where the mirror reflection will always be, regardless of the thickness of the mirror used.

Then for the dichro, we're bouncing it off of the surface that is fixed to the other 45 degree wall. Again, knowing where the beam is coming from, we can predict almost exactly where the impact will be on the dichro. As long as the reflection happens on the front surface of that dichro, no other factors should alter where that reflection takes place, becase that surface itself is affixed right up against the 45 degree wall.

The uncertainty would normally come into play from the 12mm modules themselves, and the accuracy of the pressing of the diode into the module. Certainly, you can have variances in the exit angle from the 12mm module. That said, those variances are ONLY relevent for the 20mm or so until they exit this assembly. In 20mm, even a horrible press job, and a poor quality 12mm mount, shouldn't be able to introduce enough variance to require any shims or dichro/mirror replacement to keep the point of intersection aligned.

EDIT:

- The awesome thing I've just realized, is that with eMachineShop, you can have them hold back some of your order and put it in their "store" to help cover your project's cost. When someone buys the item, they take care of everything (I don't think there's even a stage where I see who the buyer is). So I can probably actually make this work without too much hassle. Once I have a C2 in hand to take final measurements with, I'll produce 30 or 40 of these, and have EMS keep most of them. Then people can buy them through EMS's shop whenever they want, and it's solves my dilemma of not really having the capabilities to properly sell stuff. And it will make the project a bit more viable - even though I still need to put together the upfront cost.
 
Last edited:

benmwv

0
Joined
Sep 10, 2010
Messages
1,380
Points
48
It actually should be pretty close to perfect.

For the mirror, the beam is reflecting off the surface closest to diode (assuming an FS mirror). It's that surface that would be pressed right up against that 45 degree wall. So assuming the beam exits the 12mm module pretty close to center, we know exactly where the mirror reflection will always be, regardless of the thickness of the mirror used.

Then for the dichro, we're bouncing it off of the surface that is fixed to the other 45 degree wall. Again, knowing where the beam is coming from, we can predict almost exactly where the impact will be on the dichro. As long as the reflection happens on the front surface of that dichro, no other factors should alter where that reflection takes place, becase that surface itself is affixed right up against the 45 degree wall.

The uncertainty would normally come into play from the 12mm modules themselves, and the accuracy of the pressing of the diode into the module. Certainly, you can have variances in the exit angle from the 12mm module. That said, those variances are ONLY relevent for the 20mm or so until they exit this assembly. In 20mm, even a horrible press job, and a poor quality 12mm mount, shouldn't be able to introduce enough variance to require any shims or dichro/mirror replacement to keep the point of intersection aligned.

EDIT:

- The awesome thing I've just realized, is that with eMachineShop, you can have them hold back some of your order and put it in their "store" to help cover your project's cost. When someone buys the item, they take care of everything (I don't think there's even a stage where I see who the buyer is). So I can probably actually make this work without too much hassle. Once I have a C2 in hand to take final measurements with, I'll produce 30 or 40 of these, and have EMS keep most of them. Then people can buy them through EMS's shop whenever they want, and it's solves my dilemma of not really having the capabilities to properly sell stuff. And it will make the project a bit more viable - even though I still need to put together the upfront cost.

The 12mm module is exactly what I was thinking of. They add a lot of variables to the equation. The set screw for the 12mm module will push it slightly to the side of the hole, the diode could be not lined up correctly, the modules may not have small enough tolerances, etc.

I suppose they may not add up to enough to do anything, but they could. If it was just off by a millimeter you may notice the beams not combining correctly. Especially for thin single mode beams.
 

rhd

0
Joined
Dec 7, 2010
Messages
8,475
Points
0
The 12mm module is exactly what I was thinking of. They add a lot of variables to the equation. The set screw for the 12mm module will push it slightly to the side of the hole, the diode could be not lined up correctly, the modules may not have small enough tolerances, etc.

I suppose they may not add up to enough to do anything, but they could. If it was just off by a millimeter you may notice the beams not combining correctly. Especially for thin single mode beams.

That's a good point re the set screw. I've moved it to the top instead of the side. That way, it pushes the modules down vertically, which is less concern.

My trig is horrible, but to be off by 2mm, I think your beam would have to exit the module more than 7 degrees off-straight. That is actually quite a lot - I think the margin of error is more typically a degree or two.
 

benmwv

0
Joined
Sep 10, 2010
Messages
1,380
Points
48
That's a good point re the set screw. I've moved it to the top instead of the side. That way, it pushes the modules down vertically, which is less concern.

My trig is horrible, but to be off by 2mm, I think your beam would have to exit the module more than 7 degrees off-straight. That is actually quite a lot - I think the margin of error is more typically a degree or two.

The set screws were my main concern. They could have easily had a combined offset of over a millimeter.

Hopefully any other factor will be too small to affect the operation. And as long as we are talking about combining multimode 445 and 635 there is a bit more wiggle room.
 
Joined
Nov 4, 2010
Messages
404
Points
18
RHD! You have answered my prayers lol :bowdown:
If you can get some of these machined im in no questions asked!

I cant wait to see where this goes! :pop: :pop: :pop:


Top