

Laik
0
- Joined
- Jan 22, 2013
- Messages
- 946
- Points
- 28
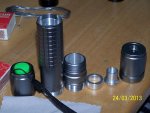
Ok so here we go. I ordered a eBay Australia: Buy new & used fashion, electronics & home d?r and a eBay Australia: Buy new & used fashion, electronics & home d?r Soon after i realized that the module wouldnt work and i saw they also had another 200mW 3.7V - 4.2V green module that had the three sections, so i contacted them and they said they would send me that one. The host arrived on the 6th of March and arrived on the 21st. The host arrived with no o-rings so i contacted techood and he said he will send them to me.
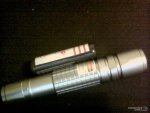
Now here is a tutorial, pictures will be at the bottom.
1. Disassemble the host and remove the heat sink. Mine just slides out, you might have to use a vice or something to press it out.
2. Unscrew the front section of the module and if you are going to use the 660nm/445nm/405nm lens that comes with the host (depends on what host you ordered) then you can skip this step. You could even use an standard clear aixiz acrylic lens because the AR coating will not be effective because its not meant for 532nm. Then unscrew the lens from the font of the module, you might want to heat it up to melt the glue. (Pictures coming soon)
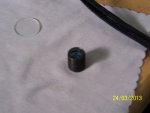
3. Now screw the lens into the lens holder, whether it is the one you extracted from the green or the 3 element lens that came with the host. You might want to use some teflon tape if the lens is a bit wobbly.(it is the 3 element lens in the picture)
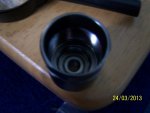
4. Press the module into the heat sink (you might want to add some thermal epoxy if it is not a tight fit) and then place the heat sink with the module in it inside the neck of the host, dont glue it in place yet if it needs glue. Screw the neck onto the body and then put a 18650 battery in and screw the tail cap on (make sure its off before you put it on, you can test with your DMM). Now position the heat sink so your spring has a good tension, then glue it into place if you need to.
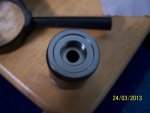
5. Place your smallest o-ring in the head of the host if it is not already in there (you will see where it goes, there is a small ring milled out in the head). Now place the clear lens on top of the o-ring and then screw the lens holder into the head of the host, get some needle nose pliers and then screw it up tight. Now you can assemble the rest of the host.
6. Now it is just trial and error with adjusting the lens. You have to adjust the lens so that when the head is fully screwed on, it is focused to infinity. You can focus it to a close range for burning by unscrewing the whole head (dont unscrew it so far that the head comes off)
7. ENJOY YOUR LASER!!!!
Now i will talk about build quality. There is only 2 things i can complain about, they are that the hole on he head of the host, looks like its been filed out a bit and the heat sink on mine isnt pressed into the host to make the whole host a sink (it just slides through, but there is only a small gap so i can use some thermal epoxy). There is nothing more to really say apart from its 20 bucks so dont be expecting some you bute host. Overall it looks very nice.
There will be more pictures soon when the module shows up, sorry they are bad quality, we have a 5mp camera from like 2000. How do you get the night beam shots to be so clear? I tried doing a few beam shots at night with a 100mW greenie but i couldnt pick up the beam very well, if not at all.
EDIT: WARNING! YOU MUST HAVE A MODULE THAT HAS THE EXPANDING LENS GLUED RIGHT ONTO THE CRYSTALS (ONLY TWO PARTS, NOT THREE) So i got my 200mW module from laserlands, what i had to do to make the module a press fit is cut about 5mm off the back of the front (the back of the front where the threads are that screw onto the back of the module, confused much? haha). You have to screw that on and then press it into the heat sink. The reason i broke it is because i screwed the lens too far back and when i screwed the head back on it picked up the little expanding lens off the crystals and when i got it out i had to take it out of the lens and then i knocked the lens over and couldn't figure out the way it went together again. Then i tried to glue the expanding lens back on and got glue all over the crystals.
Then i take you to part 3 of this adventure") I ordered a few 1mW green ebay pens and they were the ones that have the bigger, press fit modules not the ones that screw into the head. So i filed out the heatsink a tiny bit and then pressed the hell out of it into the heatsink (you could easily see the heatsink was a lot bigger than the top of the heatsink because i didnt press it in the whole way because i couldnt get it out to file it down more) so then i had to file the outside of the heatsink to fit into the host and then that expanded the neck of the host so the head was a snug fit. The module had one of those ones that had the black plastic lens so i took the lens holder out of the head and screwed the head on tight (it cant go on all the way, because the lens is too long to screw the whole head on, but it stays on there tight. It has lost its ability to be waterproof and focused, but looks mighty fine and no laser is complete without a warning sticker This module is meant for 2 AAA's but it now uses a 18650 and bumps the brightness quite considerably.
I ordered a few 1mW green ebay pens and they were the ones that have the bigger, press fit modules not the ones that screw into the head. So i filed out the heatsink a tiny bit and then pressed the hell out of it into the heatsink (you could easily see the heatsink was a lot bigger than the top of the heatsink because i didnt press it in the whole way because i couldnt get it out to file it down more) so then i had to file the outside of the heatsink to fit into the host and then that expanded the neck of the host so the head was a snug fit. The module had one of those ones that had the black plastic lens so i took the lens holder out of the head and screwed the head on tight (it cant go on all the way, because the lens is too long to screw the whole head on, but it stays on there tight. It has lost its ability to be waterproof and focused, but looks mighty fine and no laser is complete without a warning sticker This module is meant for 2 AAA's but it now uses a 18650 and bumps the brightness quite considerably.
This is nothing great but it's just for you guys to waste some time reading all of this or maybe some new people just want to try this.
Thanks Guys!
Now here is a tutorial, pictures will be at the bottom.
1. Disassemble the host and remove the heat sink. Mine just slides out, you might have to use a vice or something to press it out.
2. Unscrew the front section of the module and if you are going to use the 660nm/445nm/405nm lens that comes with the host (depends on what host you ordered) then you can skip this step. You could even use an standard clear aixiz acrylic lens because the AR coating will not be effective because its not meant for 532nm. Then unscrew the lens from the font of the module, you might want to heat it up to melt the glue. (Pictures coming soon)
3. Now screw the lens into the lens holder, whether it is the one you extracted from the green or the 3 element lens that came with the host. You might want to use some teflon tape if the lens is a bit wobbly.(it is the 3 element lens in the picture)
4. Press the module into the heat sink (you might want to add some thermal epoxy if it is not a tight fit) and then place the heat sink with the module in it inside the neck of the host, dont glue it in place yet if it needs glue. Screw the neck onto the body and then put a 18650 battery in and screw the tail cap on (make sure its off before you put it on, you can test with your DMM). Now position the heat sink so your spring has a good tension, then glue it into place if you need to.
5. Place your smallest o-ring in the head of the host if it is not already in there (you will see where it goes, there is a small ring milled out in the head). Now place the clear lens on top of the o-ring and then screw the lens holder into the head of the host, get some needle nose pliers and then screw it up tight. Now you can assemble the rest of the host.
6. Now it is just trial and error with adjusting the lens. You have to adjust the lens so that when the head is fully screwed on, it is focused to infinity. You can focus it to a close range for burning by unscrewing the whole head (dont unscrew it so far that the head comes off)
7. ENJOY YOUR LASER!!!!
Now i will talk about build quality. There is only 2 things i can complain about, they are that the hole on he head of the host, looks like its been filed out a bit and the heat sink on mine isnt pressed into the host to make the whole host a sink (it just slides through, but there is only a small gap so i can use some thermal epoxy). There is nothing more to really say apart from its 20 bucks so dont be expecting some you bute host. Overall it looks very nice.
There will be more pictures soon when the module shows up, sorry they are bad quality, we have a 5mp camera from like 2000. How do you get the night beam shots to be so clear? I tried doing a few beam shots at night with a 100mW greenie but i couldnt pick up the beam very well, if not at all.
EDIT: WARNING! YOU MUST HAVE A MODULE THAT HAS THE EXPANDING LENS GLUED RIGHT ONTO THE CRYSTALS (ONLY TWO PARTS, NOT THREE) So i got my 200mW module from laserlands, what i had to do to make the module a press fit is cut about 5mm off the back of the front (the back of the front where the threads are that screw onto the back of the module, confused much? haha). You have to screw that on and then press it into the heat sink. The reason i broke it is because i screwed the lens too far back and when i screwed the head back on it picked up the little expanding lens off the crystals and when i got it out i had to take it out of the lens and then i knocked the lens over and couldn't figure out the way it went together again. Then i tried to glue the expanding lens back on and got glue all over the crystals.
Then i take you to part 3 of this adventure
I ordered a few 1mW green ebay pens and they were the ones that have the bigger, press fit modules not the ones that screw into the head. So i filed out the heatsink a tiny bit and then pressed the hell out of it into the heatsink (you could easily see the heatsink was a lot bigger than the top of the heatsink because i didnt press it in the whole way because i couldnt get it out to file it down more) so then i had to file the outside of the heatsink to fit into the host and then that expanded the neck of the host so the head was a snug fit. The module had one of those ones that had the black plastic lens so i took the lens holder out of the head and screwed the head on tight (it cant go on all the way, because the lens is too long to screw the whole head on, but it stays on there tight. It has lost its ability to be waterproof and focused, but looks mighty fine and no laser is complete without a warning sticker This module is meant for 2 AAA's but it now uses a 18650 and bumps the brightness quite considerably.This is nothing great but it's just for you guys to waste some time reading all of this or maybe some new people just want to try this.
Thanks Guys!
Attachments
Last edited:
