Welcome to Laser Pointer Forums - discuss green laser pointers, blue laser pointers, and all types of lasers

LPF Donation via Stripe | LPF Donation - Other Methods

Links below open in new window

ArcticMyst Security by Avery

Micro laser driver - fits Aixiz/DX modules

rkcstr

0
Joined
Dec 1, 2007
Messages
1,368
Points
0
pocketfluff said:
What would be the price of an unassembled one?

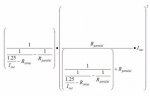
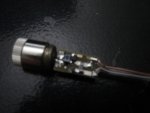
I'm thinking $4.50 for the kits.  Includes full-color PDF with step-by-step instructions with pictures and diagrams.  My current driver has 13 pages, this one will probably be even longer for extra steps.

For those who want to buy larger amounts of the kits, I may consider a discount as well.


Also, for those who have an intended range for current (ie the high-power HDDVD diodes, etc). I can also use some of my old values to limit to say 50mA or 100mA as well.


Joined
Oct 28, 2007
Messages
2,631
Points
48
so jsut a question... at 400mA a .5W pot with no resistor in parallel with it would hold?
 

rkcstr

0
Joined
Dec 1, 2007
Messages
1,368
Points
0
amkdeath said:
so jsut a question... at 400mA a .5W pot with no resistor in parallel with it would hold?

You can calculate power dissipated by a resistor by:
1. P = I^2 * R
2. P = V^2 / R

For regulators with a reference voltage of 1.25V, such as the LM317, MC33269, and LM1117 series:

With a series resistor to limit to 400mA, it would need 3.125ohms effective resistance when the pot is turn all the way down (close to 0 ohms).  The shunt resistor voltage (across the resistor/pot) will be 1.25V, so P = 1.25^2 / 3.125 = 0.5W.  That is the power dissipated by the equivalent resistor (resistor and pot combined), so the pot and the resistor in series would be dividing the power, but not equally depending on the resistance of the pot.  You can calculate the power dissipation at a given current by knowing what the pot resistance is at that current and using the first equation above.

I came up with this little equation that you can graph to figure out the power dissipation of your pot across a range just by plugging and chugging  ;D

Power(pot) = ((1.25V / Iout) - Rseries) * Iout^2

I'm not sure it's entirely accurate, but I think it should work.  The calculated peak power dissipation for the pot is around 1/8W at ~200mA assuming a 3.1ohm Rseries, so at higher and lower currents (for the same Rseries), the power dissipation drops as either the current drops, or the pot has less resistance than the Rseries.

From what I have read, as operating temp increases, effective power handling of a resistor goes down (manufacturer's datasheet may say something about how much or at least give a max temp), so at least doubling the the effective resistance of the pot is a good idea, but the fixed resistor should be OK as long as it's rated near the peak output, which for 400mA will be when the pot is turned to [near] zero ohms and will be close to 0.5W.

[Added 5/20/2008]
So you basically want to calculate what the power dissipated by the pot is at a certain current output.  What happens is that when you put a resistor in series with another, it's additive for resistance and power.  But if the resistors are not equal in their resistance the distribution of power between them is unequal (one will have more than the other).  Since the pot changes it's resistance, this balance also changes as you adjust it.

So, for example, if you're pushing 1A through two series resistors that are 10 ohms each, the effective (combined) resistance is 20 ohms and the effective power disspation is 20W.  But, you can calculate the power disspation of each as being 10W (I^2 * R).  So, by putting two 10ohm resistors in series, you can spread that 20W of power disspation out over two resistors rather than having a single 20 ohm resistor handle all 20W.

With the regulator, since current and resistance are changing, but voltage remains constant, it's a little more complicated.  Basically what's going to happen is that the resistance of the series resistor will remain constant, while the pot will change (obviously), but as the combined resistance decreases, current output from the regulator (and thru the resistors) increases.  As current increases the power dissipated also increases, and since both the pot and the resistor have the same current being pushed through them (since they're in series), the one with the higher resistance will have the most power dissipated (think of the P = I^2 * R, where bigger R equals more power).  

The peak of the current output will be where the pot and the series resistor are equal, ie where the combined resistance is twice that of the series resistor (2*Rseries).  So you could actually simply calculate the peak power dissipation for the pot by:

1. (1.25/(2*Rseries)), which gives the output current (I) of the regulator at where the pot is peaking in dissipation.

2. Then to calculate the power, you have to do I^2 * R, so you square the above equation (which gave you I) and multiply by the resistance of the pot, which Rpot = Rseries, so the equation for power becomes:

(1.25/(2*Rseries))^2 * Rseries

This is different from the equation that I posted before in that you're calculating the peak power of the pot needed for the current output limit you want (the top of your output range, determined by Rseries).  The one I gave you previously in the post just gives you the power at a specific current setting for the regulator, so you can see what the power disspation would be at any point in your range of the pot's resistance.

[end added portion]

And then you have my parallel pot with resistor and series resistor that I'll be using on my adjustable driver, also called a star configuration, which to calculate the power dissipated by the pot requires a MUCH more complicated equation, which you can check out in the attached pic.

Someone please correct me if any of this is wrong as it's all stuff I derived from standard equations, not something I found online.
 

Attachments

  • image004.jpg
    image004.jpg
    7.9 KB · Views: 246
Joined
Jan 20, 2008
Messages
1,724
Points
0
So, I received my drivers today.. I'm really happy.. they're smaller than I imagined them.

Anyways, I took a guess that the one with less resistors on it would be the one for bluray, so I soldered up my diode and plugged the thing into a 7.4v LiPo battery (at a full charge, it's probably 8.2v or so)... now, I see afterwards that one of the wires has a white line on it, but that wasn't very easy to spot... I'm assuming that wire should be GND... but that really wasn't clear when I went to plug it in... I took a guess based on "the side of the board that LD GND is on should be the negative side of the board" and plugged it in accordingly. I was watching pretty closely and noticed a small flash inside the aixiz and when I took it apart I noticed this burned trace.

I don't see any diodes in place to prevent reverse voltage... do you think I may have killed the regulator?

It might be a nice touch to use red and black wires in the future to prevent such confusion.
 

Attachments

  • bah.JPG
    bah.JPG
    45.1 KB · Views: 1,547
Joined
Jul 24, 2007
Messages
2,749
Points
0
Didn't it come with written instructions? the ones I have seen were very comprehensive, with photo's showing the layout and connections, and a table showing what resistors are mounted for what output?

Regards rog8811
 

somail

0
Joined
May 6, 2008
Messages
13
Points
0
I thought the circuit board itself has LD+, GND etc.... written on it. I know at least mine did. Also the Gnd trace run down the side of the board, so which ever side you connected your neggative pin on the diode will also be the same side the negative wire will be on.
 
Joined
Jul 24, 2007
Messages
2,749
Points
0
The ones I worked with I wrapped a piece of red insulating tape around the pos wire so that when the aixiz housing is fully assembled it is obvious which wire is which...

Regards rog8811
 

rkcstr

0
Joined
Dec 1, 2007
Messages
1,368
Points
0
Well, the burnt trace means there was a large current flowing through it, probably because you reversed the polarity of the wires and the reverse-protection diode basically shorts the output in that case.

The wire with the white stripe is positive and is the wire on the opposite side of the blown trace, which I outlined in the instructions you can download from my website.  Unfortunately I'm not sure whether you've damaged anything permanently.  It's possible you may have blown the reverse-protection diode if you also blew a trace, and who know what else may have gone with it.

Take a read through:
http://rkcstr.googlepages.com/Micro_LD_Driver.pdf

I'd suggest carefully removing the driver (just in case, short the output cap before you do it) then connecting the driver up to a diode test load (such as 4x 1N400x or some LEDs).  You can just bridge the blown trace with a solder blob or a piece of wire soldered across the gap.  Then test it to see if it’s putting out any current with an multimeter set to Amps connected in series with one of the power leads.  

The reverse-protection diode isn’t necessary for the driver’s function, but is a good idea for cases just like this.  If your laser diode isn’t blown, you can thank that diode.  So, you can use a diode test setting on the multimeter and test with the leads in one direction and then switch, it should show voltage in one direction (~.7V or so) and none in the other, if it shows 0V in both directions, it’s blown

I used the clear insulated wire because it was readily available locally and was a great deal from Radioshack.  I hoped that it would be simple enough to figure out, but even I have made the mistake switching the wires.  So, just a few days ago I bought some solid black/white insulated wire from Radioshack, but it's more than twice as much as the clear stuff... I'm still looking for somewhere I can get a good deal on some 24 gauge wire in red/black.
 
Joined
Jan 20, 2008
Messages
1,724
Points
0
Hmm.

Yeah, I didn't receive any instructions.. it might be a good idea to email that pdf or at least a link to it with every sale.

It seems that I connected it correctly then... I plugged the striped wire into positive and the clear one into negative...

I've double checked the pinout for the LD and I do have that right... do you know anything else that may have caused that? is it the battery?

I've soldered a wire across the blown trace, but I'm not real eager to try this again since I haven't changed anything and would be basically doing the exact same thing again.
 

rkcstr

0
Joined
Dec 1, 2007
Messages
1,368
Points
0
pseudolobster said:
Hmm.

Yeah, I didn't receive any instructions.. it might be a good idea to email that pdf or at least a link to it with every sale.

It seems that I connected it correctly then... I plugged the striped wire into positive and the clear one into negative...

I've double checked the pinout for the LD and I do have that right... do you know anything else that may have caused that? is it the battery?

I've soldered a wire across the blown trace, but I'm not real eager to try this again since I haven't changed anything and would be basically doing the exact same thing again.

Guess nobody sees the instructions on the site... I put them there so people wouldn't have to depend on me emailing them. But, I guess I should make it more obvious.

Putting the LD on wrong wouldn't do anything bad except for maybe damage the LD. I don't know about the battery, have you tested the voltage on it? The drivers are all tested before shipment, so it shouldn't be the driver. But, have you tested for shorts anywhere in the circuit? Try testing across the LD output pads, make sure there's not a small short there.

As for the fixed trace, I DON'T, DO NOT, ABSOLUTELY DO NOT want you to power it up again with a laser diode attached. That's just asking for a dead diode. Like I said, test it with some cheap little diodes like the 1N4001 or similar that you can get from Radioshack for $1. But, first, make sure you test for some short circuits, because it seems very likely something was shorted if it was connected correctly to the battery.
 
Joined
Jan 20, 2008
Messages
1,724
Points
0
idk.. the battery is fresh and I believe they ship with a full charge. it's a 7.4v LiPo which should have a little over 8v on a full charge and maybe 6.5 on an empty charge. It's a 900mAh 15c LiPo, capable of delivering 13.5A at a time... though from what I understand that shouldn't cause any problem as the driver should only take what it needs... right? it's not sending 13 amps at all times whether the driver needs it or not, right?

I think the IR and red positive leads may be shorted, but the pads on the bottom of the board aren't connected to anything , so I can't see that being a problem. I've visually inspected the board for shorts, and can't find any... though it might be possible one of the solder points connecting the wires to the battery may have shorted on the aixiz housing.. but I'm guessing that would make my battery explode rather than blowing a trace...
 
Joined
Jan 20, 2008
Messages
1,724
Points
0
rubberband said:
do the drivers have reverse polarity protection?

yes, it seems they do... there's a diode across the output to the laser... there's not, however, one forward of the regulator.. so if you plug it in backwards, you probably won't kill the laser diode.. you may, however, kill the driver.
 

rkcstr

0
Joined
Dec 1, 2007
Messages
1,368
Points
0
rubberband said:
do the drivers have reverse polarity protection?

Yes, they do.

untitled.jpg


pseudolobster said:
idk.. the battery is fresh...

Not sure what's going on... I didn't really suspect your battery as the culprit.  

Sometimes shorts aren't really noticeable, because they can be as much as a stray piece of metal flake that's landed on the board.  A short somewhere is my best guess as to what's happening.

If you want, just send it on back, I'll send you a new one since I have no idea what's going on with it.  

edit: I can mail you a new one by the end of the week... in the mean time, I'd see if you can track down if there is something shorted on the board.

pseudolobster said:
yes, it seems they do... there's a diode across the output to the laser... there's not, however, one forward of the regulator.. so if you plug it in backwards, you probably won't kill the laser diode.. you may, however, kill the driver.

I've inadvertantly reversed the polarity on some of personal drivers multiple times, one time I had it on for ~10 sec before realizing... but the driver's always worked after correcting the reversal.  A diode before the regulator would short the battery, possibly cause it to over heat and explode if the diode didn't blow first, so not a good idea.
 
Joined
Jan 20, 2008
Messages
1,724
Points
0
No worries, I'll check everything over with a mulimeter when I get home and try it out with a dummy load before trying again.


Top