

- Joined
- Jan 14, 2011
- Messages
- 3,816
- Points
- 63
Hey everyone!
So I have finally been allowed to order my 12x Blu-Ray diode, meaning that it is now time to start the tutorial detailing exactly how I built it!
So because this is a tutorial/build thread, I will have some things that aren't usually common in just build threads.
Soldering difficulty: Medium-hard
Fabrication difficulty: Medium
Assembly difficulty: Easy
Parts List:
- Aurora C6 Shell ($10.90 - C6 DIY Cree LED Flashlight Full Casing/Shell with Driver Pill (2*CR123A/1*18650) - Flashlight Parts and Tools)
- 7/8" Aluminum rod stock (any industrial metal shop)
- LED Driver ($6.97 - 3.6V~9V 800mA Regulated IC Circuit Board for Cree and SSC LEDs (4-pack) - Flashlight Parts and Tools)
- Small set-screw with tap to fit (Sears, Home Depot, Ace Hardware)
- Hand drill or drill press (your garage)
- Files/Lathe (but if you have a lathe, you don't need me here, do you?)
- BDR-S06J Laser diode (BDR-S06J 12x Blu-Ray burner lens(500+mW) [M0019] - $51.99 : Modwerx Shop)
- Steel wood and various sandpapers (local hardware store)
- 2x small (1206 size works well) 1 Ohm SMD resistors or one small .5 SMD resistor (DigiKey/Mouser)
- A pair of small tweezers
- Small guage solder and soldering iron
- Aixiz Module
- 2x RCR123A li-ion rechargeable batteries
- Aixiz 405nm coated AR lens or 405-G1/G2
So now that that is out of the way, let's begin.
So the first step is to remove all the components from your shell. That means unscrew it fully, remove everything that isn't part of the host (including the pill) and then screw it all back together.
Due to the dangerous nature of deanodizing aluminum, I have removed how to do it from this tutorial.
Once you have removed the anodization, grab some of your roughest sand paper, and start sanding the thing down in a rotational fashion. Move gradually up and finally finish off the sanding with grade 00 steel wool. Now it should be all shiny.
Your next step is working with the driver. Grab your driver and hold it in a helping-hand-station with an attached magnifying glass or just in something steady so you can work with both of your hands.
Now, you will be removing the resistor circled in the following picture:
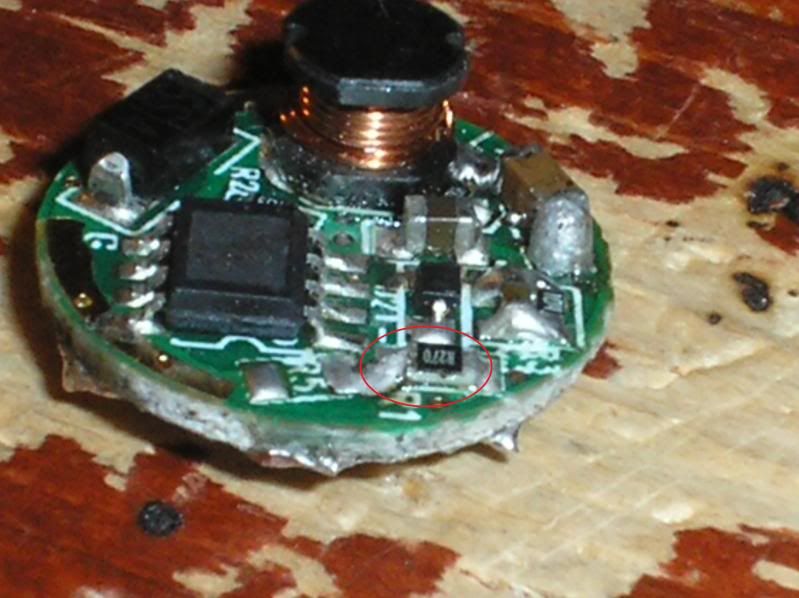
Do this by heating up both solder blobs at each end quickly and in succession while pulling with little force on the resistor with your tweezers. It should come up easily. Replace this resistor with one of your 1 Ohm resistors (should fit fine) and then stack another 1 Ohm resistor on top of *that*, giving you an equivalent resistance of .5 Ohms.
Now your driver will output 500mA, a safe but strong operating current for 12x blu-ray diodes. Connect the driver to a testload of ~6V and an input (outer ring is -, inner is +) of 7.2-8.4V to make sure it is outputting this safely.
Now take your pill that you set aside earlier and remove the brass ring from the bottom. You will need to file down your driver a bit to get it to fit in that brass ring, but once you have it, it will be a nice tight fit. Then, stick your driver in the brass ring and stick the brass ring back into the pill with the battery and host contacts facing away from the pill. Then solder a connection between the brass ring and the drivers outer ring, and you are almost done (see picture)!

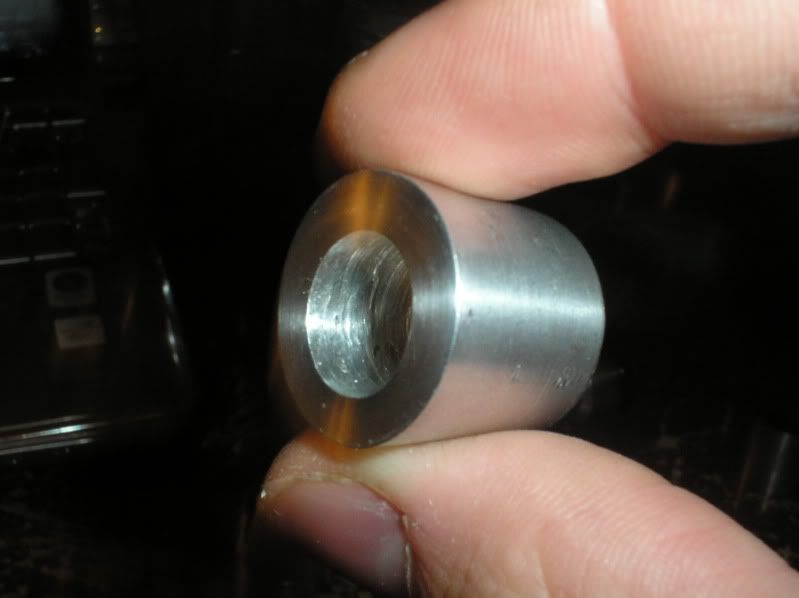
The next step is making that durn heatsink. I got some aluminum rod stock from a local metal shop and just drilled a hole in it (size 15/32"). You are going to want to make sure that you get it as close to centered as possible, and as straight down into it as possible. Of course, you are going to want to cut that rod stock first down to a reasonable size (7/8" long is safe).
After you have a hole in it and it has been cut to a good size, stick a thick bolt in the chuck of your hand drill/drill press. Stick the cut and drilled piece of rod stock on it, and then fasten it down with a nut. Now you have a makeshift lathe!
Turn on your drill and start filing away. You will want to try stick the heatsink into the top of your host (minus the headcap that screws onto the thing right above the pill) to see if it fits. It just *nearly* starts to fit in there, stop filing! Now get out your sandpaper and start sanding it down a bit and finally polish it up with your grade 00 steel wool. Now it should be nice and shiny and fit perfectly into your host. Now we just need to deal with that pesky top that is rough and will be displayed! So just sand it down and then use your grade 00 steel wool on it, and it will be all nice and shiny too. And make sure an Aixiz module head fits in the hole you drilled out, but not too loosely.
Next, decide which end you want to be the "front", and then go back about 1/4" and tap the thread for your set screw. But, make sure the set screw is the right length! This will hold your Aixiz module in place.
This is what your heatsink should look like now.
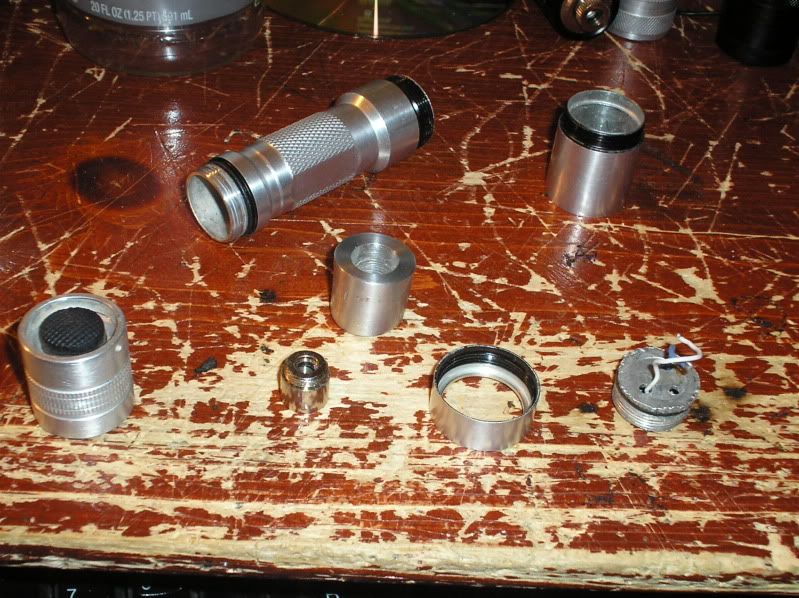
So here is everything that you should have all done, disassembled.
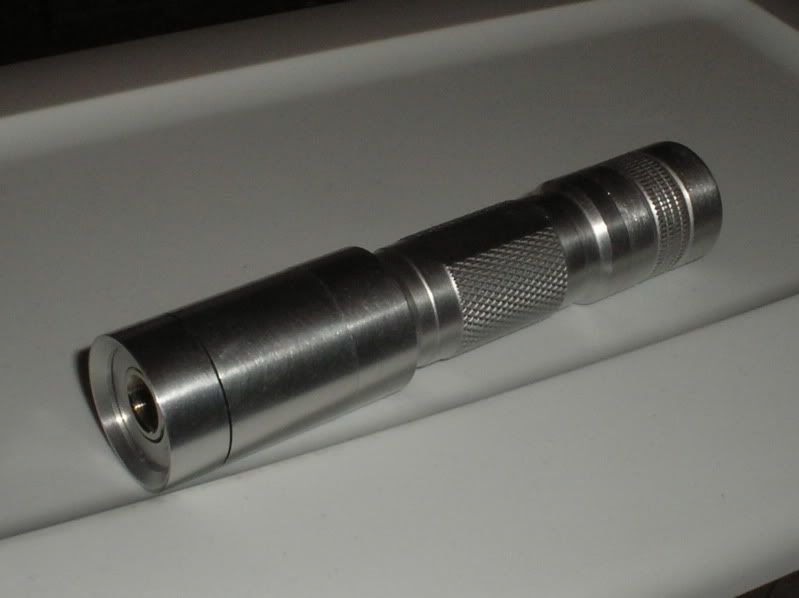
And here is a picture of everything assembled (minus the diode).
The final part is sticking your diode in the Aixiz module. Solder some small leads onto your diode (the left pin is positive, the right pin is negative, if looking at it so that the pins are at 9 o'clock, 12 o'clock, and 3 o'clock). Then, solder those leads to your driver leads (red to positive, black to negative) and cover them in shrink wrap. Make sure your batteries aren't in there yet and it's not on!
Finally, put your Aixiz module through the heatsink and set the set-screw. Now stick on your lens of your choice (I chose an Aixiz 405 glass lens), stick your batteries in, and presto! Your laser is working!
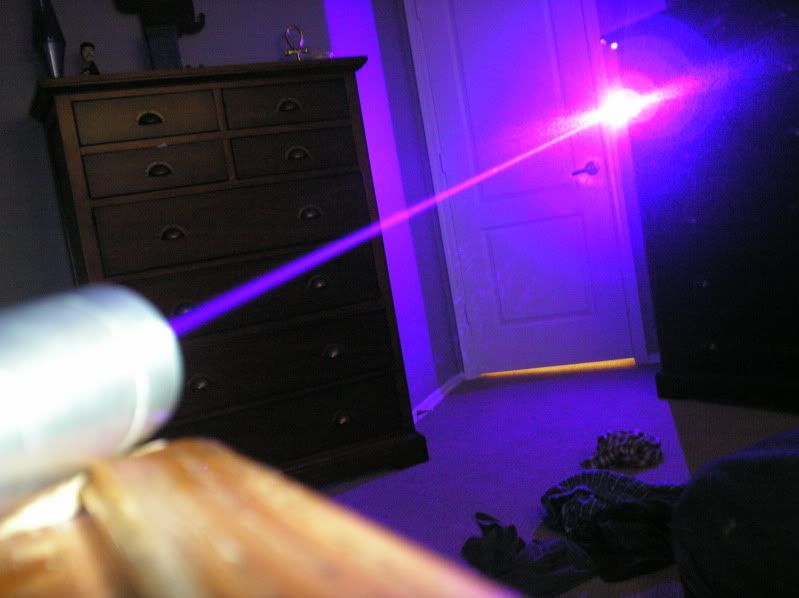
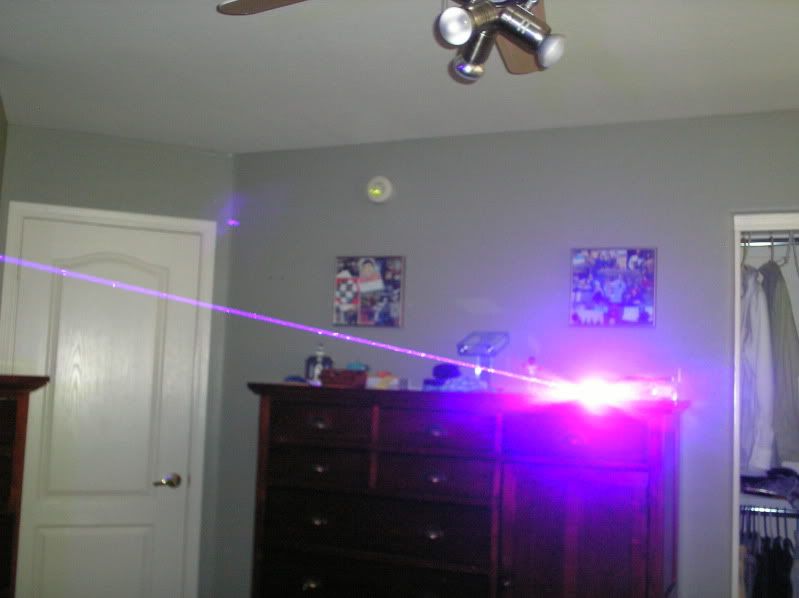
Here are some pictures of it on, and, of course, beamshots (taken in a dark room on NightMode on my camera, no smoke, etc.)

Hope you enjoyed this build/tutorial thread!
So I have finally been allowed to order my 12x Blu-Ray diode, meaning that it is now time to start the tutorial detailing exactly how I built it!
So because this is a tutorial/build thread, I will have some things that aren't usually common in just build threads.
Soldering difficulty: Medium-hard
Fabrication difficulty: Medium
Assembly difficulty: Easy
Parts List:
- Aurora C6 Shell ($10.90 - C6 DIY Cree LED Flashlight Full Casing/Shell with Driver Pill (2*CR123A/1*18650) - Flashlight Parts and Tools)
- 7/8" Aluminum rod stock (any industrial metal shop)
- LED Driver ($6.97 - 3.6V~9V 800mA Regulated IC Circuit Board for Cree and SSC LEDs (4-pack) - Flashlight Parts and Tools)
- Small set-screw with tap to fit (Sears, Home Depot, Ace Hardware)
- Hand drill or drill press (your garage)
- Files/Lathe (but if you have a lathe, you don't need me here, do you?)
- BDR-S06J Laser diode (BDR-S06J 12x Blu-Ray burner lens(500+mW) [M0019] - $51.99 : Modwerx Shop)
- Steel wood and various sandpapers (local hardware store)
- 2x small (1206 size works well) 1 Ohm SMD resistors or one small .5 SMD resistor (DigiKey/Mouser)
- A pair of small tweezers
- Small guage solder and soldering iron
- Aixiz Module
- 2x RCR123A li-ion rechargeable batteries
- Aixiz 405nm coated AR lens or 405-G1/G2
So now that that is out of the way, let's begin.
So the first step is to remove all the components from your shell. That means unscrew it fully, remove everything that isn't part of the host (including the pill) and then screw it all back together.
Due to the dangerous nature of deanodizing aluminum, I have removed how to do it from this tutorial.
Once you have removed the anodization, grab some of your roughest sand paper, and start sanding the thing down in a rotational fashion. Move gradually up and finally finish off the sanding with grade 00 steel wool. Now it should be all shiny.
Your next step is working with the driver. Grab your driver and hold it in a helping-hand-station with an attached magnifying glass or just in something steady so you can work with both of your hands.
Now, you will be removing the resistor circled in the following picture:
Do this by heating up both solder blobs at each end quickly and in succession while pulling with little force on the resistor with your tweezers. It should come up easily. Replace this resistor with one of your 1 Ohm resistors (should fit fine) and then stack another 1 Ohm resistor on top of *that*, giving you an equivalent resistance of .5 Ohms.
Now your driver will output 500mA, a safe but strong operating current for 12x blu-ray diodes. Connect the driver to a testload of ~6V and an input (outer ring is -, inner is +) of 7.2-8.4V to make sure it is outputting this safely.
Now take your pill that you set aside earlier and remove the brass ring from the bottom. You will need to file down your driver a bit to get it to fit in that brass ring, but once you have it, it will be a nice tight fit. Then, stick your driver in the brass ring and stick the brass ring back into the pill with the battery and host contacts facing away from the pill. Then solder a connection between the brass ring and the drivers outer ring, and you are almost done (see picture)!
The next step is making that durn heatsink. I got some aluminum rod stock from a local metal shop and just drilled a hole in it (size 15/32"). You are going to want to make sure that you get it as close to centered as possible, and as straight down into it as possible. Of course, you are going to want to cut that rod stock first down to a reasonable size (7/8" long is safe).
After you have a hole in it and it has been cut to a good size, stick a thick bolt in the chuck of your hand drill/drill press. Stick the cut and drilled piece of rod stock on it, and then fasten it down with a nut. Now you have a makeshift lathe!
Turn on your drill and start filing away. You will want to try stick the heatsink into the top of your host (minus the headcap that screws onto the thing right above the pill) to see if it fits. It just *nearly* starts to fit in there, stop filing! Now get out your sandpaper and start sanding it down a bit and finally polish it up with your grade 00 steel wool. Now it should be nice and shiny and fit perfectly into your host. Now we just need to deal with that pesky top that is rough and will be displayed! So just sand it down and then use your grade 00 steel wool on it, and it will be all nice and shiny too. And make sure an Aixiz module head fits in the hole you drilled out, but not too loosely.
Next, decide which end you want to be the "front", and then go back about 1/4" and tap the thread for your set screw. But, make sure the set screw is the right length! This will hold your Aixiz module in place.
This is what your heatsink should look like now.
So here is everything that you should have all done, disassembled.
And here is a picture of everything assembled (minus the diode).
The final part is sticking your diode in the Aixiz module. Solder some small leads onto your diode (the left pin is positive, the right pin is negative, if looking at it so that the pins are at 9 o'clock, 12 o'clock, and 3 o'clock). Then, solder those leads to your driver leads (red to positive, black to negative) and cover them in shrink wrap. Make sure your batteries aren't in there yet and it's not on!
Finally, put your Aixiz module through the heatsink and set the set-screw. Now stick on your lens of your choice (I chose an Aixiz 405 glass lens), stick your batteries in, and presto! Your laser is working!
Here are some pictures of it on, and, of course, beamshots (taken in a dark room on NightMode on my camera, no smoke, etc.)
Hope you enjoyed this build/tutorial thread!
Last edited:


") I Like How it turned out.
I Like How it turned out.