Hi guys!
Today I'd like to present my newest achievement, orange laser.
I started alignment by turning on laser diode just above threshold. After making sure that it works, beam is on axis and can be collimated into nice rectangle (no astigmatism compensation). After that I colimated the beam roughly in the middle of the crystal and rotated the crystal until it's sides were exactly perpendicular to pump beam followed by flat HR mirror also positioned same way. It's easy to check when external faces are parallel to laser beam because they create external cavity that greatly increases output power near threshold. It works this way even though all faces are AR coated because near lasing threshold just a bit more feedback increases power considerably. Lastly I added OC with ROC=50mm and started increasing power.
At 1.2W of pump power the absorption in crystal was at it's peak so I kept it at this level. I rotated OC until I saw two spots close to center. I slowly adjusted both mirrors until the two spots overlapped in the middle of input beam. Some dichroic filter is useful to filter out pump beam from fluorescence. I don't recommend absorptive filter because if input wavelength drifts a bit it's too simple to burn the hole into the filter.
Today I'd like to present my newest achievement, orange laser.
The inspiration
I'd like to share the details of my journey in acquiring an orange laser for my desk. Some of you might know that I initially dabbled with dye lasers. While they are impressive in terms of the range of colors they can produce (with a single dye capable of spanning half the rainbow, and a mixture of dyes covering nearly the entire visible spectrum), they come with the drawback of requiring Q-switched pumping or a complex setup involving dye jets and recirculation. These setups tend to be neither compact nor quiet. Furthermore, every lab I visited with dye lasers seemed to have tables and floors stained with dyes, creating a fluorescent environment. Clearly, I needed to explore alternative options.Another options
Ideally, using a laser diode would be the best solution. Unfortunately, due to technical limitations, there are no laser diodes available between 525nm and 630nm at room temperature.. The AlGaInP have quite high temperature dependence of up to 0.17nm/K and some people successfully pulled them up to 614nm at low power using a lot of cooling. While this approach technically works it has terrible efficiency, consuming 55+W to generate few mW of output beam.My solution
My solution was to build a DPSS (Diode-Pumped Solid-State) laser using a material that allowed for both pump and output beams in the visible light range. Welcome Praseodymium (Pr3+), an ion that absorbs blue light at around 444nm and emits red (640nm), orange (607nm), and green (523nm). This ion not only enables pumping with blue laser diodes but also simplifies alignment because everything is readily visible.Construction details
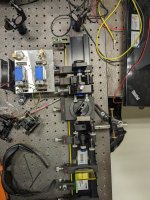
My construction process started with placing a wavelength-selected blue laser diode into a Thorlabs collimator package. I then glued a 3x3x7mm 0.3% Pr:YLF crystal into a V-mount and designed and 3D printed adapters for 15mm mirrors to fit 1" kinematic mounts. I assembled the cavity and collimator on optical table. |
| this is how setup looks like |
I started alignment by turning on laser diode just above threshold. After making sure that it works, beam is on axis and can be collimated into nice rectangle (no astigmatism compensation). After that I colimated the beam roughly in the middle of the crystal and rotated the crystal until it's sides were exactly perpendicular to pump beam followed by flat HR mirror also positioned same way. It's easy to check when external faces are parallel to laser beam because they create external cavity that greatly increases output power near threshold. It works this way even though all faces are AR coated because near lasing threshold just a bit more feedback increases power considerably. Lastly I added OC with ROC=50mm and started increasing power.
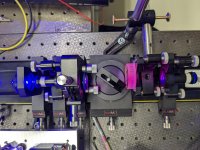
 |
| close-up of laser cavity |
At 1.2W of pump power the absorption in crystal was at it's peak so I kept it at this level. I rotated OC until I saw two spots close to center. I slowly adjusted both mirrors until the two spots overlapped in the middle of input beam. Some dichroic filter is useful to filter out pump beam from fluorescence. I don't recommend absorptive filter because if input wavelength drifts a bit it's too simple to burn the hole into the filter.
Output beam measurements
Once laser started working I added absorptive filter in series with dichroic, put power meter in beam and fine tuned resonator to get peak power. I was able to obtain 2.5mW at 607nm and over 140mW at 640nm. I added photos of both output beams but -- as always when photographing lasers -- the colors are slightly off. Orange looks like true orange in real life and not almost read like on photos. |
| orange output beam |
 |
| orange beam on power meter |
 |
| close-up of red output beam |
 |
| red beam on power meter |


")