Welcome to Laser Pointer Forums - discuss green laser pointers, blue laser pointers, and all types of lasers

LPF Donation via Stripe | LPF Donation - Other Methods

Links below open in new window

ArcticMyst Security by Avery

NUBM35 Blaster

Joined
May 4, 2009
Messages
2,239
Points
83
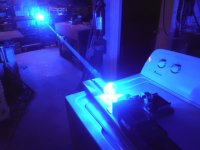
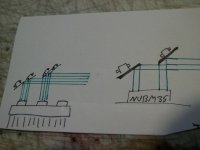
Having seen a couple people turn the laser arrays into portables I wanted one of my own. Though not quite ready for a massive NUBM36/37 I went for the smaller NUBM35. Even still i wasnt quite ready for how much heat the array produces and the run time is still quite short even with the what i though would be a decent amount of aluminum heatsink.

Heatsinks.jpg

Laser-Array.jpg


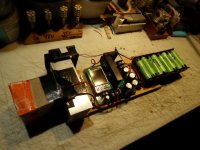
The array and two LM338K's are mounted to chunks of a 38mm aluminum bar are kept separated by plastic mounts. The whole laser is being built inside a water gun from amazon that I painted flat black.

Regulators.jpg


Three 1Ohm resistors for setting the current are thermally glued to the underside of the heatsink

Mosfet.jpg


A MOSFET handles the switching power so I can use a small microswitch glued in behind the original trigger

Batteries1.jpg


Three 1550mAh 75C 3S lipo batteries provide the power, the power and balance leads for the front two batteries had to be extended to reach the access door on the rear of the blaster

Batteries2.jpg


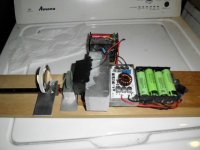
The rear battery is in the stock right under the hatch I will use for plugging in the batteries as well as for charging

Assembled-with-leads.jpg


Here you can see the battery leads coming out through the hatch

Fully-Assembled.jpg


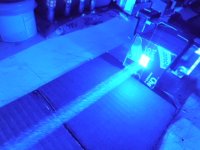
Fully assembled and ready to go. I added some decals from some Gundam Kits to help break up the flat black exterior
TopShot.jpg


The three regulators can be seen through the top opening where the water tank for the water gun used to be

Muzzle-Shot.jpg

Fire1.jpg

Fire2.jpg

Fire3.jpg


The run time is limited to about a minute, after that the laser array heatsink is pretty well heat soaked. Thanks for looking!


Joined
Jul 10, 2015
Messages
9,914
Points
113
Creative design and a nice fit. :)
Now you need to make a beam expander for it...... maybe add a safety/enable switch ?
 
Joined
May 4, 2009
Messages
2,239
Points
83
Yeah it definitely needs a safety switch, I'll be adding that next. I do want to redo it some day in a larger host with forced cooling
 

Ears and Eggs

0
Staff member
LPF Site Supporter
Joined
Oct 1, 2007
Messages
2,883
Points
113
Really cool build, just needs 4X picatinny rails, one on each side on the front so you can mount a fleshlight, 2 laser sights, and a big thermal scope on the top. :D
 
Joined
Jul 10, 2015
Messages
9,914
Points
113
Something else I like to do is make a lens flare hider to get rid of most of the side-spray and give a cleaner looking beam bundle.
Here on this ugly test-bed I used some cardboard and let the laser mark what needed to be cut out, this helps block that bright blue flare that people will otherwise see if they pass by while your lasing in all but the shallow angles, which they wont see anyway unless looking down the beam like if taking a beam pic..... of course the longer and tighter your tube, the better your angle of reduction.

Your blaster looks good, so you could use a PVC tube mounted on the front painted any color you want, then make a cardboard cap that you can slip over the tube.
Just turn the laser array on and it will mark the cap for you, just remember to make an index mark so you put it back on in the same place after cutting out for the beams.

You could also make slip over lens holders, the lenses can be wider than the tube, just center them in your slip overs.

Actually you could mount a double concave on your tube on the inside and make a slip over tube for your double convex lens so that you can slide to focus, I have had some decent results even with the aggressive divergence of the beams. Just do your best to center the beam bundle in the lens and of course be safe.
 

Attachments

  • SANY6930.JPG
    SANY6930.JPG
    203.5 KB · Views: 30
  • SANY6932.JPG
    SANY6932.JPG
    172.9 KB · Views: 11
  • SANY6933.JPG
    SANY6933.JPG
    202.9 KB · Views: 29
  • SANY6938.JPG
    SANY6938.JPG
    188.4 KB · Views: 11
  • SANY6774.JPG
    SANY6774.JPG
    182.4 KB · Views: 12
  • SANY6795.JPG
    SANY6795.JPG
    191.1 KB · Views: 13
Last edited:
Joined
Jul 10, 2015
Messages
9,914
Points
113
Yes, and using 2 tubes that you slide one over the other to zoom to focus, you can mount tour concave to the end of your tube near the array and your convex on the output end of the slip over tube and the lenses don't have to be a perfect fit, just center them and let the extra glass run over for your glue/epoxy to grab.

Just need to make a mounting, maybe a plate to fit the end of your body.

The output ( convex ) will be wider so you will need to figure/test the range of movement you need, I only needed a few inches of travel to zoom from close to 25 feet with my scavenged lenses.
So the output tube could be a threaded coupler ( PVC ) for going from 1.25 to 2.0 inch pvc or depending on your lenses, ect... Plus the threads will give finer adjustment and hold your position.

I thought about using a motorized linear motion rail, they are not that expensive...... I'm waiting for the perfect diodes to build my own knife edge array, something with m-140 or better divergence and good for 4+ watts each would be nice.
 
Last edited:
Joined
May 4, 2009
Messages
2,239
Points
83
Holy cats! My diode array is not doing well. It probably has a max of 3mins of total on time used in short 5-8secs bursts and the array is suffering terribly.

IMG-3732.jpg


5 of the 14 diodes have already kicked the bucket. All 14 were working when I got the array and by the time I put the laser together in the blaster I was already down one diode but I wasn't too distraught over that. But now it seems a few more have gone off to semiconductor heaven. Maybe its just a sign I need to go bigger and better with a NUBM37!
 

Darktron

Active member
Joined
Dec 9, 2018
Messages
133
Points
43
Holy cats! My diode array is not doing well. It probably has a max of 3mins of total on time used in short 5-8secs bursts and the array is suffering terribly.

That's unfortunate maybe you're pusing the array to hard or better cooling is required?
 
Joined
Jul 10, 2015
Messages
9,914
Points
113
Both of my nubm35's are still doing fine with the exception of the 1 diode that was DOA, that said my unit with the dead diode was soldered to a board when I got it and the other was virgin pins, so maybe the units with soldered pins are pulled due to testing out of spec somehow ??

I'm driving mine @ 3.5A one with fan forced air over fins and one with just a mass of aluminum.

I did use a thin layer of thermal compound and I seated the arrays firmly, you could have too thick of a thermal compound layer or your chosen compound could be inadequate.
Do you remember what kind of thermal compound you used ?
Also I mount to a very smooth aluminum face, some of the bar stock is cut with a carbide tooth saw and left with an uneven face.

If you wanted to be super slick you could use a liquid cooled sink, maybe like this> Sink

You could use a longer liquid cooled sink or a finned sink with fan forced air and mount several nubm35 arrays, then knife edge them onto a single foot print at say.... 20 feet.
 

Attachments

  • SANY6746.JPG
    SANY6746.JPG
    173.7 KB · Views: 3
  • SANY6866.JPG
    SANY6866.JPG
    172.2 KB · Views: 3
Last edited:
Joined
May 4, 2009
Messages
2,239
Points
83
The thermal compound is just some generic stuff from Amazon so its very possible its inadequate for the thermal load. My next build will use liquid metal thermal paste


I did consider liquid cooling, but I believe that might be best suited for continuous heat transfer rather than high intensity burst loading. For my NUBM37 I'll be using a large Noctua CPU cooler with 6 heat pipes and a 140mm BB Gear fan. I have two of these fans already cooling an air compressor and they are frighteningly powerful. If you place them on a table and power them up they will actually hover ha!


I'll also use a 1/2" thick plate of copper between the LD array and base of the CPU cooler
 

Darktron

Active member
Joined
Dec 9, 2018
Messages
133
Points
43
The thermal compound is just some generic stuff from Amazon so its very possible its inadequate for the thermal load. My next build will use liquid metal thermal paste
Thermal grizzly is great TIM. Can't say if is enough for an array though.
 

Borislav@87

Active member
Joined
Mar 20, 2022
Messages
355
Points
43
Great constitution! It's a pity that the array is damaged. I went through the same thing. I received two damaged arrays and the third one came working and after 2 weeks one diode died. At the moment, only 13 units on 4A are working and so far they are approx. These arrays are probably very sensitive and get damaged very easily. I haven't overheated mine and they still broke. You should include a Peltier cell with your cooling. Here's a video. I'm waiting for them to arrive and I'm going to install one in the back of the big heatsink that the laser array is attached to, and in the back (warm) Peltier hot part I'm going to install a heatsink with a fan. I don't know if it will be able to cool at the same time, but it will certainly help to bring down the accumulated temperature faster.


Top