

- Joined
- Sep 16, 2007
- Messages
- 3,658
- Points
- 113
Some of you may know that Les Wright developed software for a RaspberryPi spectrometer.
I've just completed building and calibrating mine.
I'm very happy with this project and thankful for Les' great work.
Build Summary:
I used PySpectrometer 2 software to build a visible light and near-infrared spectrometer for measuring lasers.
The camera module does not include an IR filter which allows measurement in the near-infrared spectrum with the right lens and proper alignment of the camera and diffraction grating spectroscope.
I fabricated a platform for mounting the camera module and spectroscope using aluminum and Delrin (acetal) stock I had on hand.
The camera module and spectroscope are position adjustable, which is critical for good measurements in the desired spectral range (note that the camera and spectroscope alignment is slightly off-center and off-axis: this is intentional).
The design of the mount is extremely simple and is very similar to the platform Les demonstrates in his original build.
I included threaded feet that allow angle and height adjustment of the spectroscope platform for aiming at the desired target.

Results summary:
I calibrated the spectrometer using a combination of lasers and a fluorescent lamp that features Mercury, Terbium, Europium, and Argon emission lines.
The lasers I used in my calibration are 532, 562, and 589 nm DPSS lasers.
I tested the spectrometer after calibration on several other lasers, including diode lasers, the results are shown below in the spectrograph.
The spectrometer is accurate across the visible range with an error less than 1 nm, assuming the solid state lasers are producing exactly the design wavelength.
During initial testing, I found that I could achieve greater accuracy using a camera lens with a longer focal length, but this comes at the cost of a narrower measurement range.
Since I would like to also be able to detect infrared out to ~810 nm, I am ok with sacrificing a small amount of accuracy for broadband coverage.
I am very happy with the performance of the software and my build.
The total cost of materials was under $100. Setup and calibration was simple and well documented.
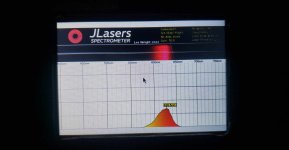
Here is the spectrograph of some (not all) of my laser wavelengths.

Materials:
The Pi Camera Module 3 comes in 2 flavors. I chose the No IR filter version to expand the range of measurement into the IR spectrum.
The module comes with a 75 degree FOV lens with autofocus. This lens is not suitable for this project, so I removed it by pinching it with round slotted pliers and twisting it counterclockwise until it clicks free. The lens can then be threaded out of the module by rotating it counterclockwise.
The lens I am using is a zoom lens, so that the field of view is adjustable. This allows me to set the field of view to an angle that provides good coverage of the spectral range I want to measure. A wider field of view includes a broader range - a narrower field of view includes a narrower range.
I needed to modify the M12 lens adapter to fit over the camera module contacts which involved milling out a slot at the base of one side of the adapter and drilling out the mounting holes to fit M2 screws.
In order to take measurements, I aimed the lasers at a white acetal block to diffuse the light, and aimed the spectroscope at this target. The acetal does fluoresce when illuminated with lasers in the blue range, which is picked up by the spectrometer. In order to avoid this effect, I used a stainless steel target for the deep blue and violet lasers.
Interestingly, I find that some of my solid state lasers, including my 532 nm and 561 nm lasers leak a small amount of infrared (despite the 532 nm laser including an IR filter) which would not be surprising except for the fact that I measured the emission at 774 nm rather than the expected 808 nm.
I'm not sure if this is an artifact or reflection inside the spectroscope leading to spurious spectral lines (this may happen when a light source shines directly into the spectroscope), if my calibration is inaccurate in the IR range, or if this is an actual unexpected emission line from these lasers. Is it possible that this could be IR fluorescence in the acetal block? I will have to do more research and testing to determine the cause. You can see this as a small peak in the spectrograph above.
The diffraction grating spectroscope produces relatively broad lines when aimed at a laser-illuminated target rather than sharp, crisp lines, which leads to some measurement error. There may be a way to make these lines shaper for better resolution and accuracy, but I don't yet know how I would achieve that. Likely this is a limitation of the diffractive optics, since the broad lines are a feature of both camera lenses I tested (one fixed lens in addition to the zoom lens).
If you like this project, check out Les' Github page and Youtube demo for details.
If you'd like to build one yourself but don't have the means to make your own mounting platform, I'd be happy to fabricate the mounting platform (the aluminum base, plastic camera module mount, diffraction spectroscope mount, and modified M12 lens adapter) and ship it to you. Cost is TBD but likely I can do it for around $30 in parts + labor, including the hardware (M2, M3, and M5 screws).
Please note that I am NOT selling a complete spectrometer. Les has generously made the software open-source, and the main components are easily purchased commercially. I am ONLY offering my services for fabricating the mounting platform for the components you see in my build.
Please feel free to ask questions if you have any!
I've just completed building and calibrating mine.
I'm very happy with this project and thankful for Les' great work.
Build Summary:
I used PySpectrometer 2 software to build a visible light and near-infrared spectrometer for measuring lasers.
The camera module does not include an IR filter which allows measurement in the near-infrared spectrum with the right lens and proper alignment of the camera and diffraction grating spectroscope.
I fabricated a platform for mounting the camera module and spectroscope using aluminum and Delrin (acetal) stock I had on hand.
The camera module and spectroscope are position adjustable, which is critical for good measurements in the desired spectral range (note that the camera and spectroscope alignment is slightly off-center and off-axis: this is intentional).
The design of the mount is extremely simple and is very similar to the platform Les demonstrates in his original build.
I included threaded feet that allow angle and height adjustment of the spectroscope platform for aiming at the desired target.
Results summary:
I calibrated the spectrometer using a combination of lasers and a fluorescent lamp that features Mercury, Terbium, Europium, and Argon emission lines.
The lasers I used in my calibration are 532, 562, and 589 nm DPSS lasers.
I tested the spectrometer after calibration on several other lasers, including diode lasers, the results are shown below in the spectrograph.
The spectrometer is accurate across the visible range with an error less than 1 nm, assuming the solid state lasers are producing exactly the design wavelength.
During initial testing, I found that I could achieve greater accuracy using a camera lens with a longer focal length, but this comes at the cost of a narrower measurement range.
Since I would like to also be able to detect infrared out to ~810 nm, I am ok with sacrificing a small amount of accuracy for broadband coverage.
I am very happy with the performance of the software and my build.
The total cost of materials was under $100. Setup and calibration was simple and well documented.
Here is the spectrograph of some (not all) of my laser wavelengths.
Materials:
- RaspberryPi Zero 2W
- Pi Camera Module 3 (No IR filter)
- Generic M12 mount 2.8 - 12 mm zoom lens
- M12 lens adapter
- Generic diffraction grating pocket spectroscope
- Aluminum and Delrin bar stock
- Steel and Stainless steel hardware
The Pi Camera Module 3 comes in 2 flavors. I chose the No IR filter version to expand the range of measurement into the IR spectrum.
The module comes with a 75 degree FOV lens with autofocus. This lens is not suitable for this project, so I removed it by pinching it with round slotted pliers and twisting it counterclockwise until it clicks free. The lens can then be threaded out of the module by rotating it counterclockwise.
The lens I am using is a zoom lens, so that the field of view is adjustable. This allows me to set the field of view to an angle that provides good coverage of the spectral range I want to measure. A wider field of view includes a broader range - a narrower field of view includes a narrower range.
I needed to modify the M12 lens adapter to fit over the camera module contacts which involved milling out a slot at the base of one side of the adapter and drilling out the mounting holes to fit M2 screws.
In order to take measurements, I aimed the lasers at a white acetal block to diffuse the light, and aimed the spectroscope at this target. The acetal does fluoresce when illuminated with lasers in the blue range, which is picked up by the spectrometer. In order to avoid this effect, I used a stainless steel target for the deep blue and violet lasers.
Interestingly, I find that some of my solid state lasers, including my 532 nm and 561 nm lasers leak a small amount of infrared (despite the 532 nm laser including an IR filter) which would not be surprising except for the fact that I measured the emission at 774 nm rather than the expected 808 nm.
I'm not sure if this is an artifact or reflection inside the spectroscope leading to spurious spectral lines (this may happen when a light source shines directly into the spectroscope), if my calibration is inaccurate in the IR range, or if this is an actual unexpected emission line from these lasers. Is it possible that this could be IR fluorescence in the acetal block? I will have to do more research and testing to determine the cause. You can see this as a small peak in the spectrograph above.
The diffraction grating spectroscope produces relatively broad lines when aimed at a laser-illuminated target rather than sharp, crisp lines, which leads to some measurement error. There may be a way to make these lines shaper for better resolution and accuracy, but I don't yet know how I would achieve that. Likely this is a limitation of the diffractive optics, since the broad lines are a feature of both camera lenses I tested (one fixed lens in addition to the zoom lens).
If you like this project, check out Les' Github page and Youtube demo for details.
If you'd like to build one yourself but don't have the means to make your own mounting platform, I'd be happy to fabricate the mounting platform (the aluminum base, plastic camera module mount, diffraction spectroscope mount, and modified M12 lens adapter) and ship it to you. Cost is TBD but likely I can do it for around $30 in parts + labor, including the hardware (M2, M3, and M5 screws).
Please note that I am NOT selling a complete spectrometer. Les has generously made the software open-source, and the main components are easily purchased commercially. I am ONLY offering my services for fabricating the mounting platform for the components you see in my build.
Please feel free to ask questions if you have any!
Last edited:


")
