Welcome to Laser Pointer Forums - discuss green laser pointers, blue laser pointers, and all types of lasers

LPF Donation via Stripe | LPF Donation - Other Methods

Links below open in new window

ArcticMyst Security by Avery

Review of the Sinner Cyperus II XL 2x18650

Joined
Jul 4, 2008
Messages
2,499
Points
113
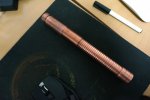
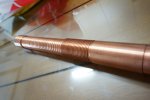
Well word of warning, this is going to be a large picture intensive review regarding a new all copper host that is being released in batches at a time courtesy of the United Arab Emirates (Dubai).

Due to the delays in getting the orders out, Sinner upgraded a few of the packages to DHL which normally delivers extremely quickly!! It took a total of 4 business days to arrive here. Wow!! impressive service! ( BIG THANK YOU SINNER!!)
I was supposed to get my package yesterday (Friday), but due to an ever occurring addressing problem in my area, the courier went to wrong apartment,
and by the time they figured it out they came too late in the day and instead dropped off an attempted delivery card on our door.
Today (Saturday) the courier is not delivering so I gave a quick phone call to the main office. In S.Korea it's really a help if you can learn to speak Korean and ask questions or be able to understand directions given to you in Korean. I certainly got my language exercise (listening and speaking) for today. My wife was impressed. :crackup:

Alright now for the review,

I'll firstly start with the packing.
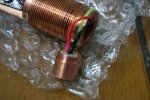
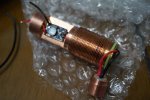
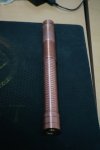
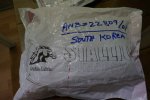
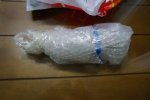
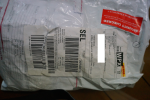
The package was well wrapped. (wrapped 3x) 2 bags and one bubble wrap which were all opened and inspected at the Korean customs office at the port of Incheon due to the red sticker and the sealing strip on the DHL bag.

Upon opening the bag, everything looked fine.
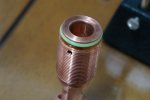
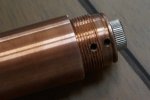
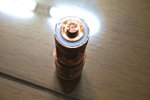
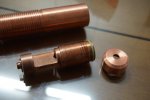
I did notice small blemish on the focussing knob when it looked like it had been dropped or gouged at some point. It's not worth worrying about and can be buffed out later.

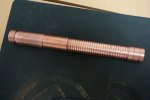
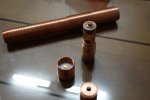
Physically this host is really dense, but well balanced. The host is slightly on the rough side around the pill and had some stray copper milling burrs that I ended up
taking a small file to. Again, not a large problem and was easily fixed.

I have thouroughtly inspected the host for any other issues.

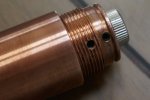
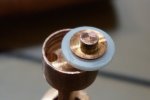
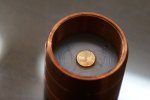
The tail switch and the battery positive contact terminal look very solid and the positive terminal popped out fairly easily.
I think this might of been a recent design change from the Ver.1 last review a few months ago... correct me if I am wrong..

Now for Part 2....
 

Attachments

  • DSC00867.JPG
    DSC00867.JPG
    165.1 KB · Views: 125
  • DSC00868.JPG
    DSC00868.JPG
    139.1 KB · Views: 113
  • DSC00866.png
    DSC00866.png
    734.3 KB · Views: 133
  • DSC00875.JPG
    DSC00875.JPG
    111.6 KB · Views: 213
  • DSC00880.jpg
    DSC00880.jpg
    383.3 KB · Views: 173
  • DSC00881.JPG
    DSC00881.JPG
    88.2 KB · Views: 153
  • DSC00884.JPG
    DSC00884.JPG
    115.2 KB · Views: 146
  • DSC00885.JPG
    DSC00885.JPG
    108.2 KB · Views: 128
Last edited:


Joined
Jul 4, 2008
Messages
2,499
Points
113
Alright,
I have uploaded a bunch of closeups so that you can see that there is indeed plenty of room in the host to utilize for dual drivers for the higher power +5W 9mm diodes.

Some technical notes about the first 2 attached pics.
The driver pill and diode all share the same of piece of copper which screws nicely into the shell (host). The diode area has 2 small set screws to lock the 9mm module into place

I've also put beside the pill, the focussing ring, the body and the tail cap.
A close-up shot of this was shown last pic in the previous post.

Hope you enjoy the review.

This really seems like it's an excellent host and I'll keep everyone updated on my build today.

Cheers.
 

Attachments

  • DSC00883.JPG
    DSC00883.JPG
    116.3 KB · Views: 167
  • DSC00876.JPG
    DSC00876.JPG
    102.7 KB · Views: 178
Last edited:

XD001

0
Joined
Feb 15, 2014
Messages
107
Points
18
Nice review, please do keep me updated, as I may be building a laser eventually, and thinking about using this laser host like this, anyways hope you enjoy the laser, +rep for a great review! :)

Anyways keep me updated, I may buy one from Sinner if I get some extra money.
 
Last edited:
Joined
Jul 4, 2008
Messages
2,499
Points
113
And now the finishing details.
The pill /core was drop dead simple to assemble.
I used arctic silver around the diode's contact point with the host's core and tightened the
hex nuts.

You'' also notice that I de soldiered the diode directly the the driver and extended the leads. This allowed me to put the driver in the pill. Again... I used the diode module mating area as a heatsink while soldering and desoldering. I did this extremely carefully.

I've hit 2 significant physical problems with this host now. The threading on the host is EXTREMELY rough and there are many areas with burrs especially the inside threading. additionally around the insert module. I cannot get the module back into the host. I tried using WD40 and letting it sit to soak in... no go... (suggestions would be helpful at this point) (last 2 pics show the maximum the module will screw back into the body. Stuck threads.


Also the focussing ring does not fit inside the focussing knob at all. The clearance is just a hair too small.


Update, I tested the module to see how everything is running. WOW... The larger amount of copper really does wonders for stability.
For a a good 10 seconds my peak hit 3448.20mW and stayed ~3.4W. My average was ~3.0W for a full minute.
My Laserbee also confirmed a near max reading after 10 sec as well. 3180mW
 

Attachments

  • DSC00894.JPG
    DSC00894.JPG
    171.3 KB · Views: 138
  • DSC00893.JPG
    DSC00893.JPG
    153.4 KB · Views: 142
  • DSC00892.JPG
    DSC00892.JPG
    130.2 KB · Views: 132
  • DSC00897.JPG
    DSC00897.JPG
    129.7 KB · Views: 134
  • DSC00896.JPG
    DSC00896.JPG
    124.6 KB · Views: 106
Last edited:
  • Like
Reactions: Cel

IWIRE

0
Joined
Dec 18, 2013
Messages
630
Points
0
Great review Seoul_lasers ! Thanks for the pics ! Nice build ! I'd REP you again but it won't let me :beer: I started on my EDC yesterday. I luv that lil' host :) I wanted to install my focusing ring before I polished it. Yes it is a tight fit. I'm thinking there is probably a slight difference in different focusing rings. I just slightly chamfer the ring where it goes into the housing. Then I screw the ring onto my Flaminpyro stuck module extractor so I don't damage the threads. Put the cap on a piece of wood. Get everything
lined up and beat it into submission with a 3lb hammer :) Seriously, that's the way I do it :) One good slap with the hammer and she straightens right up :)
Great build ! Thanks for sharing it !
 
Joined
Jul 4, 2008
Messages
2,499
Points
113
Great review Seoul_lasers ! Thanks for the pics ! Nice build ! I'd REP you again but it won't let me :beer: I started on my EDC yesterday. I luv that lil' host :) I wanted to install my focusing ring before I polished it. Yes it is a tight fit. I'm thinking there is probably a slight difference in different focusing rings. I just slightly chamfer the ring where it goes into the housing. Then I screw the ring onto my Flaminpyro stuck module extractor so I don't damage the threads. Put the cap on a piece of wood. Get everything
lined up and beat it into submission with a 3lb hammer :) Seriously, that's the way I do it :) One good slap with the hammer and she straightens right up :)
Great build ! Thanks for sharing it !

Any idea on how to fix the bad threads on the module? I can't screw it into the host and it goes ¾ of the way in before it locks. I've tried scrubbing the threads and WD40... it's a no go.
 

IWIRE

0
Joined
Dec 18, 2013
Messages
630
Points
0
Do you see any damage anywhere on the threads of the module or the host ? If so try taking something sharp and sturdy like an awl. Put the point of the awl down in the threads before where the damage starts. Start following the threads around with the awl to "chase" the threads. If it's binding up either the threads are damaged somewhere or there is something lodged down in a thread. I think I would try chasing the threads first. If the threads are damaged you might have to do it several times.
If you find nothing wrong with it I would try coating the threads with some thermal paste. I've had thermal paste make threads go together like butter when they were binding up.
Not sure about copper, but when I'm threading stainless steel I use dish soap as a lubricant instead of oil. Works much better. Let me know what you find !
 
Last edited:
Joined
Jul 4, 2008
Messages
2,499
Points
113
Do you see any damage anywhere on the threads of the module or the host ? If so try taking something sharp and sturdy like an awl. Put the point of the awl down in the threads before where the damage starts. Start following the threads around with the awl to "chase" the threads. If it's binding up either the threads are damaged somewhere or there is something lodged down in a thread. I think I would try chasing the threads first. If the threads are damaged you might have to do it several times.
If you find nothing wrong with it I would try coating the threads with some thermal paste. I've had thermal paste make threads go together like butter when they were binding up.
Not sure about copper, but when I'm threading stainless steel I use dish soap as a lubricant instead of oil. Works much better. Let me know what you find !

The inside of the host looks fine and I can't see any damage. However on the module I see lots of tiny burrs where the module threads have been bent.
hmm... I'll give the awl suggestion a try... I am hesitating with the Arctic silver as a lub.

:thanks: +1 for the suggestion. ( when the system allows it)
 
Last edited:

IWIRE

0
Joined
Dec 18, 2013
Messages
630
Points
0
Yes, don't use the Arctic Silver until you know the threads are fine. It will just make a mess of trying to clean them up. If you have a small triangle file you could clean the threads on the module with that. Something like a metal dental probe would work down in the host. Don't even attempt it until your nice and calm and not in a hurry. Patience is the key ! It's kind of a double edge sword . The nice thing about copper is it's so soft. The bad thing about copper is it's so soft. :) Best wishes your way ! I'll be wondering. Let me know when you get it working your way. Notice I said "when". Not "if". :)

Just remembered they actually make a thread file but they come in specific thread pitches. Not sure if they come in the pitch of the host threads or not. Might be worth checking out. I've messed up my share of threads and had to get it back together :) http://www.autozone.com/autozone/ac...ad-repair-file/_/N-255s?itemIdentifier=390904
If you could find a thread file in the right pitch it would work on the module but not the host. I really think you can fix it with just a probe in the host and a small triangle file on the module.
 
Last edited:

Cel

0
Joined
Jan 28, 2012
Messages
742
Points
28
I once had an issue with copper threads.

Firstly, I have cleaned the threads (inner and outer) with abrasive detergent and a toothbrush.
Then I let them to dry, after which I have applied lubrication (motor oil) on the threads.
Secondly, I screwed the parts until they became stuck, then I slowly (with moderate force) moved the parts forward-backward (screw them a bit in and out) until I could screw the part all the way in.

New threads need to be used for a few times before they can slide/screw well, because the fresh threads need to be adjusted a bit.


Oh, and great review! :beer:
 
Last edited:
Joined
Jul 4, 2008
Messages
2,499
Points
113
Alright, well I took IWIRE's advice on the awl and cleaned out as much of the copper fowling as I could, and then put a towel around the top part of the host and gave it a good crank with a wrench. The threads are now fixed and the host is back to working normally again. +1 again for the good tip! So expect more rep.. IWIRE. (once the system allows it)

I added a tiny amount of arctic silver 5 on the threads to fill in the air gaps and to lubricate the host.

I have 3 things left to fix,

a)The driver needs to be thermally interfaced with the pill. Right now I have it floating for short runs. less than 1 minute. Then I turn the system off.
b)The focussing ring needs to be drilled out a bit more or made slightly larger with a dremel tool.
c) Tail clicky needs a high current capable contact.

Laser shots are coming very shortly. I can tell you that I have now hit
a new high with the larger thermal mass of just over 3.48W with an average now of 3.1-3.2W.... This host really gets warm fast. I'm curious as to just how much current this setup is actually pulling! :eg:

You can see the green adapter ring as the focussing knob has a higher clearance than the focussing rings hole, and doesn't fit. Will have to be modded.

edit, The weight of the host with batteries is 455g exactly. The output is incredibly stable due the large thermal mass and finning.

Is it just me or does this host have an air of H.R. Geiger to it? I like Han's Artwork myself... if this host was made black (anodized) it could be pretty Geigerish... :)

vertical_large.jpg

21000.jpg
 

Attachments

  • DSC00900.jpg
    DSC00900.jpg
    79.6 KB · Views: 114
  • DSC00899.JPG
    DSC00899.JPG
    152.3 KB · Views: 123
  • DSC00898.JPG
    DSC00898.JPG
    148.8 KB · Views: 118
Last edited:

IWIRE

0
Joined
Dec 18, 2013
Messages
630
Points
0
Great news ! Progress ! Just knowing it's working out for you is better than REP anyway :) A positive attitude and patience always pays off ! 90% attitude, 10% ability = 100% success ! I was not implying you only have 10% ability :) I was using myself as a reference :)
Thanks for the info !
Likewise, REP when it lets me :beer:
 
Joined
Jul 4, 2008
Messages
2,499
Points
113
Great news ! Progress ! Just knowing it's working out for you is better than REP anyway :) A positive attitude and patience always pays off ! 90% attitude, 10% ability = 100% success ! I was not implying you only have 10% ability :) I was using myself as a reference :)
Thanks for the info !
Likewise, REP when it lets me :beer:

Having worked with copper before I have a deep appreciation/ understanding for how soft was sticky it is to machine.
It's not exactly a cheap host so I wanted to keep as neat as possible.

anyways... excellent idea with the awl... I used an exact blade and fine tip screwdriver. :thanks: Again.
 
Last edited:

IWIRE

0
Joined
Dec 18, 2013
Messages
630
Points
0
It's not a cheap host. I'm impressed with it. Just a chunk of copper before the machine work isn't cheap. Not sure how sinner does it and comes out on it. Kudos to him though. Gives us a nice host to build from. If you like the shiny look they will polish up and look like a copper mirror. :beer:
 

sinner

0
Joined
Oct 27, 2011
Messages
2,565
Points
83
I am glad you got the host before the weekend.. Looks like it is almost finished, building the host might be time consuming but trust me it is worth the trouble. IIRC the module/heatsink threads were just fine I actually remember this one host that had a similar issue with screwing the module. As it turns out the real culprit was the bottom part of the module that enters the battery tube ever so slightly at an angle, This might be because of the double sided milling on the driver mounts, that was the most painful job in the entire machining and I might not be offering those in the upcoming hosts.

Anyways looking forward to the build,

P.S: The host weights exactly 1lbs (455g) after machining. :)
 
Joined
Jul 4, 2008
Messages
2,499
Points
113
I am glad you got the host before the weekend.. Looks like it is almost finished, building the host might be time consuming but trust me it is worth the trouble. IIRC the module/heatsink threads were just fine I actually remember this one host that had a similar issue with screwing the module. As it turns out the real culprit was the bottom part of the module that enters the battery tube ever so slightly at an angle, This might be because of the double sided milling on the driver mounts, that was the most painful job in the entire machining and I might not be offering those in the upcoming hosts.

Anyways looking forward to the build,

P.S: The host weights exactly 1lbs (455g) after machining. :)

Right, and today I'll finish it. It is very impressive how it handles heating!!
I also like the outer design. (somewhat HR Geiger-ish)
More construction pics coming soon
:beer::beer::beer::beer: actually mint tea, not beer.... kidding.
 
Last edited:


Top