Welcome to Laser Pointer Forums - discuss green laser pointers, blue laser pointers, and all types of lasers

LPF Donation via Stripe | LPF Donation - Other Methods

Links below open in new window

ArcticMyst Security by Avery

Heiland Synchronar Build

Joined
Oct 3, 2014
Messages
7
Points
0
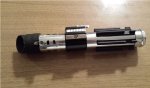
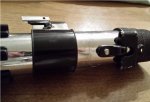
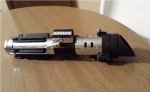
I finished my 445 build in a Heiland Synchronar 3 cell Flash tube today. The switch is from the Darth Vader Master Replicas Lightsaber. The grips are molded resin. It uses 2, 18650 batteries and should be outputting somewhere around 1.8w of 445. The batteries do not need to be removed as the charger has been integrated into the handle. They are charged by plugging a modified extension cord into the slots near the emitter. I chose not to polish the tube or repaint the shroud because the rough look adds to the effect for me. Enjoy!
 

Attachments

  • 20141230_173048.jpg
    20141230_173048.jpg
    93.7 KB · Views: 834
  • 20141230_173210.jpg
    20141230_173210.jpg
    103.2 KB · Views: 315
  • 20141230_173116.jpg
    20141230_173116.jpg
    96.1 KB · Views: 197
  • 20141230_173144.jpg
    20141230_173144.jpg
    90.3 KB · Views: 834
  • 20141230_185521.jpg
    20141230_185521.jpg
    51.1 KB · Views: 244


Podo

0
Joined
Nov 7, 2013
Messages
717
Points
63
Awesome host, a red build would be better beacause it's darth vader:na:
 
Joined
Oct 3, 2014
Messages
7
Points
0
The batteries are separately balanced so hopefully no explosions anytime soon. This may eventually become a 600mw red but I had all the parts for a 445 around and didn't want to disassemble another laser so blue is what it became for now. Plus with the housing sitting there being awesome I couldn't wait to put a laser inside!
 

Pman

0
Joined
Nov 28, 2012
Messages
4,447
Points
113
Nice replica. Is the charging port shown in the pics?
+REP
 
Joined
Oct 3, 2014
Messages
7
Points
0
The Charging ports are any of the three sets of two small holes between the black switch band and the black emitter shroud. The charger was made from a cheap charger from ebay that was disassembled and connected with some plates I made from brass to fit into the connector pieces from the flash tube. The batteries were removed from old laptop packs and therefore have the solder-able tabs. These tabs were connected to the charger board. I took care to make sure everything was insulated from all other connections and from the housing itself. It may not be the best setup but it does seem to be working. in the future I may make a hole and extend the LED from the charger so I can tell when it is done charging. Also I plug the charge cord into the lightsaber first and then the outlet as Ive been slightly concerned the leads might arc on the metal between the two holes. So far I haven't had issues but its only been one day...
 
Joined
Oct 3, 2014
Messages
7
Points
0
Thanks for the comments guys! I appreciate the encouragement especially from this forum were so many people have posted amazing builds. I will post more of my work as time passes. Much of it is much more custom than this so if you are interested keep your eyes open.


Top