

rhd
0
- Joined
- Dec 7, 2010
- Messages
- 8,475
- Points
- 0
Here goes - this may be a photo heavy thread.
After this build tonight, I need to hit the textbooks big-time. 25 page paper still in dire need of completion.
This was my crazy idea. Didn't know if it would work. Really glad that it did")
First of all, the eye candy (in video format!):
And here it is tackling 3 balloons:
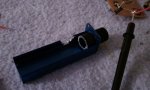
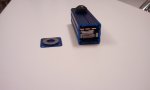
I guess I'll also start with a shot of the final product:

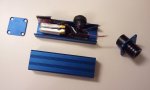
It started as an aluminum project box. I cut a hole for a switch, and for the laser housing. I don't have much of a tool selection, so I had to cut the holes by drilling successive holes with a cordless drill. It looks sloppy, but once assembled, you don't see any of the rough edges. Also, had to cut the heavy duty OdicForce housing down to fit.

Next, the batteries. I used 2x Lipo batteries that were originally sold as RC helicopter batteries. They're 3.7V and 200mAh. The benefit here - they're tiny, and they supply upwards of 3A current. Take that 18650s!
Also, you'll see a funky little piece of circuit board. Basically, I created contact points for the batteries that would be accessible once assembled. Need to be able to charge them again! Those tiny Lipos aren't going to provide much runtime So that rear end comes off, alligator clips go in, and we've got the ability to recharge!

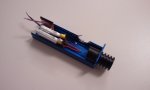
Now for the driver... I wanted a lot of power. This is a momentary clicky build. Duty cycles are going to be like 2 seconds on, 30 seconds off. This is not a workhorse. This is a ninja.
I had the benefit of ~8V fully charged. I was going to do a triple-LM1117 build (I've been getting used to those) but there were two problems. Not enough space for all the resistors... and I didn't have any LM1117s left!
So, I planned to parallel two of the $1.99 DX LED drivers that have been played around with. Except that when I started testing, I realized that ONE of these drivers, hooked to the 2x LIPO batteries, provided ~2000 mA on a 6V test load. I didn't believe this at first, so I actually ran a test build with a real (though slightly damaged) 445nm diode that I was comfortable torturing.

If you can believe it, I actually had to add 0.6 Ohms of resistance in series with the diodes just to get the current DOWN to the 1710 mA seen here. This wasn't an idea way to limit the current, but I just didn't know what else to do. BTW, I'm not sure how I feel about those $1.99 DX drivers after all. I'm a little sketched out that supplying them from LIPOs resulted in SO MUCH more output current without any other modding.
But anyway, one single driver was enough. I used lots of thermal adhesive, and attached it to the aluminum just below/under the momentary switch.
What you're also seeing in the next photo are two sets of resistors (above the batteries, and below the switch). These are actually the resistors that are in series with the diode. By my math, I needed a 10W resistor. (1700mA x ~6V). So I had to fit 5x 2W resistors in parallel inside this host. Had to separate them into two locations (3 above the battery, two below the switch - but still wired in parallel as one resistor providing 0.6 Ohms)

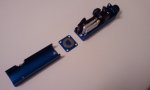
The end plates are supposed to screw in - and the do. But in case I wanted to charge the laser during a period of frequent use, I decided that I wanted a way of attaching and detaching the rear plate without constantly unscrewing 4 screws. So - I recycled two of the rare-earth magnets you find in diode sleds (usually near the final lens assembly). I glued the magnets to the case, and put a magnetic washer on the rear face plate.

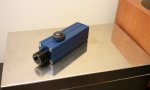
Here it is assembled, with it's rear face plate off.

And here it is activated.

I'll add that I'm not really sure what type of lens is meant for these housings. The thread is normal Aixiz lens thread, but the Aixiz lens had to disappear entirely inside of the heat-sink (had to tighten it with a screwdriver). The half threaded lenses just plane didn't work.
Anyway, this was an awesomely fun build. It's quite powerful. Surely this is not a laser meant for endurance, nor can I speculate as to how long this will actually serve me in working order before something melts-down inside the cramped case!
I love momentary push-button lasers, and this is just about my ideal creation I'm pretty happy with my creation, and I think I'll be able to tackle a 25 page paper with my brain constantly dreaming up something to distract me now!
After this build tonight, I need to hit the textbooks big-time. 25 page paper still in dire need of completion.
This was my crazy idea. Didn't know if it would work. Really glad that it did
First of all, the eye candy (in video format!):
And here it is tackling 3 balloons:
I guess I'll also start with a shot of the final product:
It started as an aluminum project box. I cut a hole for a switch, and for the laser housing. I don't have much of a tool selection, so I had to cut the holes by drilling successive holes with a cordless drill. It looks sloppy, but once assembled, you don't see any of the rough edges. Also, had to cut the heavy duty OdicForce housing down to fit.
Next, the batteries. I used 2x Lipo batteries that were originally sold as RC helicopter batteries. They're 3.7V and 200mAh. The benefit here - they're tiny, and they supply upwards of 3A current. Take that 18650s!
Also, you'll see a funky little piece of circuit board. Basically, I created contact points for the batteries that would be accessible once assembled. Need to be able to charge them again! Those tiny Lipos aren't going to provide much runtime
So that rear end comes off, alligator clips go in, and we've got the ability to recharge!Now for the driver... I wanted a lot of power. This is a momentary clicky build. Duty cycles are going to be like 2 seconds on, 30 seconds off. This is not a workhorse. This is a ninja.
I had the benefit of ~8V fully charged. I was going to do a triple-LM1117 build (I've been getting used to those) but there were two problems. Not enough space for all the resistors... and I didn't have any LM1117s left!
So, I planned to parallel two of the $1.99 DX LED drivers that have been played around with. Except that when I started testing, I realized that ONE of these drivers, hooked to the 2x LIPO batteries, provided ~2000 mA on a 6V test load. I didn't believe this at first, so I actually ran a test build with a real (though slightly damaged) 445nm diode that I was comfortable torturing.
If you can believe it, I actually had to add 0.6 Ohms of resistance in series with the diodes just to get the current DOWN to the 1710 mA seen here. This wasn't an idea way to limit the current, but I just didn't know what else to do. BTW, I'm not sure how I feel about those $1.99 DX drivers after all. I'm a little sketched out that supplying them from LIPOs resulted in SO MUCH more output current without any other modding.
But anyway, one single driver was enough. I used lots of thermal adhesive, and attached it to the aluminum just below/under the momentary switch.
What you're also seeing in the next photo are two sets of resistors (above the batteries, and below the switch). These are actually the resistors that are in series with the diode. By my math, I needed a 10W resistor. (1700mA x ~6V). So I had to fit 5x 2W resistors in parallel inside this host. Had to separate them into two locations (3 above the battery, two below the switch - but still wired in parallel as one resistor providing 0.6 Ohms)
The end plates are supposed to screw in - and the do. But in case I wanted to charge the laser during a period of frequent use, I decided that I wanted a way of attaching and detaching the rear plate without constantly unscrewing 4 screws. So - I recycled two of the rare-earth magnets you find in diode sleds (usually near the final lens assembly). I glued the magnets to the case, and put a magnetic washer on the rear face plate.
Here it is assembled, with it's rear face plate off.
And here it is activated.
I'll add that I'm not really sure what type of lens is meant for these housings. The thread is normal Aixiz lens thread, but the Aixiz lens had to disappear entirely inside of the heat-sink (had to tighten it with a screwdriver). The half threaded lenses just plane didn't work.
Anyway, this was an awesomely fun build. It's quite powerful. Surely this is not a laser meant for endurance, nor can I speculate as to how long this will actually serve me in working order before something melts-down inside the cramped case!
I love momentary push-button lasers, and this is just about my ideal creation
I'm pretty happy with my creation, and I think I'll be able to tackle a 25 page paper with my brain constantly dreaming up something to distract me now!Attachments
-
 01 start.jpg121.4 KB · Views: 2,908
 -
 02 - batteries in.jpg127 KB · Views: 3,333
 -
 03 - driver DX.jpg121.6 KB · Views: 3,275
 -
 04 - magnets.jpg120 KB · Views: 2,773
 -
 05 - assembled.jpg125.3 KB · Views: 2,793
 -
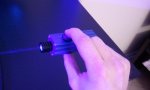 06 - activated.jpg115.5 KB · Views: 1,073
 -
 07 - final product.jpg123.6 KB · Views: 3,952
 -
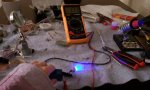 035 power test.jpg118.7 KB · Views: 2,721
Last edited:


