Welcome to Laser Pointer Forums - discuss green laser pointers, blue laser pointers, and all types of lasers

LPF Donation via Stripe | LPF Donation - Other Methods

Links below open in new window

ArcticMyst Security by Avery

Anybody else seeing this??

JLSE

1
Joined
Dec 13, 2007
Messages
3,580
Points
0
At first I didnt pay much attention to it, but I noticed it
too many times, and that got me thinking..

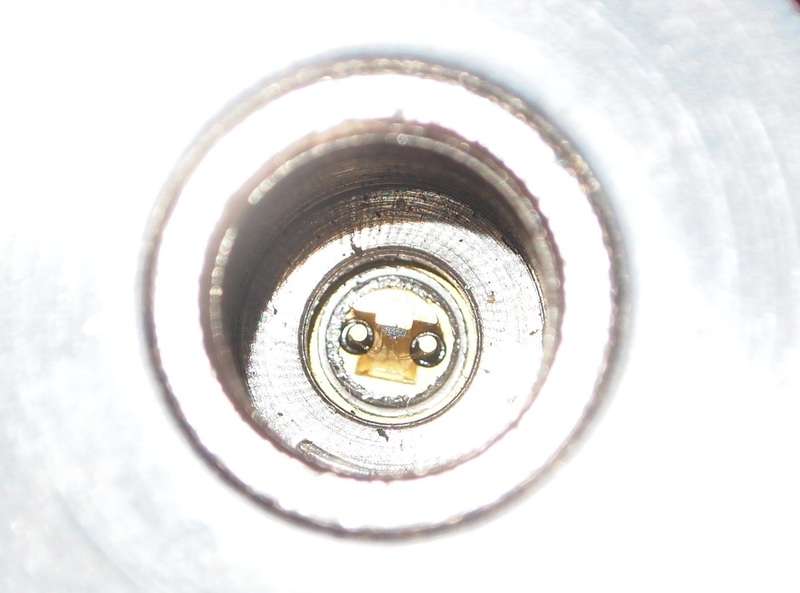
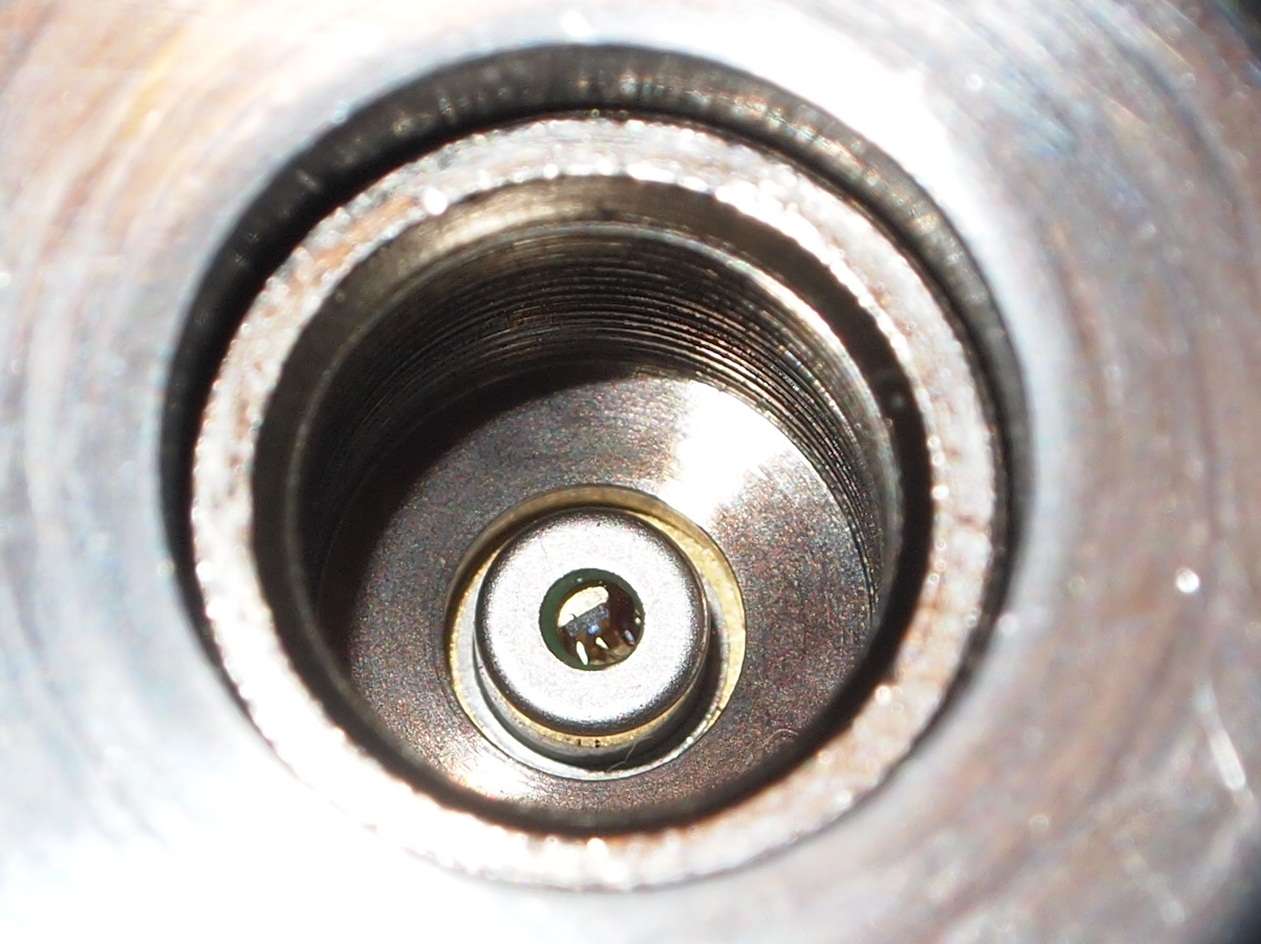
Has anybody else noticed what looks to be a 'burn' mark
in the shape of the output on your 445nm LD's??

It looks as if the laser is burning the AR coating and leaving
a very distinct mark on the window.

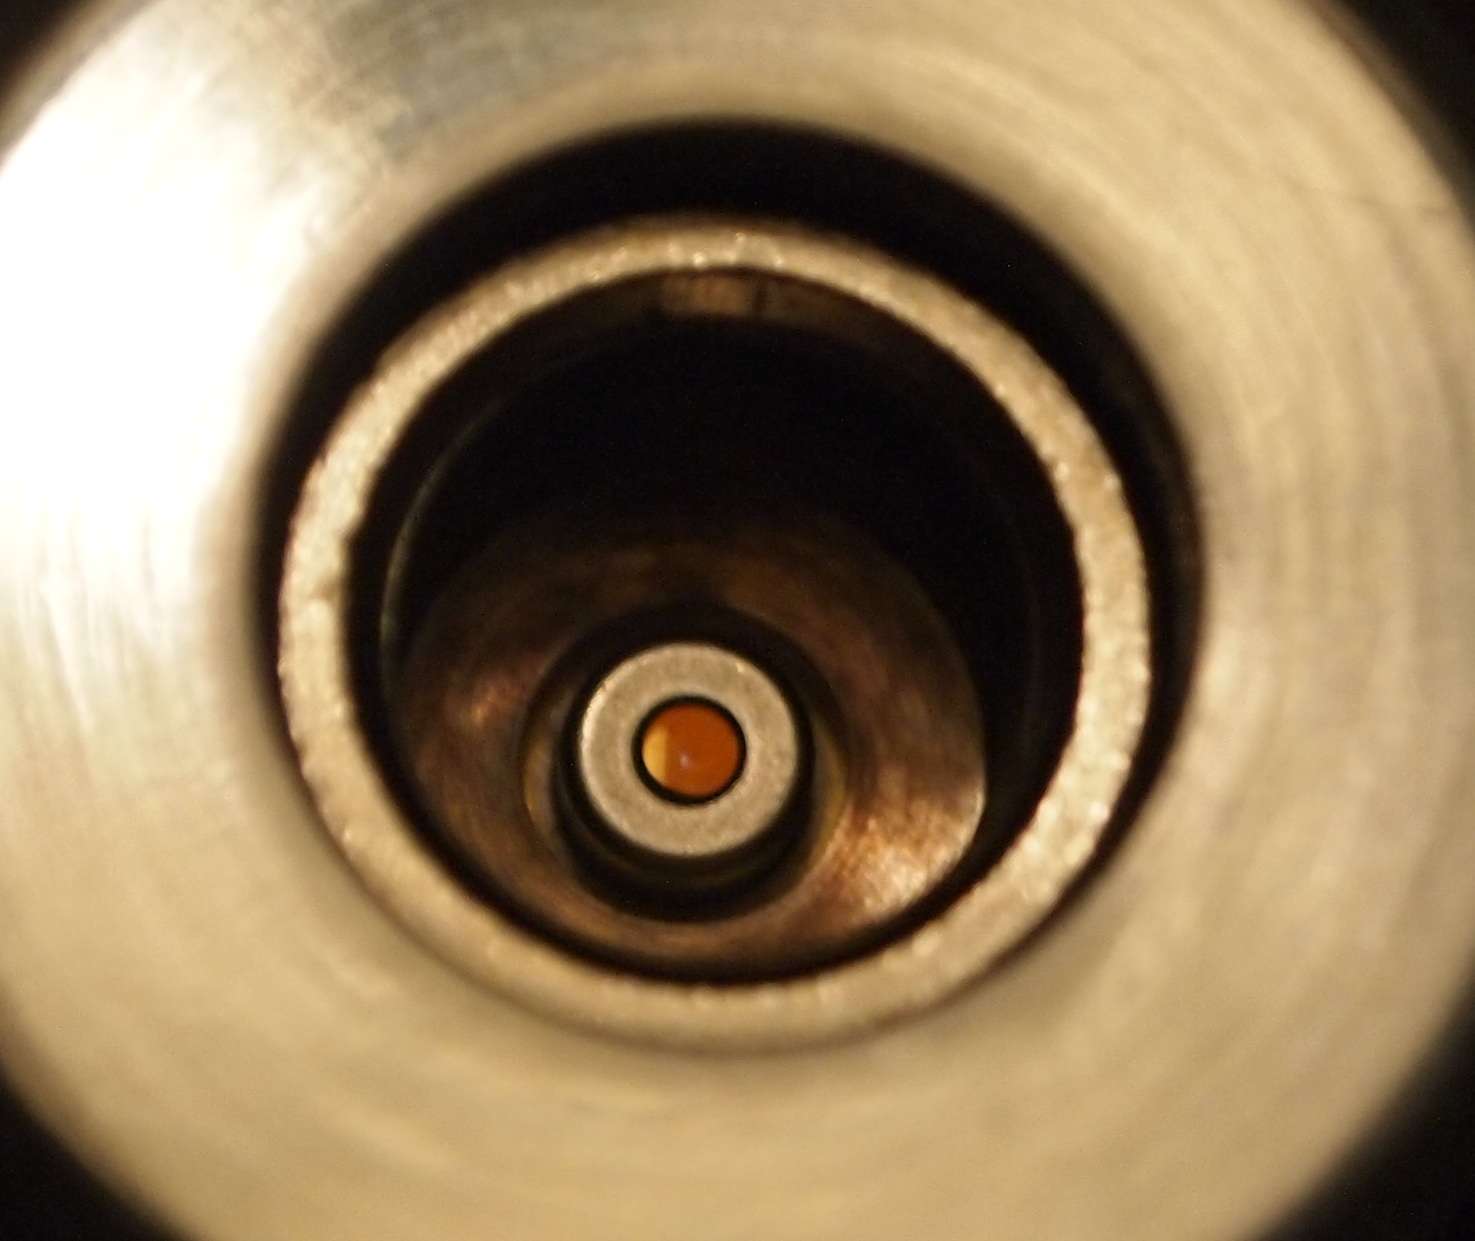
Have a look at the center of this diode, and if you have a 445nm
LD on hand, check yours with a magnifier..

422a50d562.jpg


An interesting note, the sides of this line seem to be more pronounced.
Where as the center looks less distorted.

Could the location of the seemingly more affected area also be responsible
for the 'noise' on the edge of a collimated large dot when viewed on the wall??

Im making a decanned 445 now, and will see if removing the can eliminates
any of the artifacts on the edges of the beam..


Joined
Jan 11, 2008
Messages
671
Points
0
I don't see a burn mark on any of my diodes, but I do see the outline of the inside components of the diode which could be mistaken as a burn mark.
 

JLSE

1
Joined
Dec 13, 2007
Messages
3,580
Points
0
I wish I could take a better picture..

I see it on new diodes straight out of the projector.
The LD's ive seen it on are from the a130's.

I just looked at another, same thing.. Its the size, shape
and orientation of the exiting light. If I look at the face of
the emitter, the mark sits exactly where the light shines through.
At the top and bottom there is nothing behind the glass..

I cant be the only one :tinfoil:


I enlarged the pic a little. Look at the shape then scroll down and look
at the pic of the uncorrected beam on a red filter..

5d11a32cff.jpg

corrected_445_labby.jpg
 
Last edited:

DTR

0
Joined
Jun 24, 2010
Messages
5,684
Points
113
Could the location of the seemingly more affected area also be responsible
for the 'noise' on the edge of a collimated large dot when viewed on the wall??

Im making a decanned 445 now, and will see if removing the can eliminates
any of the artifacts on the edges of the beam.


I have a decanned diode running 1.7A. It is a little cleaner output but still has the dim splash thing off to the side.:beer:

I am not sure how to get a picture of the splash because the dot drowns it out and if I put the camera through my safety glasses you cant see it.

p1013386.jpg


Regular diode.

p1013392.jpg


p1013399.jpg
 
Last edited:

JLSE

1
Joined
Dec 13, 2007
Messages
3,580
Points
0
Thanks for the pics :)

You have handled many of these LD's, have you noticed anything
similar to the 'mark' shown in the first pics?

I find it odd nobody else has seen this.. You have to look at the
LD with a good magnifier, and at a slight angle so you can see the
gold coating. If you look at the LD straight on, you wont see it..
 
Joined
Sep 16, 2007
Messages
3,658
Points
113
It's not just you, wannaburn.
I noticed that with high power 405 and 445nm laser diodes a residue accumulates on the output window.
In my case, it can easily be cleaned off with some alcohol and a cotton swab.
 
Last edited:

DTR

0
Joined
Jun 24, 2010
Messages
5,684
Points
113
Thanks for the pics :)

You have handled many of these LD's, have you noticed anything
similar to the 'mark' shown in the first pics?

I find it odd nobody else has seen this.. You have to look at the
LD with a good magnifier, and at a slight angle so you can see the
gold coating. If you look at the LD straight on, you wont see it..

No but I have not really been looking. But I also said that little splash of light off to the side of the dot is still present with the decaned diode. And it is definitely an artifact generated by the diode because it stays stationary while I turn the lens.;)
 

DrSid

0
Joined
Jul 17, 2010
Messages
1,506
Points
48
I have it too ! It's not very pronounced .. it takes some time turning against light .. but it is there for sure. I did not run the diode over 400mW yet.
 

JLSE

1
Joined
Dec 13, 2007
Messages
3,580
Points
0
No but I have not really been looking. But I also said that little splash of light off to the side of the dot is still present with the decaned diode. And it is definitely an artifact generated by the diode because it stays stationary while I turn the lens.;)

Before I press my diodes, I always give a quick look over to
see if there is any debris on it.. Just an old habbit, as LD's are much
easier to clean when they are outside of their mounts.

Im going to try an LD out and test for both power and artifacts,
then de-can and test again..

I have it too ! It's not very pronounced .. it takes some time turning against light .. but it is there for sure. I did not run the diode over 400mW yet.

Thats good to hear.. It means im not going crazy ;) I think the mark
is left the first time the LD is run in the projector.. Ive noticed these
'marks' on LD's before they are pulled from the array.

I also wonder what good the AR coating does, when the coating is not
present where the light exits.. :thinking:

This may be the first LD ive used that truly benefits from de-canning.
 
Joined
Sep 16, 2007
Messages
3,658
Points
113
I don't know if you noticed my post above, but try cleaning the window.
I don't think it's the glass degrading or the coatings since I have been able to clean the residue off.

There may be no need to de-can the diodes if you can just wipe the problem off. ;)
 

DTR

0
Joined
Jun 24, 2010
Messages
5,684
Points
113
Before I press my diodes, I always give a quick look over to
see if there is any debris on it.. Just an old habbit, as LD's are much
easier to clean when they are outside of their mounts.

I always clean them right after I mount them in the module before applying any current weather they look dirty or not. But it would work to clean them right before you put them in the module as well.:beer:
 

JLSE

1
Joined
Dec 13, 2007
Messages
3,580
Points
0
I don't know if you noticed my post above, but try cleaning the window.
I don't think it's the glass degrading or the coatings since I have been able to clean the residue off.

There may be no need to de-can the diodes if you can just wipe the problem off. ;)


Sorry, I missed that post..

The 'mark' I have seen on these is not any debris.. I have tried cleaning
them at first, then noticed it 1- does not come off, and 2- the output
from the raw LD (no optics) is nice and clean.

If it were debris I would also be seeing 'speckles' and dark spots.. On the LD's
ive noticed this with, the output looks perfect with no distortion.

Back a while ago, I had a batch of 6x sleds that came with debris on the window
fresh out of the sled.. With those, the 'speckle' was very noticeable when testing
the LD's.

Alcohol and 5-6 q-tips got rid of it.. This on the other hand does not appear
to hinder the beam nor add any 'speckle' to their output.

On a side note, I have seen IR LD's 1W+ that have this mark in the coating.
The center of the 'mark' does not have the same colour as the rest of the
glass.. Almost as if it was bleached.


I always clean them right after I mount them in the module before applying any current weather they look dirty or not. But it would work to clean them right before you put them in the module as well.:beer:


I always clean the LD's if required prior to pressing. The problem I have
found with cleaning after they are mounted, is that the threads of the aixiz
modules snag tiny fibers of cotton, which can be damn near impossible to
get rid of.

Before I use an aixiz, I check the threads, give them an ultrasonic bath
and press the diodes in a 'clean box' for higher value diodes..

Im actually working on a 'flow bench' to make the process a little easier.
Its more important with open can diodes, but it also helps to keep
any particles from entering the cavity...
 

Benm

0
Joined
Aug 16, 2007
Messages
7,896
Points
113
I've seen that output pattern using acryllic lenses: the power of these diodes seems to simply char a point in the lens exactly in the middle, leaving the beam that comes out to look like two stripes with a gap in between.

For me this was a problem with the lens only though... replacing the lens with a 400-450 nm coated aixiz glass model resolved the issue instantly.
 
Joined
Sep 16, 2007
Messages
3,658
Points
113
The diodes I've seen with this artifact also had no noticeable distortion in the beam.
However, it did look exactly like what you describe - a slight discoloration almost a darkened spot on the surface of the glass. When observed closely, though, I noticed that the beam did have a slight "haze" around it almost as if the lens was slightly "foggy."
I think that this may be due to the size of the particles deposited on the window.
If they are very small, like organic compounds from burnt materials, or impurities in the air we breathe, that could perhaps explain the minimal distortion?

I suspect that removing the can of this diode will expedite the degradation. Instead of depositing particles on the window, it will be deposited on the facet of the die. With such high intensity (~4 watts at the die), the particles will burn and I can't imagine that being good for the laser diode.

I have always been more a fan of fixed focus lasers. Partly for this reason. If the focus is fixed, I can "seal up" the module and the aperture with a glass window, making it impossible for new contaminants to find their way to the lens.

Try cleaning it again. I'm sure you know how to do it, but I use 90% (or higher if I can find it locally) isopropyl alcohol and swipe the surface gently with a cotton swab. It always works for me after a couple swabs.

Or, perhaps running the diode longer has "baked" the residue onto the surface of the window which could make it harder to remove.

I mentioned this when the 12X started becoming big but never worried much about it. I'd snap a picture but I don't have any 445nm diodes sitting around at the moment.
 

HIMNL9

0
Joined
May 26, 2009
Messages
5,318
Points
0
.....
I am not sure how to get a picture of the splash because the dot drowns it out and if I put the camera through my safety glasses you cant see it.
.....

Old trick ..... take a paper or cardboard sheet, and make a small hole in it (large just the needed for pass the beam), then point the laser at the sheet in the way that the main beam pass through the hole (and hit something safe !! ..... take care about this, too), and you have projected on the sheet the "splash zone" without the dot that saturate the camera ;)


Top