Welcome to Laser Pointer Forums - discuss green laser pointers, blue laser pointers, and all types of lasers

LPF Donation via Stripe | LPF Donation - Other Methods

Links below open in new window

ArcticMyst Security by Avery

FS: White Fusion Laser Mixing Kit

jayrob

0
Joined
Sep 21, 2007
Messages
9,862
Points
113
Re: Custom 7 Color DIY Laser Kit

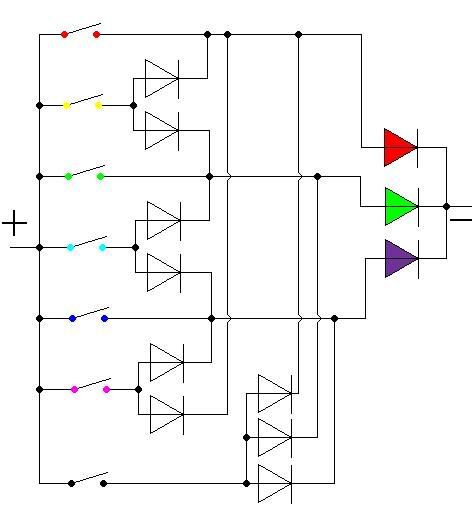
I don't isolate the module because I am using separate power supplies and drivers for each laser...

The AixiZ focus ring at the front is not for focusing, it is there just so I can have a dust cap on there! :)

For my supply, I am using 2 X CR123's in parallel for the grreen, and a single CR123 for each of the FlexDrive driven other lasers...

My battery springs are at the bottom of the clear tubes that I have for holding the batteries in place. And the small washers on the positive ends of the batteries are thin copper washers. (I found copper ones, which are easier to solder to than brass)
 
Last edited:


Joined
Aug 25, 2007
Messages
2,007
Points
63
Re: Custom 7 Color DIY Laser Kit

P.S. Finally just put my latest one in it's new home:

7%20color25.jpg

It's...just...so.....beautiful :cryyy::cryyy::cryyy:

Measurements of the box? Source for the box? ETA: Nevermind, found your other thread.


And sightfx, any news on the mini kit?
 
Last edited:

jayrob

0
Joined
Sep 21, 2007
Messages
9,862
Points
113
Re: Custom 7 Color DIY Laser Kit

Since I get the feeling that you like what you see, how about if I share a couple more details of the build...

7%20color27.jpg

7%20color28.jpg


* The clear acrylic battery tubes started out as 3/4" O.D. X 5/8" I.D. Then I used a 17mm straight flute reamer on the lathe to get the right fit for the CR123 batteries. I have a tube of some clear glue that is specifically made for acrylic. Just a little holds very strong for placement. I drilled tiny holes at the very bottom of the tubes for the negative wires to go through.

* Notice the copper washers have a drilled out center area that is fit for the positive button on the batteries. This is not completely necessary, but I did it so that the batteries will be held more stable and not slip off the washer to put undue pressure against my 'tube holders'.

* A couple of the battery holder tubes are color coded for easy battery recognition/replacement. Switches are also color coded...

This high powered configuration is about $400 dollars in just parts. It's my favorite build so far! :D

Here's the link to my thread for build tips on this assembly. It also has links for some parts, like the box: (beam shots too!)
http://laserpointerforums.com/f51/b...ng-adjustable-sled-mount-heatsinks-41942.html

Great kit from sightfx!!!
 
Last edited:
Joined
May 4, 2009
Messages
470
Points
28
Re: Custom 7 Color DIY Laser Kit

Work of art Jay!

I am currently trying to fit this all in the enclosure for the next size down. I have to run them all on the same set of batteries because I can only fit 2 maybe 3 cr2s in that box. The heat sinks will only have 1 or 2mm of free space so it will be a challenge to fit it all in there without it adjusting from any contact.

I also have a build using FlexMod drivers that fits the smaller box. It can’t fit any batteries in the smaller enclosure but it is made to be a projector laser anyway. I think I will move it to the next size bigger than Jays and add TEC cooling to it by using a thick heat sink compound between all the heat sinks and a plate of copper that the peltier will be attached to and a finned heat sink on the other side of that. It’s a lot of layers and work but I am hoping to be able to run it to the tune of hours and not minutes. I will start with a 6x Blu-Ray and if it lives after a few torture tests I will bump it up to an 8x.


Chears,

Ryan
 
Joined
May 12, 2009
Messages
1,403
Points
0
Re: Custom 7 Color DIY Laser Kit

Well it's official, I got my kit!!!

It's the new isolated kit, with full green mount.

Sight, i notice the heatsinks mounting plates have been coated with something, or are made of plastic "or something not metal" i'm assuming this means each heatsink is isolated from the sled?

I'm still trying to soak up as MUCH info as i can for this build. Im going to go ahead and put my 6x, and LPC in there.

Do you think i could get away with a 16x short closed can red @ like 300mA with a meredith lens? or should i stick with LPC-815 and an acrylic lens?

@Jayrob, why not use an aixiz glass lens on your LOC diode? just a cost saver? or does the acrylic make a difference. I would have thought the glass lens would clean the beam up a bit, and allow you to run the red at about 350-360mA instead of 380mA. for longevities sake anyways. just curious.

I'm thinking of making acrylic boxes that are ready to go for this kit. "with battery holders, and an exit aperture" but i wouldnt do it the way Jayrob did, thats his koolaid and I wont dare copy it.

As a matter of fact.. I think you should sell them instead Jay, it would be nice to have an option to buy a pre-buttoned, pre-battery fit, pre- w/e'ed acrylic box so when someone finishes their laser, they can pop it in, and hook the power up. and have the button right there ready to go,

Another possible Jayrob Exclusive! ;)

It'd be cool to have a button for EACH color... like wire them so you have a white button, wich would activate all three diodes, and then 6 other buttons that do the same. Would that require any special cuicutry or chips or anything, or could this be achieved using complicated wiring methods?

Like instead of having only 3 buttons, i mean one for each color. is it possible Jay? i'm quite curious, I want to make something unique :)

Tyler - Dark Lasers
 
Joined
Jan 12, 2008
Messages
3,290
Points
83
Re: Custom 7 Color DIY Laser Kit

Not exactly easy I'm afraid, unless someone knows a better way. Also this wont work if the green module isn't electrically isolated form the rest of the sled.
7.jpg
 

jayrob

0
Joined
Sep 21, 2007
Messages
9,862
Points
113
Re: Custom 7 Color DIY Laser Kit

@Jayrob, why not use an aixiz glass lens on your LOC diode? just a cost saver? or does the acrylic make a difference. I would have thought the glass lens would clean the beam up a bit, and allow you to run the red at about 350-360mA instead of 380mA. for longevities sake anyways. just curious.

I'm thinking of making acrylic boxes that are ready to go for this kit. "with battery holders, and an exit aperture" but i wouldnt do it the way Jayrob did, thats his koolaid and I wont dare copy it.

As a matter of fact.. I think you should sell them instead Jay, it would be nice to have an option to buy a pre-buttoned, pre-battery fit, pre- w/e'ed acrylic box so when someone finishes their laser, they can pop it in, and hook the power up. and have the button right there ready to go,

Another possible Jayrob Exclusive! ;)

It'd be cool to have a button for EACH color... like wire them so you have a white button, wich would activate all three diodes, and then 6 other buttons that do the same. Would that require any special cuicutry or chips or anything, or could this be achieved using complicated wiring methods?

Like instead of having only 3 buttons, i mean one for each color. is it possible Jay? i'm quite curious, I want to make something unique :)

Tyler - Dark Lasers

Hey Dark, I'm not selling these so I would only be honored if anybody at all liked some of my ideas and made a kit available! :)

I really don't want to do any kind of a kit for this build myself...

About the buttons, I find that I really like the individual buttons. After all three are on, you can just slightly depress one or two at a time (without clicking it all the way off), and change the color combination's in this way.

About the lens for red, AxiZ glass is something that I haven't tried. Not a bad idea. You should experiment with that!

I went with the AR coated acrylic from Virtual Village because it gives more power for red than AixiZ glass, and I wanted to keep the current as low as I could for longevity. (the expensive Meredith glass was not needed)

The AR coated acrylic lens gives a 10% increase vs AixiZ acrylic. (back opened) Where as the AixiZ glass is only about 4% increase. If you read that someone got more that 4 or 5% with AixiZ glass, it is either a 'fluke', or because it is being compared with a 'New AixiZ acrylic lens'. (back not opened) People should clarify whether or not the black plastic is cut away from the AixiZ acrylic lens when stating power comparisons.

Hey sightfx, if you have a contest of what to name your kit, I thought of '7 Color Beam Combustion Kit'! :D
 
Last edited:
Joined
May 4, 2009
Messages
470
Points
28
Re: Custom 7 Color DIY Laser Kit

Hey Jay,

Yea I have been thinking of kicking off a Name that Kit contest in the Deals and Discounts section. Best name gets you a free kit that I won't sell because of a small scratch that is too close to one of the adjustment screw holes for me to buff out. You know how I like to make sure your kit is shiny when you get it :D

Anyway this version of the kit needs a name. I will kick off the contest later next week so keep coming up with new names. I won't put a limit on entries. I was thinking of letting the wife and kids be the judges to make it impartial.


Hey Dark,

As far as using buttons goes I am kind of partial to how Rog did his original Pocket 7 Color. He set up the switches in a triangle arrangement and made a triangular mechanical button that allows him to press any one, two or all three buttons at the same time.

Another idea if you’re using the Flex Mod drivers I recommended is to add a 5V regulator and 3 thumb wheel pots with switches so that you can vary each laser and get any color you wish. It is pretty simple really. You just use the pots as voltage dividers to supply anywhere from 0 to 5v to the mod inputs of the flex drives. I will work it out on the test bench and post a schematic when I have time.


Here is a link to the type of pot I am talking about:
POT THUMB WHEEL 10K OHM HORZ - EVU-TW7B45C14
10k-Ohm Wheel Potentiometer - RadioShack.com


Chears,

SightFX
 
Joined
May 4, 2009
Messages
470
Points
28
Re: Custom 7 Color DIY Laser Kit

Oh I forgot to answer your question Dark. Yes that is a JB Weld coating around the metal washers. It insolates the mounts from the sled. You realy only need that on the green. You still have to watch out for the bolt that holds the mount to the sled though. If the Greenie touches it while adjusting the heat sink closer your Greenie will not be insolated from the sled anymore. In your case both Green and Red would have to both be touching for it to be a problem. You would also have to be running the red and green off the same batteries. Easiest way to avoid touching the bolt is to adjust the heat sinks all the way down before you put the modules in and leave a small gap when you do. You should do that anyway before adjusting the beams so that the springs are at the highest tension and holding the heat sinks still.

I will be adding the option of insolating the Green mount for $5. If anyone who already has a kit already would like to exchange yours just PM me and we can arrange that. I have to turn the bolt down a bit to make room for the insolator so the thing to do is have you send your old mounting pieces (Bolt and Washer) back by snail mail when you get the new ones.


Thanks,

SightFX
 
Joined
May 12, 2009
Messages
1,403
Points
0
Re: Custom 7 Color DIY Laser Kit

Yeah thats what i thought it was, good old JB, so all my sinks are isolated... does this mean i can use thep same power source for them all? or is there no way to do that? maybe have a nice power supply with a distribution center (pcb configuration of some sort) and run power to each from there, and deal with the case positive and case negative issues independently.

Does that even SOUND feasable?

And thanks for the links to those parts, I may try that when i do a 26million color build ;)

Dark
 
Joined
May 4, 2009
Messages
470
Points
28
Re: Custom 7 Color DIY Laser Kit

Yes that is why they are isolated so the case - and + issue is already covered. What drivers are you using? In most cases they will only supply the voltage the diodes need as long as you have enough supplied to them within their spec. Are you using Flex Mods? Those take 9 to 12V in and will supply whatever the Diode needs. You just hook all 3 to the same 3 or 4 batteries and adjust the current limits. Flex Drives are rated for 2 to 5.5VDC so you would have to use the correct voltage according to the drivers you are using. If you have a mix of drivers then things may get more complicated if they don’t have a common spec between them.


-SightFX
 
Joined
May 4, 2009
Messages
470
Points
28
Re: Custom 7 Color DIY Laser Kit

my green moves maybe 1/2 an inch at about 25 feet when I tilt the laser. The red and bluray stay in very close alignment though. I have the extra large green heatsink, that may make a difference.

I just got done with a build that has this same issue. Well it is not realy done till it gets resolved. In my testing of the issue it seams to be stemming from the nut that secures the mount to the sled. It is movement here rather than the spring tention not being enough that is causing the drift.

Is anyone else seing this issue. Those nuts are hand made so not all builds will. I have a solution in the works so if you are we can work out the best solutions either by exchange or a tutorial on how to apply the fix when it is fully tested and proves to resolve the issue. There will be this fix going forward before any new kits are shipped.


Thanks,

Ryan
 
Joined
May 12, 2009
Messages
1,403
Points
0
Re: Custom 7 Color DIY Laser Kit

I hope I dont run into this issue, does this only happen with the large green heatsink upgrade?

Anyways, I'm gunna start puttin in my red and blu-ray, so i should get magenta right?

Hope it works.

Should I wait and have the green in with them, cus i remember reading something about the turning mirror needing to be just right with the green in place, and at least the red or blu.

Am I correct?

Dark
 
Joined
Jan 12, 2008
Messages
3,290
Points
83
Re: Custom 7 Color DIY Laser Kit

Just a thought, haven't anyone considered using glue, epoxy or whatever to really secure the lasers ones being tuned in place? You don't need to go crazy with it, just enough so the lasers cant move. And IF a diode would die (I suggest to really under-power them in this case) you can just brake the glue and pop in a new diode, tune, then glue again.
 
Joined
May 4, 2009
Messages
470
Points
28
Re: Custom 7 Color DIY Laser Kit

I just got done with a build that has this same issue. Well it is not realy done till it gets resolved. In my testing of the issue it seams to be stemming from the nut that secures the mount to the sled. It is movement here rather than the spring tention not being enough that is causing the drift.

Is anyone else seing this issue. Those nuts are hand made so not all builds will. I have a solution in the works so if you are we can work out the best solutions either by exchange or a tutorial on how to apply the fix when it is fully tested and proves to resolve the issue. There will be this fix going forward before any new kits are shipped.


Thanks,

Ryan

False alarm on there being a mount issue.

I figured out what it is (at least in my build). It was a loose lens. I have the green so locked in there that I could pry on it good with my fingers and no movement but when I turn the build it would move...hmmmm I then checked my red and after some testing found that it was a loose glass lens in the red lens nut that was causing the red to move on me not the green. My blu-ray I had for this one didn't turn out so all I have for relative alignment was the red. I replaced the red lens with an aixiz acrylic and the problem went away. I used a full 2 layers Teflon tape so it was not the nut loose but the lens in the nut.

For anyone that does see this issue now or in the future I suggest you check the module lenses first. A simple finger prying test to the mounts will show that it is not the mounts. From what I observed when I pried on the lasers heads in my build I couldn't move the alignment very much at all. Not near as much as when I tilted the build and the lens moved.


Thanks,

Ryan
 
Last edited:


Top