Welcome to Laser Pointer Forums - discuss green laser pointers, blue laser pointers, and all types of lasers

LPF Donation via Stripe | LPF Donation - Other Methods

Links below open in new window

ArcticMyst Security by Avery

Halo Style 2 stage COILGUN

Joined
Apr 28, 2009
Messages
2,416
Points
63
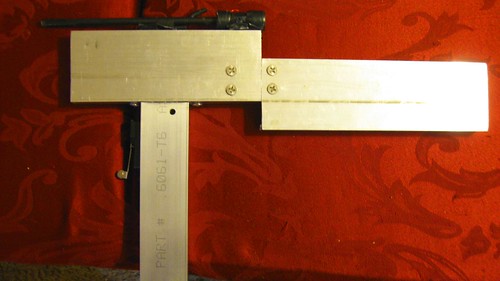
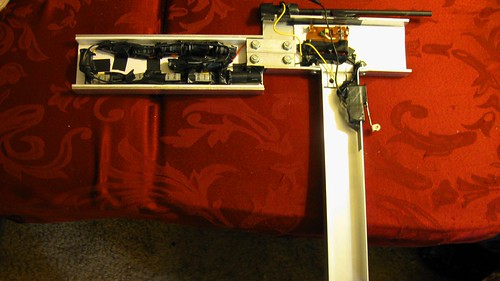
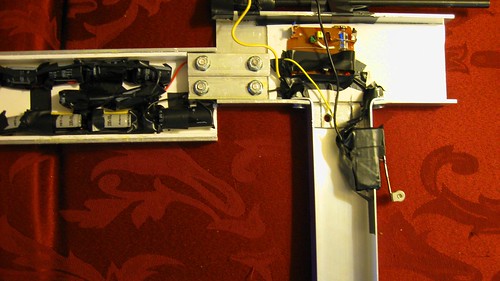
Capacitor bank is installed onto the frame with the plastic sheet insulating the frame from any possible arcs. I have used electrical tape to isolate the positive and negative terminals as an insurance policy. Tomorrow I will attach the battery/switch enclosure to the circuit board enclosure.


Joined
Oct 31, 2009
Messages
856
Points
43
So you are almost done.
I would insulate the housing too...from the inside. 60J shorted when the leads touched 0.8mm brass sheet...molten like nothing...almost a hole. Loud and bright...no need to see that happen again.
 
Joined
Apr 28, 2009
Messages
2,416
Points
63
xD die Hose is noch trocken.

Yes, I'm getting close now. Don't like the large white spark so I think I'm safer with this build than the prototype. ;-)

Edit: 100 Joules is most certainly in the lethal range and deserves great respect with each step taken.
 
Last edited:
Joined
Oct 31, 2009
Messages
856
Points
43
I remember that quote, but on which thread or video did I write that?

I discharged 25J thru my thumb...left 3 marks...and I was shocked.
 
Joined
Apr 28, 2009
Messages
2,416
Points
63
Yes, that would be extremely painful to endure. But at least yours did not pass through your heart like mine. I almost didn't survive.(Marshall amplifier) So I'm very cautious now.

That quote was on the Scientist ND:Yag build thread near the video but down a bit. It makes perfect sense when translated to English....."At least I didn't wet my pants" :p

I just scored 18 camera bodies. 4 held low value 80uF, 10 held 120uF and 4 held 160uF. I was very excited to see 160uF in these disposable Kodak cameras. ^^ It was the first time. :D I don't bother with the 80uF. :/ So everything is done except to finish the trigger/battery compartment. So I will be finished tomorrow evening and firing a pointed 3/4 X .25" projectile at an aluminum can with 100J for the first time. I'm hoping it goes through both sides from a 5mm distance. wünsche mir Glück! ;-)

Edit: I'll post a pic of the project soon without any covers or plastic to show the inside construction. :)
 
Last edited:
Joined
Oct 31, 2009
Messages
856
Points
43
Nd YAG build? Still dont remember xD I leave alot of sarcastic comments :)

Sounds good so far...maybe you should assemble the second stage as well...at least put everything in place without wiring...
 
Joined
Apr 28, 2009
Messages
2,416
Points
63
Well I would put the second stage on before the test except that I need to wind a second stage coil that would just "slide" onto the barrel. That would be so that I can experiment on coil length and coil position to achieve the optimal timing for acceleration. If I try to wind a coil tomorrow it would prevent me from giving it a try tomorrow night and I'm anxious to see some results. ;-)

Edit: small setback, I won't be ready until Monday evening to test.

Edit: so I was able to test it tonight at 2010uF, instead of the 1800uF I had earlier. It doesn't seem to be any more powerful with this configuration and I think that's because I have more ESR in the wiring of the capacitors. I should have put the capacitors closer together when I soldered everything up. I think that they produce a more powerful capacitor bank that way. Longer wiring does seem to create a slower pulse and therefore less power. I'm hesitant to change it right now because it works well and takes a lot of labor to get all of those caps in parallel into another configuration. I should have a pic up tomorrow night.
 
Last edited:
Joined
Apr 28, 2009
Messages
2,416
Points
63
Some pics of the coil gun. It still needs a battery holder installed below the switch. Then the black plastic skin will be installed except for the areas that will be added for the second stage capacitor bank. The barrel is temporary and a longer one will be installed to allow a better second coil position. .......................

5427266229_0275acf06f.jpg


5427268019_e4e3ce0460.jpg


5427267101_ba3e9720b5.jpg
 
Last edited:
Joined
Oct 31, 2009
Messages
856
Points
43
You really think its the wiring? Just calculate how much resistance you get from your AWG and add it to your coil...then simulate again. Will tell you how the pulse-duration has changed.

Set up looks clean. When will you make a video? ^^
 
Joined
Apr 28, 2009
Messages
2,416
Points
63
Well, it will get a better test for it's power after I have the black plastic access covers and skin installed. Then I will probably record a short video of the aluminum can test. ;-) It will be a little more powerful with the second stage, if all goes as planned. It feels good ergonomically when held against my arm/chest.
 
Joined
Oct 31, 2009
Messages
856
Points
43
Thats my problem most of the time: I dont care how it feels to hold it ;-) No matter if its a laser or a coilgun...all I care about is the look ^^ the halo-gun feels like shit after a few minutes. All the weight is packed in the front-section....which is kinda stretched.
Yours is more a bullpup design...which makes it more comfi to carry.

Did you test different types of ammo as well? I tried round and pointed tips...for example.
 
Joined
Apr 28, 2009
Messages
2,416
Points
63
Yes, I would trade my ergonomics for your aesthetic value and power anytime. :) I need to craft a few 3/4 x .25" pointed projectiles. I had only tried with 5/8" long and round nose with 1800uF which only went through one side. So 3/4" length works better and maybe 1 inch if I include a pointed tip. ;-)
 
Joined
Oct 31, 2009
Messages
856
Points
43
I am thinkin to start something with metal-work. Maybe not an apprenticeship (takes 3.5 years over here), but I will improve on my skills...for sure.
I am a lab-technician in a chemical lab...no metal worker ;-) but always glad to read positive feedback.
Imo its still to improvised, even if it might look alright in the end...since I dont like to make big and detailed schematics and plans you know.

I need the balance between look and function...nobody wants a box able to punch thru a wall, but I dont want a fancy rifle which isnt able to punch thru paper neither :)
 
Joined
Apr 28, 2009
Messages
2,416
Points
63
OT: I also worked in the chemical industry for Intel corp. Acids, metal and silicon compounds to create semiconductors. It included substances regarded as nerve gas, which were used to dope silicon. There were special gas detectors for detecting parts per million of these gases in the manufacturing plant.

Yes, a box version of the coil gun is only good for extremely high powered stationary accelerators. Not an attractive build when done on a small scale of ~150 Joules. If the 150J rifle can't penetrate both sides of an aluminum can, it would be a waste of time.

So, it was very difficult to cut the black plastic and epoxy the skin to the first capacitor bank enclosure. As well as adding an access cover made of the same black plastic with screws to access the capacitors as needed. But the good news is that it went very well, and looks like a bullpup stock. ;-)

Tomorrow I will put the black plastic skin and access cover on the circuit board enclosure, and probably wind a new primary coil(30mm with 8 layers of 21awg) onto a longer barrel. Then I think a yellow high voltage warning sticker over the capacitor bank access panel is appropriate.(for safety and for looking cool) I could create one with my Gimp graphics program and print it out on decal material at my local print shop. :)
 
Last edited:
Joined
Oct 31, 2009
Messages
856
Points
43
These days I wish I would do something with metal and electrics.....or lasers. But optics and lasers are boring when its your job I believe. Very theoretical...not my style.

Seems your gun comes together pretty quick. Will you have a video uploaded by weekend?
 
Joined
Apr 28, 2009
Messages
2,416
Points
63
Probably late Saturday or late Sunday, I'll post a video. Great news now that I have black plastic panels and skin on the outside, it looks like something evil. :eg: And it finally penetrates both sides of an aluminum can at 5mm distance with the projectile withdrawn slightly away from the coil. ^^ I'm thinking of adding a permanent magnet to hold the projectile stationary before it's fired. This is with the flat ended 6mm x 3/4" chrome steel projectile. Back to work winding a new primary coil onto the longer barrel tomorrow.


Top