djQUAN
0
- Joined
- May 27, 2013
- Messages
- 1,154
- Points
- 63
I needed a way to hold my Flir E4 when monitoring something during testing etc.
Looked around for low cost solutions but the cheap tripods are either too small, too flimsy or both! I decided making my own would be the way to go.
This is not exactly a step by step instruction on how to build one as I forgot to take pics during the process") These are just to get ideas from when someone decides to make one too.
These are just to get ideas from when someone decides to make one too.
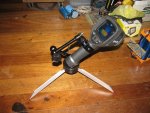
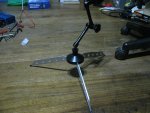
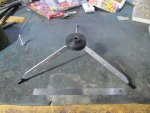
The tripod was pretty simple. A black delrin round stock for the central part, three aluminum legs, a keyring and a 1/4" bolt and six screws is all that was needed. Oh, and about 2-3hours of work machining the thing.

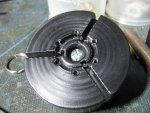
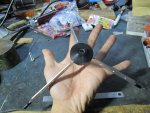
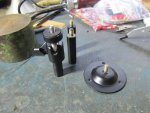
The central part is about 2" diameter and about 1" thick. It could have been thinner but I did not know how thick I needed it when I trimmed the stock Using the mill, I cut slots for the legs (the legs are friction fit in this to keep it in place) and a round slot for the keyring. The 1/4" bolt sits in a drilled and tapped hole in the center as a means of mounting the camera or whatever to it.

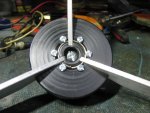
Here, you can see the legs in place. The keyring goes through holes on the legs to keep them together when folded. Six screws hold the ring in the round stock. The screws are important as they keep the legs in place when weight is applied on the tripod.

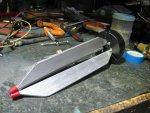
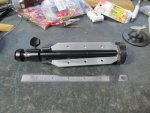
Folded together, they look like some nasty robot claws

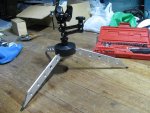
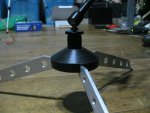
The bolt sticks out just enough just like in off the shelf tripods.

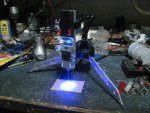
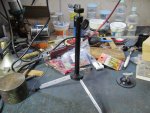
I bought a magic arm and a clamp a while back and they work together for this perfectly.

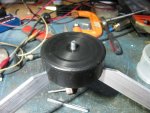
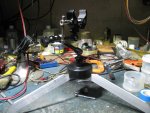
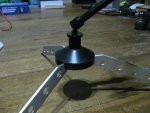
Here it is holding my Flir. It is quite sturdy as I can put a bit of weight on it without moving and it feels solid too.

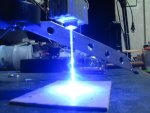
And just because this is a laser forum, there just had to be a laser in it.

Looked around for low cost solutions but the cheap tripods are either too small, too flimsy or both! I decided making my own would be the way to go.
This is not exactly a step by step instruction on how to build one as I forgot to take pics during the process
These are just to get ideas from when someone decides to make one too.The tripod was pretty simple. A black delrin round stock for the central part, three aluminum legs, a keyring and a 1/4" bolt and six screws is all that was needed. Oh, and about 2-3hours of work machining the thing.
The central part is about 2" diameter and about 1" thick. It could have been thinner but I did not know how thick I needed it when I trimmed the stock
Using the mill, I cut slots for the legs (the legs are friction fit in this to keep it in place) and a round slot for the keyring. The 1/4" bolt sits in a drilled and tapped hole in the center as a means of mounting the camera or whatever to it.Here, you can see the legs in place. The keyring goes through holes on the legs to keep them together when folded. Six screws hold the ring in the round stock. The screws are important as they keep the legs in place when weight is applied on the tripod.
Folded together, they look like some nasty robot claws
The bolt sticks out just enough just like in off the shelf tripods.
I bought a magic arm and a clamp a while back and they work together for this perfectly.
Here it is holding my Flir. It is quite sturdy as I can put a bit of weight on it without moving and it feels solid too.
And just because this is a laser forum, there just had to be a laser in it.