Welcome to Laser Pointer Forums - discuss green laser pointers, blue laser pointers, and all types of lasers

LPF Donation via Stripe | LPF Donation - Other Methods

Links below open in new window

ArcticMyst Security by Avery

Kaidomain 50mW CR2 - inital review

IgorT

0
Joined
Oct 24, 2007
Messages
4,177
Points
0
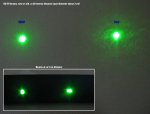
You're right. And if it was mechanical, it would most likely just get slightly dimmer and it wouldn't be that noticable in the pattern.

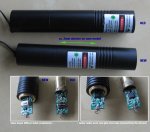
But how can a "driver" like that do this? Especially, since it doesn't really do much more, than a resistor would...


Joined
Sep 12, 2007
Messages
712
Points
0
hmm ill try to take a pic of the driver when i get home
im not worryed cause it seems like a stable output, its just odd it is not like the others

i kind of dont think its the spirograph
last night it was the only laser pulsing like that again
 

Benm

0
Joined
Aug 16, 2007
Messages
7,896
Points
113
More info on the innards...

I proceeded to take the laser apart to pieces like knimrod did (see previous page). The MCA/lens came loose from the diode in mine, causing problems.

When i took it apart, i found that the glue holding the mca and its ring onto the diode had somehow gone bad. The pump diode was still emitting a barely visible amount of red light, but this is normal. I proceeded to hold the MCA in front of the duide by hand, and to my surprise it produced a decent amount of green!

I glued the MCA back in place (as well as possible) with some cyanoacrylate, and powered the laser up. I rotated the diode to the position it produced maximum green, and tightened the ring that holds it.

After re-assembling the whole thing, it works! Maybe not 100% of the original output, but certainly no less than half. Also, i mode hops, but i think it always did to some degree. The beam doesnt really split in half, but has an elongated pattern with some darker bands. This is only visible when the focus lens is removed, when its focussed you can hardly tell, the beam just seems a bit oval.
 
Joined
Mar 2, 2008
Messages
171
Points
0
Aww bollocks, I fried mine!

I was soldering the leg down to make a better joint and it doesn't seem to be lasing anymore.

It's a shame especially because I had superb output before retarded old me decided to open it up. I think it mode hopped to TEM21 or something!

Still, it was a great spend of £13 and that's chump change. I'll be buying a few more soon, while I try to resurrect this one.

Edit: Post mortem - I found out why it died. I snapped off the solder from the resistor right next to the diode leg. Phew...

By the way, THERE IS NO IR FILTER AT ALL. How did the LED museum measure negligible IR?


Edit #2: Ah, totally dead. I made sure this time by ripping the thin wires on the IR diode itself. Just to stop myself from wasting time. So now I'm looking for a driver + IR diode compaitible with the crystal module ;D

Does anyone know where I can get a really cheap (<£10) infra red diode, preferably 400mW or above? I don't mind salvaging from a DX pen if it comes to it.
 

IgorT

0
Joined
Oct 24, 2007
Messages
4,177
Points
0
Benm said:
Also, i mode hops, but i think it always did to some degree. The beam doesnt really split in half, but has an elongated pattern with some darker bands. This is only visible when the focus lens is removed, when its focussed you can hardly tell, the beam just seems a bit oval.

My best one also has this slightly oval beam, but it's not really bad. This thing can actually melt a black floppy! Real mode hopping makes a laser lose most power, so i'm not really worried.

I noticed, i can make it more powerfull, if i touch the button very slightly, while it's on. I'm not sure if it's a contact or the pressure on the diode. I will definatelly be taking it appart anyway (during driver replacement), so i'll try to make this power permanent.


One question tho. From all the talk about the glue holding it in place, i got the feeling, that if i removed the glue, to remove the driver, the diode would become loose, and could actually turn, losing the alignment.

I know i asked this before, but after reading your post, where you said you tightened the nut, that holds it in place:

If i remove the glue, will the nut still hold the diode in place? Is it possible, to mount it firmly just with the nut? Or is there a danger of losing the alignment by removing just the glue?

Thanks!
 

Benm

0
Joined
Aug 16, 2007
Messages
7,896
Points
113
IgorT said:
One question tho. From all the talk about the glue holding it in place, i got the feeling, that if i removed the glue, to remove the driver, the diode would become loose, and could actually turn, losing the alignment.

I know i asked this before, but after reading your post, where you said you tightened the nut, that holds it in place:

If i remove the glue, will the nut still hold the diode in place? Is it possible, to mount it firmly just with the nut? Or is there a danger of losing the alignment by removing just the glue?

The diode is held in place by the locking ring. As long as you do not unscrew that, you can remove the glue and desolder the diode from the board (or desolder the board from the diode really, as the diode stays in place in the tube). I would actually recomment removing all the glue before trying to remove the circuit board, since the glue does provide a mechanical connection between board and locking ring.
 
Joined
Mar 2, 2008
Messages
171
Points
0
The locking ring does NOT hold the diode in place. It limits its movement in ONE direction ONLY. It is free to rotate and slip out of alignment without the hot glue.

Unless you got a decent unit where the lockring actually pushes the diode into 3 notches designed to prevent it rotating - I sincerely doubt that.
 

Benm

0
Joined
Aug 16, 2007
Messages
7,896
Points
113
Must vary between units then, in mine the diode was held in place well by the locking ring (i.e. it would not rotate easily when handling the circuit board) before i untightened it. I havent noticed any notches in the barrel - the diode has the regular indentations in its outer rim, but i didnt find anything that fits in hem on the barrel.

Also, when i slightly untighten the locking ring, the diode rotates easily and this allows adjusting for optimum position.
 
Joined
Nov 4, 2007
Messages
385
Points
0
Benm said:
Must vary between units then, in mine the diode was held in place well by the locking ring (i.e. it would not rotate easily when handling the circuit board) before i untightened it. I havent noticed any notches in the barrel - the diode has the regular indentations in its outer rim, but i didnt find anything that fits in hem on the barrel.

Also, when i slightly untighten the locking ring, the diode rotates easily and this allows adjusting for optimum position.

This is my experience also.
 
Joined
Mar 2, 2008
Messages
171
Points
0
Benm said:
Must vary between units then, in mine the diode was held in place well by the locking ring (i.e. it would not rotate easily when handling the circuit board) before i untightened it. I havent noticed any notches in the barrel - the diode has the regular indentations in its outer rim, but i didnt find anything that fits in hem on the barrel.

Also, when i slightly untighten the locking ring, the diode rotates easily and this allows adjusting for optimum position.


You got a pretty good unit then :)

Mine, the diode is free regardless of how tight the lockring is.
 

IgorT

0
Joined
Oct 24, 2007
Messages
4,177
Points
0
No wonder i was confused then... It's both! :)
Well, i guess i'll see what i have soon enough. Probably a little of both as well.


The notches don't make sense tho. If they would grab onto the diode, the rotation couldn't be adjusted for max output.. Maybe that was an older model, where the crystals should have been adjustable, but they modified it, and that's why the nut doesn't hold it in place anymore..

Otherwise, i'm really hoping the nut will hold it in place unaided in mine, otherwise i will have to modify it somehow, as i don't want to rely on glue for something as sensitive as the alignment.
 

Benm

0
Joined
Aug 16, 2007
Messages
7,896
Points
113
I just got second, new KD50, in the mail... and there surely are some differences!

Physical appearance:
- new unit is ~2mm shorter, only the middle section of the tube is shorter.
- new unit has warning sticker on the middle, not the end.
- new unit came with a panasonic CR2, old one with an unbranded battery.

Internally, the lasers use the same circuit, but they contain several components from different batches (switch, capacitor). The soldering work on the new unit looks better. Current draw is 320 mA from a 3.6v battery for the new one, the old takes around 300. There are slight differences in the pcb silkscreen as well, indicating a different batch too. Schematics seem identical though.
 

Attachments

  • kd50_old_vs_new_1.jpg
    kd50_old_vs_new_1.jpg
    282.7 KB · Views: 78

Benm

0
Joined
Aug 16, 2007
Messages
7,896
Points
113
Performace: They seem about equally powerful to the eye (i'd say the new one is marginally brighter), but the new one has much better optics. There is little or no scatter in the beam, seems nice and clean. Also, the beam on the new model is rounder, probably as good as it gets.

The new one melts thin plastics much more easily than the old one (which i did take apart and reassemble). It's not a matter of power, but of better focus. In the picture you can see the difference between the beams at ~10 meter distance, but also up close in the inset... notice how stretched out the dot from the old one is?

I'll be leaving the new one in one piece for now, as it performs very nicely and doesnt need tinkering.

Also, i'd recommend anyone to order this laser at this point: the new one performs very well, very stable output and much improved quality optics.
 

Attachments

  • kd50_old_vs_new_2.jpg
    kd50_old_vs_new_2.jpg
    224.5 KB · Views: 70
Joined
Mar 2, 2008
Messages
171
Points
0
Great laser pron! I ordered two more.

Is your old laser modehopping there? The dot seems to be that distinct oval shape. And is the new laser IR filtered?
 

IgorT

0
Joined
Oct 24, 2007
Messages
4,177
Points
0
Once you have more than one, you start noticing differences in power..

Two of my lasers seem to compete for the place of the best one. Every now and then i get a feeling, that one got weaker, but then i notice, it's the other one, that is getting stronger. One slowly increases in power as it warms up, and the other slowly decreases, and becomes slightly weaker than the other, even tho it starts stronger.

When i only had one, i didn't notice any of this.


Also, the slightest difference in the battery internal resistance changes the brightness. I have two brand new batteries, but one seems to have a slightly higher resistance, so the brightness of the two depends on which battery i put in which one.

Once i have them current regulated, i will finally know which one is better for sure. As it is, it is impossible to tell what is causing what. I'm also looking for better optics.


Also, the oldest one (the used one) had the cleanest output, so i switched the lens with the most powerfull one, and now there is no speckle around the dot. Looks like this doesn't really depend on the "model" (all three of mine are slightly different), but rather how "careful" they were during the assembly. Looks like they sometimes get some dirt on the lenses.

The used one had the same clean output as the one in the pic on the left, and the other two, the same "dirty" output as the one on the right. But they all have nice round dots, which turn slightly oval after warming up, but also brighter at the same time, so i'm not worried..


I don't regret having three of these even if one is scratched and used.  At first i wanted to sell one of mine to a friend, but i ordered another one for him. They dropped in price slightly, and with the dollar dropping as well, they are almost free. 16 Euro is nothing for such a great laser.


Top