Welcome to Laser Pointer Forums - discuss green laser pointers, blue laser pointers, and all types of lasers

LPF Donation via Stripe | LPF Donation - Other Methods

Links below open in new window

ArcticMyst Security by Avery

Tutorial: DIY GITD sheet

3zuli

0
Joined
May 30, 2009
Messages
810
Points
28
SEE POST no.9 FOR UPDATE

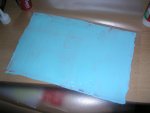
so, here's simple guide how to make your own GITD sheet for less than $4
attachment.php

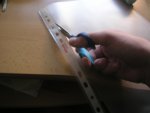
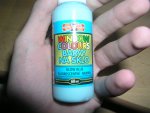
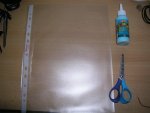
you'll need: GITD window paint, A4 plastic envelope and scissors. I don't know where you can buy that paint, try to serach on ebay. any kind will be ok, but it must be GITD
attachment.php

attachment.php

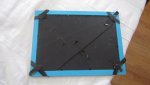
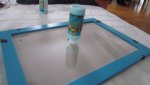
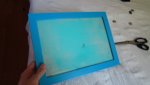
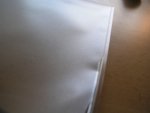
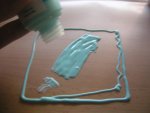
cut off the edges, so you'll be able to open it like a book
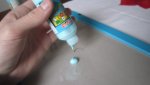
attachment.php

attachment.php

I used this paint
attachment.php

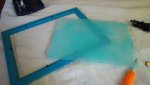
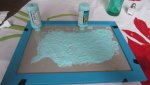
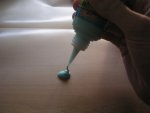
start adding paint, approximately in the middle of your sheet
attachment.php

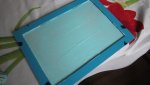
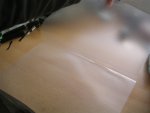
at beginning, make a square about 8*8cm in the middle of sheet
attachment.php

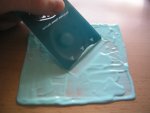
level the surface of square as well as possible, you need about 1mm layer of paint
 

Attachments

  • P1010059 copy.jpg
    P1010059 copy.jpg
    99.2 KB · Views: 1,218
  • P1010060 copy.jpg
    P1010060 copy.jpg
    98.7 KB · Views: 1,221
  • P1010061 copy.jpg
    P1010061 copy.jpg
    123.8 KB · Views: 1,146
  • P1010062 copy.jpg
    P1010062 copy.jpg
    183.5 KB · Views: 1,156
  • P1010063 copy.jpg
    P1010063 copy.jpg
    117.3 KB · Views: 1,123
  • P1010064 copy.jpg
    P1010064 copy.jpg
    123.2 KB · Views: 1,145
  • P1010065 copy.jpg
    P1010065 copy.jpg
    123.3 KB · Views: 1,184
  • P1010057 copy.jpg
    P1010057 copy.jpg
    189.7 KB · Views: 1,766
Last edited:


3zuli

0
Joined
May 30, 2009
Messages
810
Points
28
Re: DIY GITD sheet

then start adding more paint around the square, untill you have size that is ok to you.
attachment.php

now when you are done, leave it 8-12 hours to dry. then you can leave it on the sheet (you 'close' it) or you can stick it on a window etc.

u r done :D

hope you like it
 

Attachments

  • P1010067 copy.jpg
    P1010067 copy.jpg
    151.6 KB · Views: 976
Joined
Sep 6, 2009
Messages
101
Points
18
Seeing as how no one has commented yet and your thread is about to drop off the front page. I thought that I would just say thanks for sharing. It might be easier just to buy a GITD sheet, but your idea is certainly very innovative. Thanks for taking your time to upload the photos and video.
 
Joined
Jan 13, 2010
Messages
708
Points
0
can't wait to try this out, no blu-ray yet though, ill have to use a UV led (works just the same)

stuart :)
 

3zuli

0
Joined
May 30, 2009
Messages
810
Points
28
bumping with some updates :D
I lost the original sheet and decided to make another one, but bigger and better!

attachment.php

first I bought some photo frame and secured the back, so the glass will be pushed tightly and there won't be any gap between glass and frame

attachment.php

attachment.php

I started adding GITD window paint...

attachment.php

... on the glass

attachment.php

using some piece of plastic, I started to level the surface of paint

attachment.php

the layer is about 2mm thick

attachment.php

I left it overnight to dry
 

Attachments

  • IMG_0141.jpg
    IMG_0141.jpg
    224.8 KB · Views: 770
  • IMG_0163.jpg
    IMG_0163.jpg
    307.4 KB · Views: 776
  • IMG_0148.jpg
    IMG_0148.jpg
    233.3 KB · Views: 817
  • IMG_0147.jpg
    IMG_0147.jpg
    239.1 KB · Views: 830
  • IMG_0146.jpg
    IMG_0146.jpg
    280.2 KB · Views: 789
  • IMG_0143.jpg
    IMG_0143.jpg
    210.3 KB · Views: 769
  • IMG_0142.jpg
    IMG_0142.jpg
    237.5 KB · Views: 781

3zuli

0
Joined
May 30, 2009
Messages
810
Points
28
attachment.php

then I dis assembled the frame and cleaned the inner side of frame form the paint

attachment.php

then I put it back, but I flipped it so the glass side is facing out

and we're done! :D
 

Attachments

  • IMG_0166.jpg
    IMG_0166.jpg
    312.2 KB · Views: 739
  • IMG_0167.jpg
    IMG_0167.jpg
    218.7 KB · Views: 759
Last edited:
Joined
Mar 1, 2011
Messages
610
Points
0
They sell photoluminescent (also known as gitd) paint in spraycans at some of the larger home centres you know. A couple of cans could paint a whole segment of wall. The coating wouldn't be too thick so the effect would fade quite quickly.
You could also do the "shadow" thing by setting off a strobe light at really low speed to "freeze" your shadow on the wall for a few seconds at a time.
-I wouls so like to see you doing the inevitable jumping up and down trying to get it just right when the strobe flashes...:crackup:
 
Joined
Dec 29, 2009
Messages
3,136
Points
63
I add accents to certain things using a bit of clear epoxy or clear nail polish and some glow powder (get the europium doped one, not the old zinc based)

I think the manufacturer recommends mixing with clear or elmers to make a paint. I tried mixing with nail polish and it turned into a cement-like substance that was hard to spread. Next, I tried applying nail polish and then sprinkling powder on it like how kids made glitter pics in kindergarten. Then, I recoated it with nail polish to seal it. That turned out much better.

I was thinking it would be neat to make a keychain UV LED that blinked on for 5 seconds every few hours to recharge the glow I put on my keys.

Of course, buying paint premixed is way easier, and getting the zinc based will allow it to dim out more quickly so that you can draw again.


Top