Welcome to Laser Pointer Forums - discuss green laser pointers, blue laser pointers, and all types of lasers

LPF Donation via Stripe | LPF Donation - Other Methods

Links below open in new window

ArcticMyst Security by Avery

"Sinking" Ship

Joined
Dec 14, 2013
Messages
19
Points
3
So, in true rookie form I have selected a host cause it:

A. Looked cool

and

B. Was readily available for purchase locally.


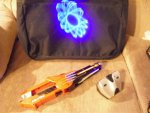
Turns out, when hooking my diode to the wires at the top of the host, I get a whimper of a 445nm M model. When hooked directly to the battery (chill driver is inline too) I get a burning Diode. Killer. Thank you DTR.

So, now I have the unfortunate task of removing this heap in the middle. Any suggestions? I've tried hooking a punch to the various holes at a 45 degree angle and hammering down counter-clockwise. No luck yet.

Save this "sinking" first build. Any advise (besides start over) is appreciated.

Here are some photos of the host before.

http://laserpointerforums.com/f37/hello-members-lpf-my-first-build-86930.html

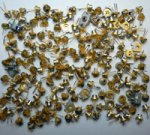
Here are photos of the host now. Haha. Hack Hack.


Last edited:


Zeebit

0
Joined
Aug 27, 2012
Messages
1,110
Points
0
Uh, remove the screws shown on the last pic.

You have the heatsink for that host?
 
Joined
Feb 21, 2013
Messages
5,013
Points
0
Problem is there is a driver in that section so when you hook it to that you are double driving it. There is a retaining ring in the top, remove it. Remove the screws and smash your way through if you have to.

You will need a heat sink for that diode and since its a "custom" host that will need one off machining and that's expensive
 
Joined
Dec 14, 2013
Messages
19
Points
3
Hey Zeebit and LivinLoud,

Thanks for the replies. I'm going to try the screws at the bottom, but not sure if that will help remove the press to fit sink for the LED Diode. Will try. Thought someone might say stick two so and so's into those holes and take a such and such and unscrew counterclockwise.

Yeah, Livin' dual drivers is no good for this situation right?! But the sink isn't too bad. I've been told 1-2 weeks by one vendor and 3-4 weeks by another vendor and $40. Not bad.

Just figured since I have some time and the holidays and such I'd get in there and mess with the host a bit. I like the tip, "Smash you're way through it if you have too!" Will comply - or WILCO as we say....

Thanks guys, updates later as the build progresses. Merry Christmas!
 
Joined
Dec 14, 2013
Messages
19
Points
3
Hey Guys, Hope everyone had a great Christmas. My wife and I moved to another location in Sin City. Crazy week. Managed to get some time to pound through this host. Turns out there was no retainer at the top - it was in the middle under the screw sleeve that opens for charging - and woops, the heat sink WAS threaded in. Not going to be in a hurry to talk crap about "cheap Chinese products" anytime soon. This thing really put up a hell of a fight and seemed to be put together pretty well actually.

Here you can see where I got punch-and-hammer-happy. Even poked a hole through a useable part of the host. Woops.


Anyways, thinking about some active cooling options - ones that I haven's seen on the forum yet. Maybe the noob will come up with something. More as this build progresses.

Side note, my wife had this in the throw away pile. New host?! :shhh:
Plenty of room in here. No secret by my avatar and screen name - I'm sorta' after a blaster. Would like to see some of us "burners" regulars at a modified (for lasers) shooting ranges some day.

 
Last edited:
Joined
Apr 2, 2009
Messages
10,662
Points
113
Ok-- whenever you see these two things
Inside threads
or
Two holes - that a sign that a tool needs to be used in those holes to unscrew the flashlight's original pill- if you look VERY close with ample light you may see some glue on the threads which will make taking apart a little more difficult- some use 'Blaster' spray to loosen the glue or a heat gun-- some use both- I have even had some luck using the tips of a pair of scissors. BUT the proper tool works better.. take care adding a battery to the lasers in any state other than inside its heatsink- and of course NEVER direct to a diode w/o Hsink even for a second- another common mistake is failing to short any caps that have been energized many have set their driver with a dummy load and forgot to do this and that is the end of another diode- these often become just very expensive LEDs --

For 40$ you could have gotten a JAD kit- soldered up and in a host/hsink Just Add Diode-- sometimes free or for a small fee you can have the seller/
maker set the driver for you.. I shy away for the upper limits- hard to see any big improvement for any extra 100mWs or more and the laser should live longer as long as you follow a safe duty/rest cycle.--


)))))))))))))))))))))))))
About the toy 'ray' gun...

Thats a new one to me..

We have seen lots -nientdo guns have room inside to build and i found a somewhat rare PowerRangers gun that would make a nifty laser pistol.
I read that this toy is worth arounf 50$ if NIB.
The 'toy areas' at thrift shops can be a goldmine of stuff- aside from guns, watch for wired RC toys-- the 'innards' can be turned into a quickndirty SPIRO build-using the two motors inside still wired to the RC= glue FS mirrors to the motor shafts menu on something with these as claoe to each other as possible mount one or more lasers hiting mirror #1 bouncing off #2- and out- with some you can change ti direction of the spin and control the motors speeds- These spiros can be also made from wireless RC toys too. for a very nice EFX you can 'knife edge' more than one color laser- as long as they all hit both mirrors- hint-- the smaller mirrors need to be 1st one hit- dont worry too much about having the mirrors too FLAT (making a dot rather than a small circle) its near impossible to mount on that is not making a circle(when spinning) I use plastic gears found inside toys etc- make the hole slightly smaller than the motor shaft the force it on- glue is optional- an nice 3vdc motor and a keystone FS mirror is inside every Poliroid 'one-step' camera- I buy every one that priced right st thrifts- $1 or so. the mirrors in these are thin and fairly easy to cut into small 'squares' - the trick with that is to NEVER try to 'scratch' the mirrors completely to the edge- as that is when you will either chip it or cause a bad break-- 'Regular' mirrors CAN be used but you end up with double reflections-

here are two pics of the power rangers gun and a modded from red to 445 spiro toy done for my by Luke and the diodes I killed learning how to build and last --enlarge that as big as possible(rt click then open in a new window)..stare at the center- keeping your head still and try not to blink and say softly 'begone begone begone'..


:beer:
 

Attachments

  • Pangolin diode graveyard.jpg
    Pangolin diode graveyard.jpg
    31.6 KB · Views: 90
  • PowRanger gun-Luke Spiro 445 004.jpg
    PowRanger gun-Luke Spiro 445 004.jpg
    78 KB · Views: 100
  • PowRanger gun-Luke Spiro 445 007.jpg
    PowRanger gun-Luke Spiro 445 007.jpg
    74.2 KB · Views: 108
  • gvnQUhX (1) STARE and say begone.jpg
    gvnQUhX (1) STARE and say begone.jpg
    13.5 KB · Views: 98
Last edited:
Joined
Dec 14, 2013
Messages
19
Points
3
I get a diode with the driver already soldered up. I saw several options with heatsink ready to go but for some reason I just didn't want my first build to look like either a) so many others I see. b) like, well, a flashlight.

Currently I'm working on a custom heatsink with active cooling. Pics early next year as this build comes along.

Great info on Ray gun options! Will save this thread.
Happy New Year!
 
Joined
Dec 14, 2013
Messages
19
Points
3
So, the other day I decided to remove the lens and reflector from the end of the host. I don't plan to use this part just wanted to get it gutted in case. So, anyways, before realizing that the end of the host actually unscrewed (yeah, total noob) to allow removal of the lens and reflector I decided for a subtle approach. A carpenters framing hammer!

Man, just look at the abuse the lens took. Placed the tip of the host on concrete and wacked the heck out of over and over - WITH A HAMMER and it just bounced off the lens. To the right of center you can see where I even took a flat head screw driver and used the hammer to wack the handle of the driver in a frivolous attempt to punch a hole - even that didn't do it.

So this begs the question, how "cheap" are Chinese companies making their products these days? I mean I have an iPhone, seemingly everyone I know has one and I don't hear them ever say, "Oh my cheap Chinese iPhone.

I guess the difference, we should assume is that the iPhone is "Designed in California, Assembled in China." Same can be said for those bomber and very popular GoPro cameras! Don't hear anyone complaining about those.

So, to say Ozark Trail is a cheap Chinese light makes me wonder. Is it? Seems the difference when looking at a product is, did the Chinese design it or just manufacture it. The Chinese have been making cars for several years (of their own design), but only last year did they find a way to pass US safety standards and hit our shores. They have bought two US aviation manufactures recently that I know of Cirrus and Teledyne Continental. Both sad days in US history. Anyways, food for thought when considering "Chinese" products.

Now, back to this magic lens - just what the hell is it made of?! Sure wish everything I owned was made of this stuff.....whatever it is...


Tmack

0
Joined
Oct 13, 2013
Messages
2,478
Points
0
Holy crap! That's definitely crazy. Must be some kind of laxan plastic or something. But geez. Sure took a beating!
 
Joined
Sep 12, 2007
Messages
9,399
Points
113
Placed the tip of the host on concrete and wacked the heck out of over and over - WITH A HAMMER

Now try it with a $300 glass lens from thorlabs. If it shatters, the thorlabs lens is clearly inferior.

:yabbem:

So this begs the question, how "cheap" are Chinese companies making their products these days? I mean I have an iPhone...

Well, since several hammer blows seems to be the standard test for quality, try it with your iphone and let us know. :beer:
 
Joined
Dec 14, 2013
Messages
19
Points
3
Cyparagon, Clearly. (said with a Thurston Howell, rich accent)

By the way. Does putting up a smile face and a beer make your unsolicited sarcasm okay? Your first and only chime in is this? It's no wonder so many noobs just lurk. So as not to engage the superior individuals on this forum...for fear of taunting.

By the way, before you say it, I'll say it for you - "I'm just too sensitive and you were just joking." If that's the case you would have added a friendly tip (from your huge brain) to help with my first build, or a little hello and welcome.
 
Joined
Dec 29, 2009
Messages
3,136
Points
63
Host that size, I wouldn't bother on fiddling with active cooling. Just stuff as much metal into that head as you can :evil:

I'd also throw away the hammer and punch set. Those are not suitable tools for this sort of work. Cheap flashlights often have crappy threads, and if you mistreat them too much, they'll just stop threading. My first ubercheap (as in, knock off of a knockoff of a knock off) light I accidentally threaded the lens cap on too tight. Didn't feel like I was going to strip the threads, but I did. the resistance barely changed, but it wasn't enough to make me think "Oh, this is as far as it should thread in."

Also, generally speaking, glass is superior to plastics in terms of optical clarity. You can even find some sapphire lens in flashlights, though usually for high end lights. You can also coat glass with MgO, while it is much harder for plastics to be coated.

IIRC, ozark even cheaped out and use the Cree XT series rather than XP. While they are slightly more efficient, they are not as easy to focus as tightly as the XP. Any gains may very well be lost in absorbtion into that plastic lens. In their defense, I would guess that most people would not find a tight, intense hotspot very useful in day-to-day activities.


Top