- Joined
- Jul 30, 2010
- Messages
- 215
- Points
- 0
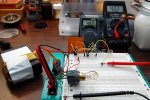
I plan on eventually making drivers for lasers, but I haven't ordered a single "laser" part yet") (well, except those 5 Mohrengberg heatsinks, but they were cheap) What I'm doing now is making simple power supplies using a breadboard and trying them out on equally make-shift test-loads. I have a bunch of v-reg chips in my arsenal, the 2 that I have been messing with are LM7805CV and 78L05 (datasheets attached). I have encountered some problems along the way, and I feel it is because I am either not connecting the components the right way or my brain isnt connecting the results I am a software engineer with very very limited understanding of electronics, so I am reaching out to the EE masters on this forum who can shed some light on the topic :bowdown:
(well, except those 5 Mohrengberg heatsinks, but they were cheap) What I'm doing now is making simple power supplies using a breadboard and trying them out on equally make-shift test-loads. I have a bunch of v-reg chips in my arsenal, the 2 that I have been messing with are LM7805CV and 78L05 (datasheets attached). I have encountered some problems along the way, and I feel it is because I am either not connecting the components the right way or my brain isnt connecting the results I am a software engineer with very very limited understanding of electronics, so I am reaching out to the EE masters on this forum who can shed some light on the topic :bowdown:
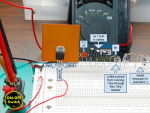
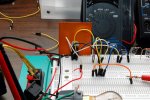
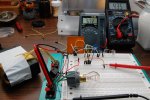
My current goal is to make a CCCV charger for LiIon. I found a power supply from a printer that puts out 16v (measured, on the box it says 10v). Step 1, I used it as the input into the LM7805 to produce 5v out, see page Fig.13 on pg.16. I get 5.05v, so far so good. I did not have a 0.33uF capacitor, so I put 3x 1uF electrolytic caps in series instead, i hope this is ok and i dont need a different type. For the 0.1uF I used a ceramic one.
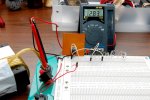
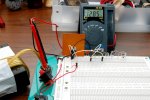
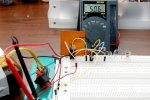
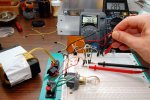
Step 2, current regulator from Fig.14. I noticed that in these diagrams they have 1/2/3 numbered pins on the chip. It looks like 1 is input voltage, 2 is output voltage and 3 is ground. But that's not how it is on the physical chip - 1 is input, 2 is ground and 3 is out! Is this a mistake in the diagrams or should I actually wire the rightmost pin on the chip directly to ground? Btw, I am assuming that you have to look at the chip from the side that has the black body with writing and the metal plate with the hole is on the back...
(well, except those 5 Mohrengberg heatsinks, but they were cheap) What I'm doing now is making simple power supplies using a breadboard and trying them out on equally make-shift test-loads. I have a bunch of v-reg chips in my arsenal, the 2 that I have been messing with are LM7805CV and 78L05 (datasheets attached). I have encountered some problems along the way, and I feel it is because I am either not connecting the components the right way or my brain isnt connecting the results I am a software engineer with very very limited understanding of electronics, so I am reaching out to the EE masters on this forum who can shed some light on the topic :bowdown:My current goal is to make a CCCV charger for LiIon. I found a power supply from a printer that puts out 16v (measured, on the box it says 10v). Step 1, I used it as the input into the LM7805 to produce 5v out, see page Fig.13 on pg.16. I get 5.05v, so far so good. I did not have a 0.33uF capacitor, so I put 3x 1uF electrolytic caps in series instead, i hope this is ok and i dont need a different type. For the 0.1uF I used a ceramic one.
Step 2, current regulator from Fig.14. I noticed that in these diagrams they have 1/2/3 numbered pins on the chip. It looks like 1 is input voltage, 2 is output voltage and 3 is ground. But that's not how it is on the physical chip - 1 is input, 2 is ground and 3 is out! Is this a mistake in the diagrams or should I actually wire the rightmost pin on the chip directly to ground? Btw, I am assuming that you have to look at the chip from the side that has the black body with writing and the metal plate with the hole is on the back...