- Joined
- May 10, 2009
- Messages
- 379
- Points
- 28
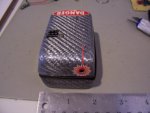
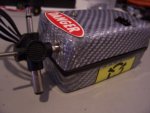
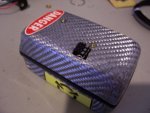
After making my third carbon fiber laser host successfully I decided I would post a thread on how they are built.
It is my preference to use carbon for several reasons; strength, weight, durability, looks, and ease of adaptability. It's also great because it wont transfer body heat to a heatsink or cunduct electricity.
Building your own carbon host requires very few tools, is cost effective, and can be done in one day.
Parts List: 1. Carbon fiber fabric(eBay can be a decent source) 2. Epoxy resin(MAS epoxies) 3. A Mold 4. Mold release agent 5. Ziploc vacumm bags with pump(or better bags and pump if you have it) 6. Tools: scissors, paint brushes, mixing cup, dykes etc.
First you must decide what shape or style you would like your laser to be. The second and most difficult part is finding/making a mold for the carbon fiber to conform to.
For one of my builds I found a great mold from the travel case for my Phillips Sonicare tooth brush. The plastic that the case is made of has a micro texture that transfers when the carbon is formed to give an excellent scratch resistant finish. (If you already have a mold and don’t need to make one, you can skip reading the next paragraph)
The other two builds I've done with carbon I used plexi glass to form the mold. Plexi can be purchased at Home depot, Lowes and Ace hardware. I use 3/16" thickness because it is easy to work with. First I used a section of pressure treated pine 2x4 to shape the blank or positive to mold the plexi around. To shape the wood I trimmed it with a hack saw and shaped the curves with 220 grit sand paper then smoothed it out with 600 grit. Second you need to make a frame that is slightly larger than the positive to hold the melted plexi tight around it. For this I used parts from an erector set. Next you must heat the plexi glass to the point where it is shapeable without overheating and getting bubbles. You will begin to see small bubbles form when the plexi is getting too hot. I heat mine in a convection oven at about 375-400 degrees for about three minutes. Then I quickly remove it from the oven and place it over the positive and squeeze the frame over the positive forming the plexi around it. DO NOT try to cool the plexi too fast like with water, this will induce micro cracks in the plexi, use a slight breeze from a fan instead. Once it has cooled the positive can be removed and you’ve got a smooth mold.
To prepare your mold I recommend that you first wipe it clean with a wax/grease remover like klean-strip. Then use a spray or paste mold release agent. If your using a paste apply it just like you wax a car, small circular motions, apply, wait a few minutes and wipe clean.
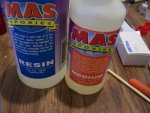
When selecting a resin to encapsulate the carbon use ONLY epoxy resins as polyester resins WILL shrink over time. DO NOT USE FAST SET or 5min epoxy, you need time to work with it. Also select a resin that has a moderate to high level of clarity and a hardener that is appropriate for the temperatures your working in. I use a medium epoxy made by MAS epoxies, which has a minimum 60min. working time, low viscosity and very hard.
Mix a small batch of epoxy and using a paint brush spread a THIN layer of resin over the inside of the mold being careful not to glob it in corners. Immediately cover it with plastic wrap to keep dust and hair out but DON'T put the plastic wrap directly on the resin. Depending on the curing time remove the plastic wrap when the first coat is TACKY not hard, not soft but tacky, for mine it takes 30-40 min.
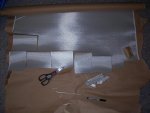
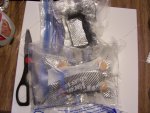
When selecting a carbon fiber fabric use a 2x2 twill weave this will give you good flexibility to get it to conform to compound shapes. I use a silvered carbon fiber from eBay it's $25.00 for 3.5ft X 3.5ft. and it will go a long, long way.
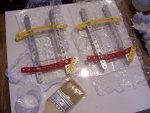
You will need at least 2 layers of carbon but I recommend using three. Cut out your pieces of fabric slightly larger than you will need and make sure to turn each layer 90 degrees for strength in multiply directions. Mix a second and larger batch of resin(enough to soak all of your pieces of fabric). Brush the resin directly on the fabric using a stippling motion and place them inside your mold remembering to turn each layer 90 degrees. Gently press the fabric into the corners and smooth out any lumps. Then put the entire thing inside a vacuum bag with the textured side of the bag on the resin side of the mold to allow a place for the air bubbles to escape. Carefully spread the bag over the area with carbon evenly as you apply vacuum to the bag. Once it's under full vacuum it can be left over night to cure.
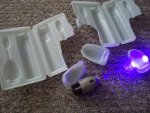
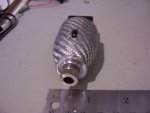
Before I remove it from the vacuum bag I run VERY hot water over the entire bag or it can be immersed entirely for several minutes then I quickly move it cold water for several more minutes. I do this to temper the resin and make it more rigid. The mold and carbon are removed from the vac. bag and the carbon is gently removed from the mold by twisting and bending the mold slightly. You may find it helpful to use a few popsicle sticks to aid in prying the carbon out. Once the part is removed the excess can be trimmed off with either sheers, very sharp scissors or dykes. I suggest drilling any necessary holes and/or any trimming before you do the final cure as it will be difficult once it becomes very hard. To cure the final product I put the carbon pieces in the oven at about 250 degrees for 10 minutes and allow them to cool at room temperature, this step is not really necessary, however it will make it much more rigid.
I hope this thread can help/inspire others to create carbon works of art too. I'd like to see what you’ all can do! Happy lasing")
It is my preference to use carbon for several reasons; strength, weight, durability, looks, and ease of adaptability. It's also great because it wont transfer body heat to a heatsink or cunduct electricity.
Building your own carbon host requires very few tools, is cost effective, and can be done in one day.
Parts List: 1. Carbon fiber fabric(eBay can be a decent source) 2. Epoxy resin(MAS epoxies) 3. A Mold 4. Mold release agent 5. Ziploc vacumm bags with pump(or better bags and pump if you have it) 6. Tools: scissors, paint brushes, mixing cup, dykes etc.
First you must decide what shape or style you would like your laser to be. The second and most difficult part is finding/making a mold for the carbon fiber to conform to.
For one of my builds I found a great mold from the travel case for my Phillips Sonicare tooth brush. The plastic that the case is made of has a micro texture that transfers when the carbon is formed to give an excellent scratch resistant finish. (If you already have a mold and don’t need to make one, you can skip reading the next paragraph)
The other two builds I've done with carbon I used plexi glass to form the mold. Plexi can be purchased at Home depot, Lowes and Ace hardware. I use 3/16" thickness because it is easy to work with. First I used a section of pressure treated pine 2x4 to shape the blank or positive to mold the plexi around. To shape the wood I trimmed it with a hack saw and shaped the curves with 220 grit sand paper then smoothed it out with 600 grit. Second you need to make a frame that is slightly larger than the positive to hold the melted plexi tight around it. For this I used parts from an erector set. Next you must heat the plexi glass to the point where it is shapeable without overheating and getting bubbles. You will begin to see small bubbles form when the plexi is getting too hot. I heat mine in a convection oven at about 375-400 degrees for about three minutes. Then I quickly remove it from the oven and place it over the positive and squeeze the frame over the positive forming the plexi around it. DO NOT try to cool the plexi too fast like with water, this will induce micro cracks in the plexi, use a slight breeze from a fan instead. Once it has cooled the positive can be removed and you’ve got a smooth mold.
To prepare your mold I recommend that you first wipe it clean with a wax/grease remover like klean-strip. Then use a spray or paste mold release agent. If your using a paste apply it just like you wax a car, small circular motions, apply, wait a few minutes and wipe clean.
When selecting a resin to encapsulate the carbon use ONLY epoxy resins as polyester resins WILL shrink over time. DO NOT USE FAST SET or 5min epoxy, you need time to work with it. Also select a resin that has a moderate to high level of clarity and a hardener that is appropriate for the temperatures your working in. I use a medium epoxy made by MAS epoxies, which has a minimum 60min. working time, low viscosity and very hard.
Mix a small batch of epoxy and using a paint brush spread a THIN layer of resin over the inside of the mold being careful not to glob it in corners. Immediately cover it with plastic wrap to keep dust and hair out but DON'T put the plastic wrap directly on the resin. Depending on the curing time remove the plastic wrap when the first coat is TACKY not hard, not soft but tacky, for mine it takes 30-40 min.
When selecting a carbon fiber fabric use a 2x2 twill weave this will give you good flexibility to get it to conform to compound shapes. I use a silvered carbon fiber from eBay it's $25.00 for 3.5ft X 3.5ft. and it will go a long, long way.
You will need at least 2 layers of carbon but I recommend using three. Cut out your pieces of fabric slightly larger than you will need and make sure to turn each layer 90 degrees for strength in multiply directions. Mix a second and larger batch of resin(enough to soak all of your pieces of fabric). Brush the resin directly on the fabric using a stippling motion and place them inside your mold remembering to turn each layer 90 degrees. Gently press the fabric into the corners and smooth out any lumps. Then put the entire thing inside a vacuum bag with the textured side of the bag on the resin side of the mold to allow a place for the air bubbles to escape. Carefully spread the bag over the area with carbon evenly as you apply vacuum to the bag. Once it's under full vacuum it can be left over night to cure.
Before I remove it from the vacuum bag I run VERY hot water over the entire bag or it can be immersed entirely for several minutes then I quickly move it cold water for several more minutes. I do this to temper the resin and make it more rigid. The mold and carbon are removed from the vac. bag and the carbon is gently removed from the mold by twisting and bending the mold slightly. You may find it helpful to use a few popsicle sticks to aid in prying the carbon out. Once the part is removed the excess can be trimmed off with either sheers, very sharp scissors or dykes. I suggest drilling any necessary holes and/or any trimming before you do the final cure as it will be difficult once it becomes very hard. To cure the final product I put the carbon pieces in the oven at about 250 degrees for 10 minutes and allow them to cool at room temperature, this step is not really necessary, however it will make it much more rigid.
I hope this thread can help/inspire others to create carbon works of art too. I'd like to see what you’ all can do! Happy lasing