Here is part 2 of my Laser Phaser build
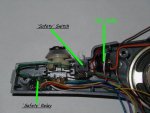
Photo 7 shows both relays, the modified ‘stun/kill’ switch with LED, and the safety switch in their final places. As you can see, I like to use hot glue to hold relays & switches in place.
When I first tried setting the heat-sink into its place and close both halves, the Phaser would not even come close to mating. So out came the Dremel tool and a sanding drum. Maybe a little too much sanding? Photo 8 shows where I glued some thin brass shim stock to hold the heat-sink in place. I glued pieces in both halves when they seemed to hold the heat-sink securely in place.
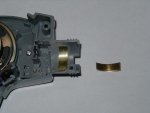
Photo 9 shows the O-like 50mW module, as it came. The center spring will be removed, the switch bypassed, and power leads soldered on to the PCB. Continuity tests on the module I received showed that the upper left (in the photo) tab on the PCB was same as the brass case, which is Positive.
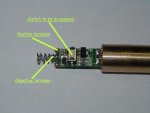
Photo 10 shows the jumper around the switch, the new orange wire soldered to the Positive tab on the PCB, and the new brown wire soldered to the tab that used to hold the spring – the Negative supply. The wires are going toward the exit end so that I can ty-rap them to the driver board, acting as a strain relief.
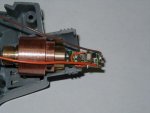
Photo 11 shows everything in place, ready to close up. I lucked out on the alignment of the module – with the nose-cone tightened all the way, the beam was hitting the drilled out clear plastic, but a quarter turn out allowed the beam to get out.
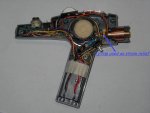
Because of my enthusiasm for the project, I charged ahead when ever I got parts. This resulted in having the new relays & switches hot-glued in place, and the sound board in place, before my final checking of the alignment of the heat-sink. Very awkward working that way. If I had to do it again, I would do the heat-sink/laser module alignment FIRST, without any other components in the Phaser halves. I just used my eyeballs to check if the bore of the heat-sink looked to be coming out centered, but you could very easily insert a wooden dowel rod in the heat-sink, and that would give a very good indication of where the beam would go.
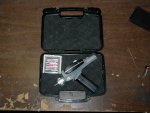
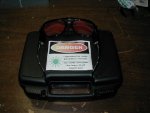
The last 2 Photos are of the neat little plastic handgun case I got for my baby. All together it took me maybe 3 evenings to get this beauty up and running.
This is my cost break-down for the project:
Phaser 42.59
532nm 50mW 31.99
2) Safety Goggles 47.98
JayRob heat-sink, nose-cone, light pipe 46
2) 3-volt relays ~4
Safety switch ~1
Trigger switch ~6
Handgun Plastic Case 16.94
---------
~$196.50
The part numbers, etc for heat-sinks, O-like modules, & switches can be had on JayRob’s Phaser build how-to.
The small relays that I used are Omron G5V-1-DC3, Newark Electronic # 89C6068
The gun case is on Flambeau Pistol Pack Series - 6445SC/6450SC/6455SC | CSN Stores and it’s the 10.5” size.
THANKS JAYROB!
Photo 7 shows both relays, the modified ‘stun/kill’ switch with LED, and the safety switch in their final places. As you can see, I like to use hot glue to hold relays & switches in place.

When I first tried setting the heat-sink into its place and close both halves, the Phaser would not even come close to mating. So out came the Dremel tool and a sanding drum. Maybe a little too much sanding? Photo 8 shows where I glued some thin brass shim stock to hold the heat-sink in place. I glued pieces in both halves when they seemed to hold the heat-sink securely in place.

Photo 9 shows the O-like 50mW module, as it came. The center spring will be removed, the switch bypassed, and power leads soldered on to the PCB. Continuity tests on the module I received showed that the upper left (in the photo) tab on the PCB was same as the brass case, which is Positive.

Photo 10 shows the jumper around the switch, the new orange wire soldered to the Positive tab on the PCB, and the new brown wire soldered to the tab that used to hold the spring – the Negative supply. The wires are going toward the exit end so that I can ty-rap them to the driver board, acting as a strain relief.

Photo 11 shows everything in place, ready to close up. I lucked out on the alignment of the module – with the nose-cone tightened all the way, the beam was hitting the drilled out clear plastic, but a quarter turn out allowed the beam to get out.

Because of my enthusiasm for the project, I charged ahead when ever I got parts. This resulted in having the new relays & switches hot-glued in place, and the sound board in place, before my final checking of the alignment of the heat-sink. Very awkward working that way. If I had to do it again, I would do the heat-sink/laser module alignment FIRST, without any other components in the Phaser halves. I just used my eyeballs to check if the bore of the heat-sink looked to be coming out centered, but you could very easily insert a wooden dowel rod in the heat-sink, and that would give a very good indication of where the beam would go.
The last 2 Photos are of the neat little plastic handgun case I got for my baby. All together it took me maybe 3 evenings to get this beauty up and running.


This is my cost break-down for the project:
Phaser 42.59
532nm 50mW 31.99
2) Safety Goggles 47.98
JayRob heat-sink, nose-cone, light pipe 46
2) 3-volt relays ~4
Safety switch ~1
Trigger switch ~6
Handgun Plastic Case 16.94
---------
~$196.50
The part numbers, etc for heat-sinks, O-like modules, & switches can be had on JayRob’s Phaser build how-to.
The small relays that I used are Omron G5V-1-DC3, Newark Electronic # 89C6068
The gun case is on Flambeau Pistol Pack Series - 6445SC/6450SC/6455SC | CSN Stores and it’s the 10.5” size.
THANKS JAYROB!


