- Joined
- Aug 25, 2012
- Messages
- 116
- Points
- 0
UPDATES BELOW:
I hate to necro an old thread, but rather than try to explain it all over again, I thought updating my old one would help preserve the adhesive research in the best way possible. That, and it all pertains to the same laser. I hope you enjoy the updated results and new beam shot photos!
ORIGINAL CONTENT:
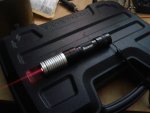
Here is a C6 that I've been experimenting with for some time now. It is an LPC-826 red, running at approximately 100mW. It has a two part glass lens (eBay special) and runs a linear driver. The heat sink design was inspired by Lazereer's 'personal' C6, but there's a twist: mine directly threads to the C6 body.

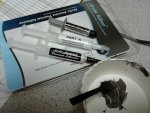
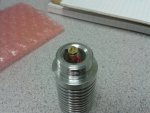
The Aixiz was intended to be a direct press fit, but came out a little loose. I don't like the idea of permanently epoxying electronic components together, in case I want to change things up later. I read somewhere that people are having luck mixing equal parts of Arctic Alumina 2-part thermal epoxy with Arctic Silver thermal compound, and after some testing, I can confirm it works. 1 part part A, one part part B, and one part Arctic Silver paste. It will hold well, but with some pressing you can get it to release.

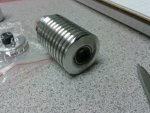
One thing to note: the Aixiz module had to be roughed up a bit with a file to get it to bite. The first time I mounted it, I thought the mixture didn't hold as well as during the trial. When I pressed out the module, it came out cleanly. After some scratches from a file, it worked flawlessly. Below are some pics of the module glued together.

It looks a little messy, but if the mixture is not inside a crevice, you can scratch it off with a fingernail. I used one of my acrylic lenses to keep the gunk from getting in the diode cavity.
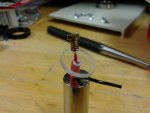
The battery contact on the rear is a piece of acrylic, filed to perfection, and a trimmed down brass motherboard mounting stud. It was fantastic to solder, and I'm probably going to do it again! The acrylic gives it a real trick look, too. It's nearly invisible in the second photo!


Overall I like how it came out. My only gripe is the focusing knob feels a little loose for my liking, but since the power isn't that high, I might wrap the lens threads with teflon tape. Any thoughts on this?
At any rate, I always say art is in the eye of the beholder... not the artist! I can be a perfectionist all I want but I'll probably never finish.
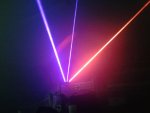
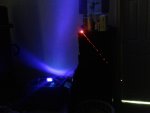
Oh... obligatory beam photo!

The purple light in the backdrop is an LED black light I built as a proof-of-concept. It cost as much as two 48" black light bulbs to build. I think it gave some good contrast to help bring out the red. I still need to find a smoke supply for these pictures...
UPDATE: 24 JAN 2013
Although I lack beamshots just yet, I cranked this thing up to do approximately 300mW. During the dissasembly phase, I got a firsthand look at how well the temporary heatsink adhesive actually held up. WELL, here are the results:
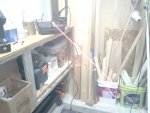
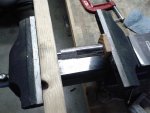
In order to crack this thing open, I had to use two sockets, one the size of the aixiz module, the other large enough to catch it. Place the setup in the vise and press it out. It wasn't difficult, but without a vise or c-clamp I think it would prove very difficult.

Once it came out, it was evident that the 'roughing up' of the sides were definitely necissary. Much of the adhesive was stuck to the sides of the heatsink and aixiz module. To remove the remaining stuff, a wooden coffee stick was used. It came off without too much fuss.

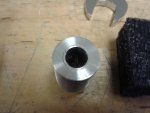
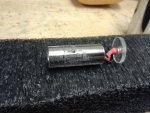
And here is a photo of the inside of the heatsink... with all the adhesive still clinging on.

I hope you enjoyed this update. I'll have beamshot photos up soon, so stay tuned!!!!!!
UPDATE: 26 JAN 2013
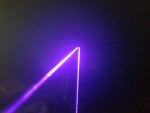
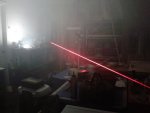
As promised, here are some beam shots. I got out the machine and smoked out the garage with a density that Cheech and Chong would approve of.
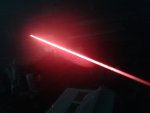
Here she is, now at approximately 300mW.


Even with the lights on!

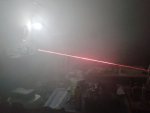
Lights off!

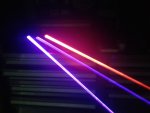
Brought some 405's to come and play. The opposite side is my Q5 (85mW DT0811) and the middle is a 100mW (or so) ebay pen. The pen doesn't focus and therefore doesn't look so intense.


I hate to necro an old thread, but rather than try to explain it all over again, I thought updating my old one would help preserve the adhesive research in the best way possible. That, and it all pertains to the same laser. I hope you enjoy the updated results and new beam shot photos!
ORIGINAL CONTENT:
Here is a C6 that I've been experimenting with for some time now. It is an LPC-826 red, running at approximately 100mW. It has a two part glass lens (eBay special) and runs a linear driver. The heat sink design was inspired by Lazereer's 'personal' C6, but there's a twist: mine directly threads to the C6 body.
The Aixiz was intended to be a direct press fit, but came out a little loose. I don't like the idea of permanently epoxying electronic components together, in case I want to change things up later. I read somewhere that people are having luck mixing equal parts of Arctic Alumina 2-part thermal epoxy with Arctic Silver thermal compound, and after some testing, I can confirm it works. 1 part part A, one part part B, and one part Arctic Silver paste. It will hold well, but with some pressing you can get it to release.
One thing to note: the Aixiz module had to be roughed up a bit with a file to get it to bite. The first time I mounted it, I thought the mixture didn't hold as well as during the trial. When I pressed out the module, it came out cleanly. After some scratches from a file, it worked flawlessly. Below are some pics of the module glued together.
It looks a little messy, but if the mixture is not inside a crevice, you can scratch it off with a fingernail. I used one of my acrylic lenses to keep the gunk from getting in the diode cavity.
The battery contact on the rear is a piece of acrylic, filed to perfection, and a trimmed down brass motherboard mounting stud. It was fantastic to solder, and I'm probably going to do it again! The acrylic gives it a real trick look, too. It's nearly invisible in the second photo!
Overall I like how it came out. My only gripe is the focusing knob feels a little loose for my liking, but since the power isn't that high, I might wrap the lens threads with teflon tape. Any thoughts on this?
At any rate, I always say art is in the eye of the beholder... not the artist! I can be a perfectionist all I want but I'll probably never finish.
Oh... obligatory beam photo!
The purple light in the backdrop is an LED black light I built as a proof-of-concept. It cost as much as two 48" black light bulbs to build. I think it gave some good contrast to help bring out the red. I still need to find a smoke supply for these pictures...
UPDATE: 24 JAN 2013
Although I lack beamshots just yet, I cranked this thing up to do approximately 300mW. During the dissasembly phase, I got a firsthand look at how well the temporary heatsink adhesive actually held up. WELL, here are the results:
In order to crack this thing open, I had to use two sockets, one the size of the aixiz module, the other large enough to catch it. Place the setup in the vise and press it out. It wasn't difficult, but without a vise or c-clamp I think it would prove very difficult.
Once it came out, it was evident that the 'roughing up' of the sides were definitely necissary. Much of the adhesive was stuck to the sides of the heatsink and aixiz module. To remove the remaining stuff, a wooden coffee stick was used. It came off without too much fuss.
And here is a photo of the inside of the heatsink... with all the adhesive still clinging on.
I hope you enjoyed this update. I'll have beamshot photos up soon, so stay tuned!!!!!!
UPDATE: 26 JAN 2013
As promised, here are some beam shots. I got out the machine and smoked out the garage with a density that Cheech and Chong would approve of.
Here she is, now at approximately 300mW.
Even with the lights on!
Lights off!
Brought some 405's to come and play. The opposite side is my Q5 (85mW DT0811) and the middle is a 100mW (or so) ebay pen. The pen doesn't focus and therefore doesn't look so intense.
Attachments
-
 20120823_134419.jpg177.6 KB · Views: 193
 -
 20120823_134144.jpg175 KB · Views: 190
 -
 20120823_131848.jpg120.7 KB · Views: 307
 -
 20120823_140757.jpg142.3 KB · Views: 192
 -
 20120825_133141.jpg86.6 KB · Views: 223
 -
 20121025_115947.jpg161.9 KB · Views: 160
 -
 20121025_120227.jpg168.8 KB · Views: 192
 -
 20120823_144101.jpg156 KB · Views: 228
Last edited: